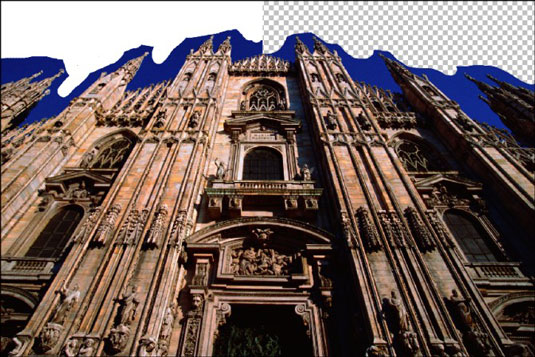
The Eraser tools in Photoshop Elements let you erase areas of your image. Elements has three eraser tools: the regular Eraser, the Background Eraser, and the Magic Eraser. The Eraser tools look like those pink erasers you used in grade school, so you can’t miss them. If you can’t locate them, you can always press E and then Shift+E to toggle through the three tools.
When you erase pixels, those pixels are history — they’re gone. So, before using the Eraser tools, you should probably have a backup of your image stored somewhere. Think of it as a cheap insurance policy in case things go awry.
The Eraser tool
The Eraser tool enables you to erase areas on your image to either your background color or, if you’re working on a layer, a transparent background.

To use this tool, simply select it and drag through the desired area on your image, and you’re done. Because it isn’t the most accurate tool on the planet, remember to zoom way in and use smaller brush tips to do some accurate erasing.
You have several Eraser options to specify on the Options bar:
Brush Presets: Click the drop-down panel to access the Brush presets. Choose the brush of your choice. Additional brush libraries are available on the Brushes pop-up menu.
Size: Click the down-pointing arrow to access the Size slider. Choose a brush size between 1 and 2500 pixels.
Mode: Select from Brush, Pencil, and Block. When you select Block, you’re stuck with one size (a 16-x-16-pixel tip) and can’t select other preset brushes.
Opacity: Specify a percentage of transparency for your erased areas. The lower the Opacity setting, the less it erases. Opacity isn’t available in Block mode.
 Eraser tool settings on the Options bar.
The Background Eraser tool
The Background Eraser tool erases the background from an image while being mindful of leaving the foreground untouched. The Background Eraser tool erases to transparency on a layer. If you use this tool on an image with only a background, Elements converts the background into a layer.
The key to using the Background Eraser is to carefully keep the hot spot, the crosshair at the center of the brush, on the background pixels while you drag. The hot spot samples the color of the pixels and deletes that color whenever it falls inside the brush circumference. But, if you accidentally touch a foreground pixel with the hot spot, it’s erased as well.
This tool works better with images that have good contrast in color between the background and foreground objects. If your image has very detailed or wispy edges (such as hair or fur), you’re better off using the Magic Extractor command.

Here’s the rundown on the Background Eraser options:
Brush Preset Picker: This option provides settings to customize the size and appearance of your brush tip. The Size and Tolerance settings at the bottom are for pressure-sensitive drawing tablets.
Limits: Discontiguous erases all similarly colored pixels wherever they appear in the image. Contiguous erases all similarly colored pixels that are adjacent to those under the hot spot.
Tolerance: The percentage determines how similar the colors have to be to that of the color under the hot spot before Elements erases them. A higher value picks up more colors, whereas a lower value picks up fewer colors.
 Background Eraser tool settings on the Options bar.
The Magic Eraser tool
You can think of the Magic Eraser tool as a combination Eraser and Magic Wand tool. It selects and erases similarly colored pixels simultaneously. Unless you’re working on a layer with the transparency locked, the pixels are erased to transparency. If you’re working on an image with just a background, Elements converts the background into a layer.
The Magic Eraser shares many options with the other erasers. Here are the unique options:
Anti-Alias: Creates a slightly soft edge around the transparent area.
Sample All Layers: Samples colors using data from all visible layers but erases pixels on the active layer only.


