Before you choose a sharing activity and ultimately begin work on a creation, you need to ask a few questions:
- What device(s) are going to display my creations? When it comes to viewing photos and movies, you have choices that include computers (including desktops, notebooks, and netbooks), handheld devices such as cellphones and tablets (such as the Apple iPad and Samsung Galaxy), and TVs. If you want your creations to be viewable on all devices, you need to use different Elements tools and file formats than you would use for showing creations exclusively on a TV or on a computer.
Consider two factors regarding devices and viewing your creations:
- Adobe Flash: Some online hosts convert your video uploads to Adobe Flash. If you want to share photos with iPhone/iPod/iPad users (several hundred million and counting), stay away from any host that supports Flash-only conversions.
- Storage space: Hosts vary greatly in terms of space allocated for storing content. If you want to share large video files, be certain the storage host you choose allocates enough storage space to permit you to upload your files.
- What storage hosts are the most popular? From within Photoshop Elements, you can export photos directly to Facebook, Flickr, and Twitter. For videos, you have direct support for YouTube and Vimeo. For other social media sites — such as Tumblr, Snapchat, WhatsApp, and so on — you need to prepare your images in Elements and upload them according to the developer’s specifications.
- What types of creations can I share? Obviously, you can upload individual photos to any one of the online services. You can use the Share panel and choose to share directly to Flickr, Facebook, Twitter, YouTube, and Vimeo. In addition to uploading single photos to a service, some of the creations you might want to share include the following:
- Albums: You can create photo albums and share the albums on many different sites.
- Slideshows: In Windows, you can create a slideshow and choose to export the slideshow as a movie file (.wmv) or a PDF. On the Mac, you can export a Memories file to a video but you then have to exit Elements and upload the file through another means. Ultimately, you can view exported videos in a number of different online hosts. If you use Facebook, all devices show your creations. Slideshows have an additional benefit in supporting audio files. You can add audio to the creations, and the audio plays on all devices if you upload them to Facebook.
- Videos: If you want to host videos on your own website and make the videos available to iPhone/iPod/iPad users as well as computer users, you need a little help from Adobe Premiere Elements. In Premiere Elements, you can export video for mobile devices, and the resultant file can be viewed on an iPhone/iPod/iPad as well as a computer.
Photo sharing in Elements 2019
Not all sharing providers are directly linked to Photoshop Elements. Many more social media sharing providers exist than those you find in the Elements Share panel. You can always make creations and manually upload creations, photos, and videos to many other services. A list of the more popular websites is shown here.
Photo Sharing Providers
| Source | Description |
| Behance | A place to show off your artwork and see examples of excellent design and photography. |
| dotPhoto | Requires a club membership fee. |
| Free unlimited photo and video uploads. The following figure shows a video shared on Facebook. | |
| Flickr | Allows 1TB of photo uploads with no limits. |
| Google+ | Unlimited storage for photos. |
| Photobucket | Up to 2GB photo and video uploads per month. |
| Shutterfly | Concentrates on photo products — calendars, iPhone cases, cards, cushion covers, and so on — rather than photo storage. |
| SlickPic | Store 200 size-limited (limited to 100MB) images for the free account. For paid accounts, you can get 50GB of space and up with no size limits. |
| SmugMug | Paid service for photo storage. Minimum account is $3.84/month. |
| Allows up to 100 images (max 3MB each), and most recent uploads are displayed. | |
| Vimeo | Free video uploads of 500MB per week. |
| YouTube | Free unlimited video uploads of up to ten minutes and not exceeding 100MB. |
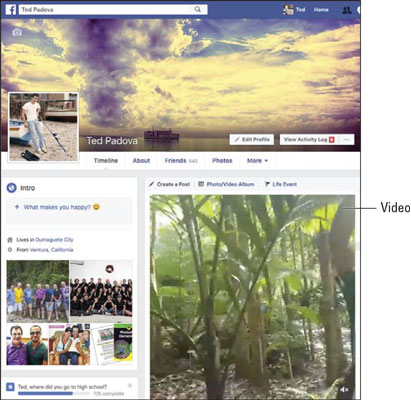 Video on Facebook is shown on an Apple iPad.
How to use the Elements Share Panel
You choose an option in the Share panel by clicking one of the buttons, and then one of two interfaces appears:- Some options lead you to more specific choices in the Share panel.
- Other choices open a window where you log in to an account for sharing photos. The choices for sharing photos with other services open windows for logging in to your account and proceeding through steps to prepare and upload images.
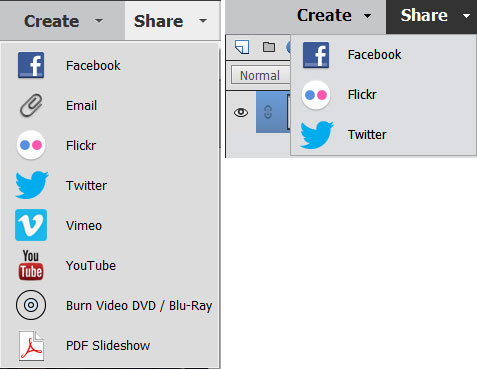 The Share panel as it appears in the Organizer (left) and Photo Editor (right).
Options available in the Share panel are identical on both platforms.
How to email photos in Elements
Rather than save your file from Elements and then open your email client (such as Outlook or Apple Mail) and select the photo to attach to an email, you can use Elements to easily share photos via email with one click.When you want to email a photo or a creation, follow these steps:
- In the Organizer, select the photos you want to email to a friend.
- Open the Share panel and select Email Attachments. The First time you try to email photos, Elements opens the Organizer Preferences panel and requires you to configure your email account. Fill in the text boxes and click OK.
- Check Convert Photos to JPEGs and choose a quality setting for the attachment and click Next.
Drag the Quality slider and observe the file size noted at the bottom of the panel where you see Estimated Size, as shown. If the file is large, you may need to resize it in the Image Size dialog box before emailing the photo.
 Set the Quality slider to a medium setting for faster uploads to your mail server.
 - (Optional) Add recipients.
The next panel provides settings for adding a message and adding recipients from an Address Book, as shown here.
 Add recipients from your Address Book.
You can bypass adding recipients from your Address Book. If no recipients are listed in the Select Recipients panel, you can add recipient email addresses in the new message window in your email client.
- Click Next.
The photo(s) are first sampled to the output size. Wait a few minutes until Elements completes the sampling; then the photos are attached to a new email message in your default email client.
Elements attaches the media to a new email message. You need to toggle to your email client in order to see the message and send the mail.
- Review the To, Subject, and Attach fields to be certain the information is correct. Then click the Send button.
By default, Elements uses your primary email client application, which may or may not be the email program you use. You can change the default email client by pressing Ctrl+K (Command + K on the Mac) to open the Preferences dialog box when you're in the Organizer and then clicking Email in the left pane. From a drop-down list in the Sharing preferences, choose the email client application that you want Elements to use.
How to work with Adobe Premiere Elements
Several options in the Share and Create panels require that you use Adobe Premiere Elements. The items denoted as Burn Video DVD/BluRay, Online Video Sharing, and Mobile Phones and Players all require Adobe Premiere Elements.If any of these items interest you, you can download a free trial of Adobe Premiere Elements and work with it for 30 days. If Premiere Elements is a tool you find worthwhile, you can purchase it from the Adobe Store. If you’re perusing this book and have not yet purchased Elements 2019, you can purchase the Adobe Photoshop Elements 2019 and Adobe Premiere Elements 2019 bundle. Buying the bundle purchase is much less expensive than buying the products separately.
For Adobe Premiere Elements trial versions, just click one of the options for video sharing in the Share panel, and you’re prompted to download a trial version of Premiere Elements.
How to share your photos on social networks
You have a variety of options for sharing photos and placing orders on a number of service networks. We don’t have enough space in this book to cover each and every service that Elements supports, so we walk through the more popular services (Flickr, Facebook, and Twitter) as an example for connecting with a service provider. If other services interest you, poke around and explore options for the services you use.Experienced users of Elements will immediately notice that services such as Flickr and Facebook have been promoted from options nested in the More Options drop-down list found in earlier versions of Elements to buttons shown in the Share panel.
How to share photos on Flickr, Facebook, and Twitter
Whether you’re uploading photos to Flickr, Facebook, or Twitter, you follow the same process in Elements. You first select photos, albums, or creations in the Organizer and then click the Flickr, Facebook, or Twitter button in the Share panel.You need to authorize Elements to communicate with these social networks before uploading any content. Click the Authorize button and proceed to a login page, where you supply your account username and password information.
After you are logged in to a site, the process for uploading images is easy, as shown here, shown after we authorized Facebook.
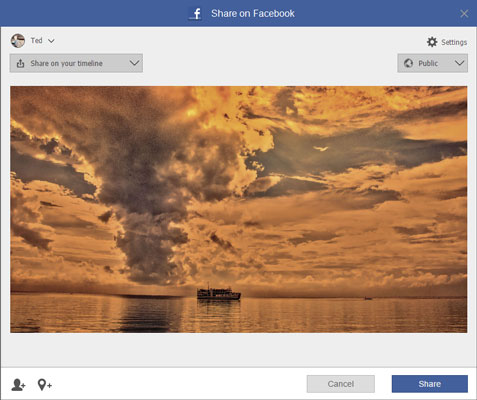 After authorizing Facebook, the Facebook window permits you to choose an album or create a new one and add a description.
After a photo is uploaded, you see the photo on your timeline or in a photo collection.
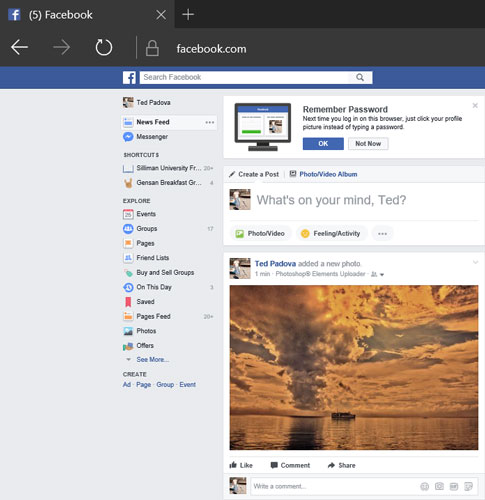 A photo uploaded to a Facebook account.
How to use other online services
After you become familiar with uploading photos to a service, you can easily follow similar steps to upload photos to any of the services that are supported by Elements. You first encounter the window to authorize an account, such as when using Facebook, Flickr, and Twitter. When setting up a new account, you can log in to the service and create the new account.When you enter a site for sharing photos, printing photos, or creating items such as photo frames, follow the easy online steps that each service provides.
How to create Facebook cover images
Creating Facebook Covers has been around for a while in the Create Panel in the Organizer; however, the first efforts by Adobe were limiting and a bit clumsy. You had to struggle with a limited set of templates to simply add a background photo and a profile picture without any default text.Adobe provides you with several templates to help you create just the right Facebook Cover you want. A list of themes appears in the Themes Category.
To create a Facebook cover and upload the file(s) to your Facebook account, follow these steps:
- Select photos in the Organizer. The Facebook cover option appears in both the Organizer’s and Editor’s Create panels; hence, you need to select your images in the Organizer first.
- Open the Create Panel and choose Facebook Cover. The Facebook Cover window opens, as shown here.
 Photographer: Rommel Balcita; Makeup: Gerelyn/Juliet
A photo uploaded to the Facebook timeline.The minute you choose Facebook Cover in the Organizer you are switched to the Photo Editor.
- Choose a theme. The Facebook Cover Wizard opens. Click a theme and decide whether you want to use a single photo or multiple photos by clicking the corresponding theme category. In our example, we use the new Clean template to add a background photo and profile picture.
- Edit the images for position and size. Click the green check mark when you have the image(s) sized to your liking.
- If you want, click the Save button to save the file as a .pse file that you can reopen and rework if you change your mind.
- Click the Upload button when finished. The final photos are uploaded as shown here.
 Click the Upload button to upload to Facebook.
You arrive at the Upload Photos to Facebook window. The window shows you a preview of how your new cover will appear. If you like what you see, click the Next button and follow the steps to upload the images to your Facebook account.


