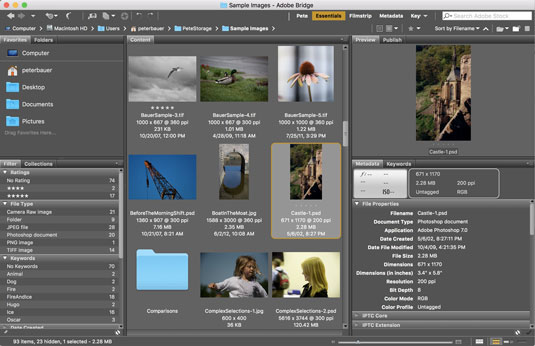
 Bridge’s color scheme is automatically matched to what you choose in Photoshop’s Preferences, but you can change that in Bridge’s Preferences → Interface.
In the figure, note the Publish tab in the upper-right, nested with the Preview tab. That gives you direct access to Adobe Stock, enabling you to submit your images for sale as stock photos right from Bridge.
Here are a few tips for working with Adobe Bridge:
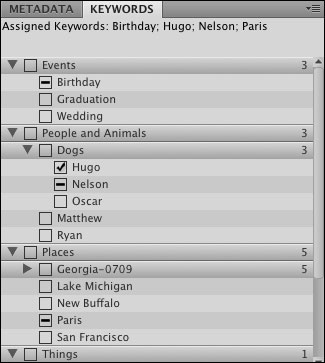
- Use keywords and categories. Using the Keywords tab (shown here), to the lower right in Bridge’s default layout, you can assign keywords and categories to images. Keywords and categories are descriptive terms that you assign to individual images. Down the road, you can choose File → Find to find all images with a specific assigned keyword. A checkmark to the left of a keyword indicates that all the files currently selected in Bridge’s Thumbnails pane have that keyword assigned, a dash indicates that some, but not all, selected images have been assigned that keyword.
 Assign keywords and categories to help organize (and locate) images.
-
Select multiple images in Bridge. You can have multiple images active by clicking and Shift+clicking (or Command +clicking/Ctrl+clicking) the image thumbnails. You might want to select multiple images and then assign the same keywords to all the selected images at once.
- Use labels, ratings, and filters. Under the Label menu, you can assign a star rating to each image and assign colors to organize by subject or project. Use the View→ Sort menu to arrange images in the thumbnails area of Bridge according to either the label or the rating.
- Add folders to the Favorites. You invariably will visit some folders on a regular basis. Choose File → Add to Favorites to get back to that folder faster and more easily. In the upper-left corner of the Bridge window, click the Favorites tab for one-click access. Keep in mind, too, that you can add a folder to the Favorites while working on a specific project, and then choose File → Remove from Favorites when the project is finished.
- Change your view and workspace. Use the View menu to customize what the Bridge window shows, and use the Window → Workspace menu to determine how it is displayed. You might find that Compact Mode fits your needs better in some circumstances than does Full Mode. And don’t overlook Bridge’s Slideshow feature — it can be a great way to show off your work!
- Use stacks to organize images. Select similar images or variations on the same shot and use Bridge’s Stacks →Group as Stack command. All the selected images are piled into one spot as a single thumbnail, with a number in the upper-left corner to indicate how many images are stacked together. When you have ten or more images in a stack, you can scroll through the thumbnails with a slider that appears when you move the cursor over the stack.
- Zoom with the Loupe. Click in the Preview (in the upper-right corner of the default workspace) to zoom in. Drag the cursor to inspect the preview up close and personal. Use your mouse’s scroll wheel or your trackpad to zoom from 100% to as high as 800%.
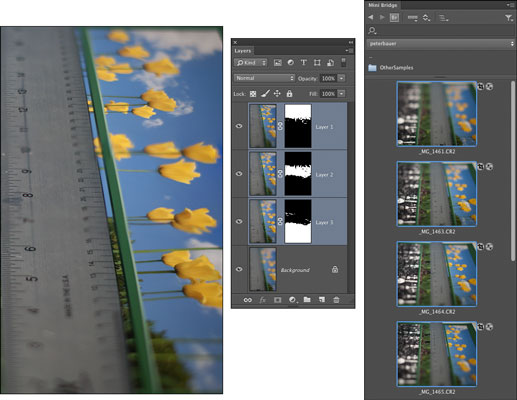
- Access Photoshop scripts. In Bridge’s Tools menu, you’ll find a submenu named Photoshop (as well as menus for other installed programs that use Bridge). Through that menu, you can easily access Photoshop’s Batch, Image Processor, Photomerge, and a number of other features. Select the thumbnails in Bridge first, then select the feature you want to use. Perhaps my favorite command in the menu is Load Files into Photoshop Layers — all of the files selected in Bridge are opened into a single Photoshop document, each on its own layer. It’s a fabulous time saver when preparing a series of images for use with Photoshop’s stack modes.
If you enjoy macro photography — taking close up shots of little things — you can shoot a series of images with different focal points (using a tripod, of course), then use Bridge’s Load Files in Photoshop Layers command. After the files load, choose Select→All Layers from Photoshop’s menu bar (did you know about that command — very handy, eh?), choose Edit→ Auto-Align Layers (even if you did use a tripod), then choose Edit → Auto-Blend Layers with the Stack Images option. Each of the in-focus areas is combined to a single all-in-focus image using layer masks.
 Auto-aligning and auto-blending layers.


