Before you bound headlong into applying transformations to your objects in Blender, you need to understand how coordinate systems work in 3D space. All coordinate systems in Blender are based on a grid consisting of three axes:
The X-axis typically represents side-to-side movement.
The Y-axis represents front-to-back movement.
The Z-axis goes from top to bottom.
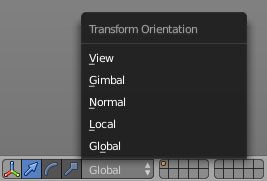
This grid system with axes is referred to as the Cartesian grid. The origin, or center, of this grid is at the (0,0,0) coordinate. The difference in the coordinate systems within Blender lies in the way this grid is oriented relative to a selected 3D object. The figure shows the Transform Orientation menu in the 3D View header when you left-click it.

If you're coming from another 3D program, you may find the way Blender handles coordinates a bit disorienting. Some programs (such as Cinema 4D and Maya) have the Y-axis representing vertical movement and the Z-axis going from front to back. Currently, you can't change the coordinate system in Blender to match these programs, so this system is one of those things that migrating users just need to get used to.
You can choose from five orientations: Global, Local, Normal, View, and Gimbal. Working in any of these coordinate systems gives you absolute control of how your object lives in 3D space. Depending on how you'd like to transform your object, one orientation may be more appropriate than the others. Blender also gives you the ability to create custom orientations. After you create a custom orientation, it also becomes available on the Transform Orientation menu.
This list describes details of the five possible orientations:
Global: You see this orientation of Blender's base grid in the 3D View. In many ways, the Global orientation is the primary orientation to which everything else relates, and it's the base coordinate system described. The Z-axis, marked in blue, runs vertically in the space. The Y-axis is marked in green, moving along the front-to-back line, and the X-axis is in red, along the side-to-side line. The origin is located directly at the center of the grid.
Local: In addition to the Global orientation, each 3D object in Blender has a local coordinate system. The base of this system isn't the same as the Global coordinate system's base. Instead, this coordinate system is relative to the center point, or origin, of your object.
The object origin is represented by the orange dot that's usually located at the center of your 3D object. By default, when you first add a new object in Blender, its Local coordinate system of the object is aligned to the Global axis, but after you start moving your object around, its Local coordinate system can differ greatly from the Global orientation.
Normal: The Normal orientation is a set of axes that's perpendicular to some arbitrary plane. When working with just objects, this description doesn't really apply, so the Normal orientation is exactly the same as the Local orientation.
When you begin editing meshes, though, Normal orientation makes more sense because you have normals (imaginary lines that extend perpendicular to the surface of a triangle or plane) to work with. Blender also uses the Normal orientation for the local coordinate system of bones when working with Armatures for animation. A nice way to think about the Normal orientation is the "more local than local" orientation.
Gimbal: When you rotate an object about its X, Y, and Z axes, the angles about those axes are known as Euler (pronounced like oiler) angles.
Unfortunately, a side effect of using Euler angles is that you have the possibility of running into gimbal lock. You run into this problem when one of your rotation axes matches another one. For example, if you rotate your object 90 degrees about its X-axis, then rotating around its Y-axis is the same as rotating about its Z-axis; mathematically speaking, they're locked together, which can be a problem, especially when animating. This orientation mode in Blender helps you visualize where the axes are, so you can avoid gimbal lock.
View: The View orientation appears relative to how you're looking at the 3D View. Regardless of how you move around in a scene, you're always looking down the Z-axis of the View coordinate system. The Y-axis is always vertical, and the X-axis is always horizontal in this orientation.
All these coordinate system explanations can be (please forgive the pun) disorienting. An easy way to visualize this concept is to imagine that your body represents the Global coordinate system, and a book is a 3D object oriented in space. If you hold the book out in front of you and straighten your arms, you move the book away from you. It's moving in the positive Y direction, both globally and locally. Now, if you twist the book to the right a few degrees and do the same thing, it still moves in the positive Y direction globally. However, in its local orientation, the book is moving in both a positive Y direction and a negative X direction. To move it in just the positive local Y direction, you move the book in the direction in which its spine is pointing.
To relate this concept to the View orientation, assume that your eyes are the View axis. If you look straight ahead and move the book up and down, you're translating it along the View orientation's Y-axis. Gimbal orientation would be if you rotate the book 90 degrees toward you, rotating about its X-axis. Then it's Y and Z axes are locked together. For a clear reference, the 3D manipulator shows the difference between the coordinate systems.

The last object you select is the active object. If you're using the Local, Gimbal, or Normal orientations and select multiple objects, the transform operations happen relative to the active object's orientation.
You can quickly change the coordinate system you're using by using the Alt+Spacebar hotkey.


