In Excel 2010, you select portrait or landscape page orientation, which affects the layout of the printed page. You also can adjust the Size setting based on the size of the paper you plan to use to print your worksheet.
In addition to the Ribbon methods described below, you also can change the paper orientation and paper size from the Settings section of the Print panel in Backstage view (press Ctrl+P).
Adjusting the page orientation
Because many worksheets are wider than they are tall (such as budgets or sales tables that track expenditures over all 12 months), you may find that printouts look better if you switch the orientation from the default portrait mode to landscape mode.
On the Page Layout tab of the Ribbon, you'll find the Orientation button in the Page Setup group. Clicking the Orientation button reveals a drop-down menu with these two options:
Portrait (the default), where the printing runs parallel to the short edge of the paper.
Landscape, where the printing runs parallel to the long edge of the paper.
 The Orientation setting comes in two flavors: Portrait and Landscape.
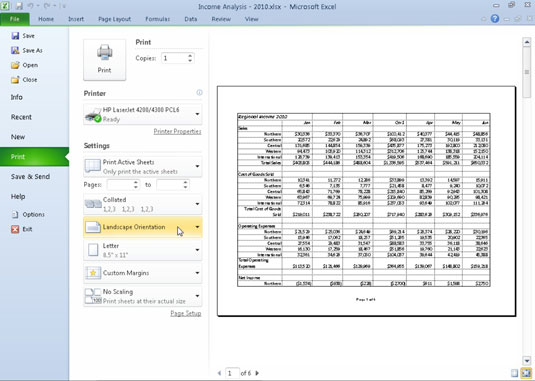
In the following figure, you see the first page of a report in landscape mode in the Print panel of Backstage view. For this report, Excel can fit three more columns of information on the page in landscape mode than it can in portrait mode. The total page count for this report decreases from ten pages in portrait mode to six pages in landscape mode. Of course, the portrait orientation may work better for other reports. Experiment with the settings until you find the best fit.

Selecting a paper size
In most cases, you'll use the standard 8.5-x-11-inch letter-sized paper to print your worksheets. However, if you find that you need to print on 8.5-x-14-inch legal paper size, an envelope, or another paper size, you must tell Excel which size paper you want to use.
To change the paper size setting, click the Size button in the Page Setup group of the Page Layout tab, and select the desired size from the resulting drop-down list.


