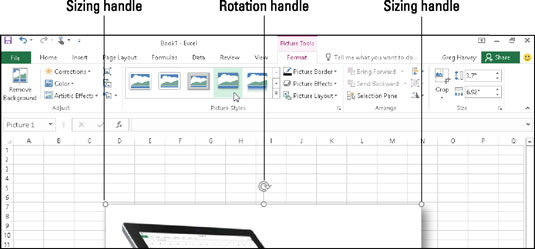
When an inserted picture is selected in the worksheet, Excel 2016 adds the Pictures Tools contextual tab to the Ribbon with its sole Format tab. The Format tab is divided into four groups: Adjust, Picture Styles, Arrange, and Size.

The Adjust group contains the following important command buttons:
Remove Background opens the Background Removal tab and makes a best guess about what parts of the picture to remove. You have the option to mark areas of the picture to keep or further remove, and the shaded areas automatically update as you isolate what areas of the picture you want to keep. Click Keep Changes when you are finished or Discard All Changes to revert back to the original picture.
Corrections to open a drop-down menu with a palette of presets you can choose for sharpening or softening the image and/or increasing or decreasing its brightness. Or select the Picture Corrections Options item to open the Format Picture dialog box with the Picture Corrections tab selected. There you can sharpen or soften the image or modify its brightness or contrast by selecting a new preset thumbnail on the appropriate Presets palette or by entering a new positive percentage (to increase) or negative percentage (to decrease) where 0% is normal in the appropriate combo box or dragging its slider.
Color to open a drop-down menu with a palette of Color Saturation, Color Tone, or Recolor presets you can apply to the image, set a transparent color (usually the background color you want to remove from the image), or select the Picture Color Options item to open the Picture Color tab of the Format Picture dialog box. There you can adjust the image's colors using Color Saturation, Color Tone, or Recolor presets or by setting a new saturation level or color tone temperature by entering a new percentage in the appropriate combo box or selecting it with a slider.
Artistic Effects to open a drop-down menu with special effect presets you can apply to the image or select the Artistic Effects Options item to open the Artistic Effects options in the Format Picture task pane where you can apply a special effect by selecting its preset thumbnail from the palette that appears when you click the Artistic Effect drop-down button.
Compress Pictures to open the Compress Pictures dialog box to compress all images in the worksheet or just the selected graphic image to make them more compact and thus make the Excel workbook somewhat smaller when you save the images as part of its file.
Change Picture to open the Insert Pictures dialog box where you can find and select a new image to replace the current picture.
Reset Picture button to select the Reset Picture option to remove all formatting changes made and return the picture to the state it was in when you originally inserted it into the worksheet or the Reset Picture & Size to reset all its formatting as well as restore the image to its original size in the worksheet.
You can also format a selected clip art image or imported picture by opening the Format Shape task pane (Ctrl+1) and then selecting the appropriate options attached to the Fill & Line, Effects, Size & Properties, and Picture buttons, which cover almost all aspects of formatting any image you use.
In addition to the command buttons in the Adjust group, you can use the command buttons in the Picture Styles group. Click a thumbnail on the Picture Styles drop-down gallery to select a new orientation and style for the selected picture. You can also modify any of the following:
Border shape and color on the Picture Border button's drop-down palette
Shadow or 3-D rotation effect on the Picture Effects button's drop-down menus
Layout on the Picture Layout button's drop-down palette to format a picture with SmartArt-styles


