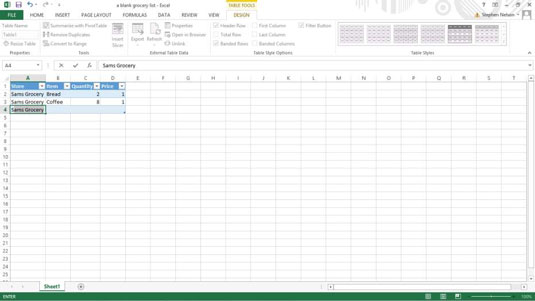
To create a table in Excel manually, you typically want to enter the field names into row 1, select those field names and the empty cells of row 2, and then choose Insert→Table. Why? The Table command tells Excel, right from the get-go, that you’re building a table. Take a look at how this process works.
Manually adding records into a table
To manually create a list by using the Table command, follow these steps:
Identify the fields in your list.
To identify the fields in your list, enter the field names into row 1 in a blank Excel workbook. Cells A1, B1, C1, and D1 hold field names for a simple grocery list.

Select the Excel table.
The Excel table must include the row of the field names and at least one other row. This row might be blank or it might contain data. For example, you can select an Excel list by dragging the mouse from cell A1 to cell D2.
Click the Insert tab and then its Table button to tell Excel that you want to get all official right from the start.
If Excel can't figure out which row holds your field names, Excel displays this dialog box.

Check the My Table Has Headers check box to confirm that the first row in your range selection holds the field names. When you click OK, Excel re-displays the worksheet set up as a table.

Describe each record.
To enter a new record into your table, fill in the next empty row. For example, use the Store text box to identify the store where you purchase each item.
Store your record in the table.
Click the Tab or Enter button when you finish describing some record or item that goes onto the shopping list. Excel adds another row to the table so that you can add another item. Excel shows you which rows and columns are part of the table by using color.
Some table-building tools
Excel includes an AutoFill feature, which is particularly relevant for table building. Here’s how AutoFill works: Enter a label into a cell in a column where it’s already been entered before, and Excel guesses that you’re entering the same thing again.
For example, if you enter the label Sams Grocery in cell A2 and then begin to type Sams Grocery in cell A3, Excel guesses that you’re entering Sams Grocery again and finishes typing the label for you. All you need to do to accept Excel's guess is press Enter.

Excel also provides a Fill command that you can use to fill a range of cells — including the contents of a column in an Excel table — with a label or value. To fill a range of cells with the value that you’ve already entered in another cell, you drag the Fill Handle down the column.
The Fill Handle is the small plus sign (+) that appears when you place the mouse cursor over the lower-right corner of the active cell.


