The Ribbon interface in Microsoft Office Excel 2010 may seem tricky to navigate until you get used to how commands are organized. The File tab on the left side of the Ribbon provides access to commands related to file management, such as opening, saving, printing, sharing, and closing files.
Let’s take a tour of the Ribbon:
Click the File tab in the Ribbon.
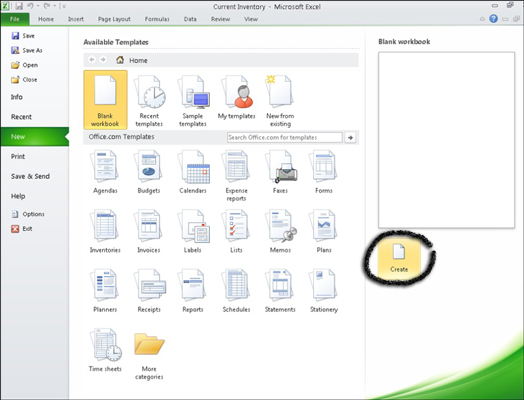
Clicking the green File tab displays the Excel Backstage view. In the left pane, you see many of the commands that used to be under the File menu in Excel 2003 and earlier versions.
Click New in the left pane.

Excel displays options for starting a new workbook in the middle and right panes. When you’ve selected the template you want, click the Create button.
Scan the Ribbon tabs and click the Home tab.
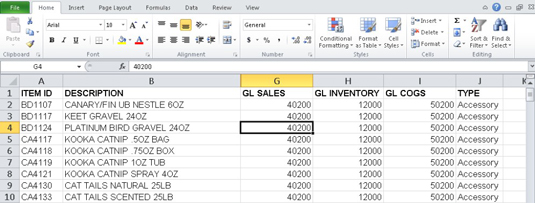
The worksheet reappears and the Ribbon displays the options on the Home tab. The options appear in groups related to function — Clipboard, Font, Alignment, Number, Styles, Cells, and Editing. Point your mouse over any button and a description of the button’s function appears.
Take a gander at the groups.

Find the Styles group on the Home tab. You can control how a table in your worksheet looks from this group. Click the Format as Table button (in the Styles group) to see a gallery of table styles. (Click the Format as Table button again to close the gallery.)
Locate the dialog box launchers.
In the bottom-right corner of many Ribbon groups is a little box with an arrow. This is a dialog box launcher. Click the Font dialog box launcher and the Format Cells dialog box appears, with the Font tab displayed. (Click Cancel to exit without making changes.)
Each of the tabs on the Ribbon interface works the same way. Buttons are collected into different Groups, and many groups have a dialog box launcher with even more options.


