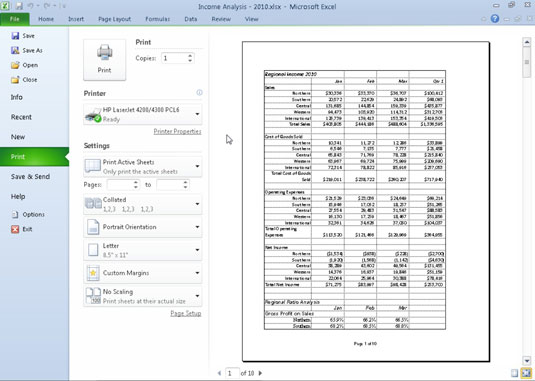
The Print panel in Excel 2010's Backstage view includes commands that allow you to specify which parts of a workbook you want to print. You also can specify a print area from the Page Layout tab of the Ribbon.
To display the Print panel, click the File tab and choose Print (or press Ctrl+P).
Specifying print areas in Backstage view
You can specify print areas in the Settings section of the Print panel in Excel's Backstage view. To change what part of the worksheet is printed in the report, select an option in the Print Active Sheets button's drop-down menu — you can choose from the following options:
Print Active Sheets: Excel prints all the information in active worksheets in your workbook. Normally, this means printing just the data in the current worksheet. To print additional worksheets in the workbook, hold down the Ctrl key while you click the sheets' tabs.
Print Entire Workbook: Select this option to have Excel print all the data in each of the worksheets in your workbook.
Print Selection: Select this option to have Excel print just the cells that are currently selected in your workbook. (Remember to select these cells before opening the Print panel and choosing this printing option.)
Depending on what is selected in the worksheet when you display the Print panel, you may see additional options in this menu, including Print Selected Table or Print Selected Chart. Choose the desired option based on what you want to print.

Select Ignore Print Area at the bottom of the Print Active Sheets button's menu when you want one of the other print options (Print Active Sheets, Print Entire Workbook, or Print Selection) that you selected to be used in the printing rather than the print area you previously defined.
Other options in the Settings area that affect what you print include the following:
Pages: At times, you may need to print only a page or range of pages. To print a single page, enter its page number in both text boxes or select these page numbers with the spinner buttons. To print a range of pages, put the first page number in the first text box and the last page number in the second text box.
Print One Sided: If your printer is capable of double-sided printing, you can choose one of the Print on Both Sides settings from the Print One Sided drop-down menu.
Collated: When you collate pages, you simply make separate stacks of each complete report, rather than print all copies of page one, and then all copies of page two, and so on. To have Excel collate each copy of the report, ensure that Collated is selected in this menu.
Setting the print area from the Ribbon
You can use the Ribbon to define any cell selection in an Excel worksheet as the print area. After you define the print area, Excel then prints this cell selection anytime you print the worksheet (until you clear the print area or set another print area).
To use the Ribbon to set a print area in Excel 2010, follow these steps:
Select the range of cells you want to print.
You can select noncontiguous areas of the worksheet by holding down the Ctrl key as you select the cell ranges.
On the Page Layout tab of the Ribbon, in the Page Setup group, choose Print Area→Set Print Area.
Once you define a print area, its cell range is the only one you can print (unless you select the Ignore Print Area command) until you clear the print area.
 Use the Print Area command to set or clear a print area.
To clear a print area that you set previously, choose Print Area→Clear Print Area on the Page Layout tab of the Ribbon.


