Excel 2016 SmartArt is a special type of graphic object that gives you the ability to construct fancy graphical lists and diagrams in your worksheet quickly and easily. SmartArt lists and diagrams come in a wide array of configurations (including a bunch of organizational charts and various process and flow diagrams) that enable you to combine your own text with the predefined graphic shapes.
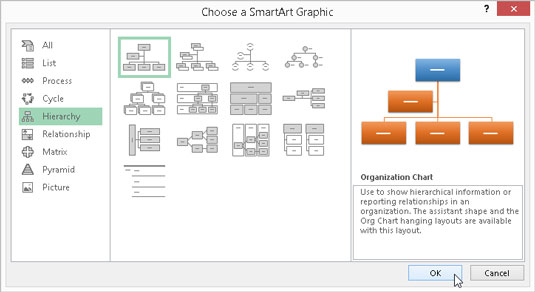
To insert a SmartArt list or diagram into the worksheet, click the Insert a SmartArt Graphic button in the Illustrations group on the Insert tab or press Alt+NM to open the Choose a SmartArt Graphic dialog box (shown here). Then click a category in the navigation pane on the left followed by the list's or diagram's thumbnail in the center section before you click OK.

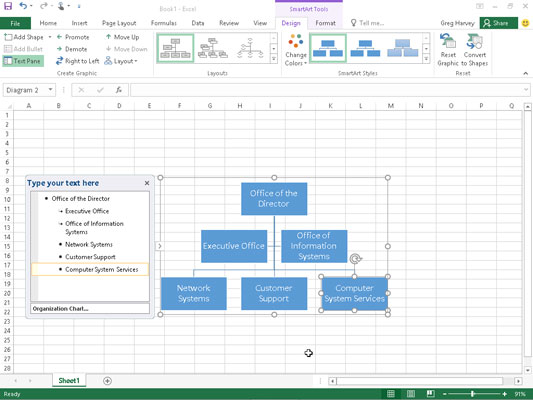
Excel then inserts the basic structure of the list or diagram into your worksheet along with a text pane (displaying Type Your Text Here on its title bar) to its immediate left and [Text] in the shapes in the diagram where you can enter the text for the various parts of the list or diagram (as shown here). At the same time, the Design tab of the SmartArt Tools contextual tab with Layouts and SmartArt Styles galleries for the particular type of SmartArt list or diagram you originally selected appears on the Ribbon.

Filling in the text for a new SmartArt graphic
To fill in the text for the first section of the new list or diagram in the text pane that already contains the insertion point, simply type the text. Then press the down-arrow key or click the next list or diagram section to set the insertion point there.
Don't press the Tab key or the Enter key to complete a text entry in the list or diagram as you naturally do in the regular worksheet. In a SmartArt list or diagram, pressing the Enter key inserts a new section of the list or diagram (at the same level in hierarchical diagrams, such as an org chart). Pressing Tab indents the level of the current section on the outline (in hierarchical diagrams) or does nothing.
When you finish entering the text for your new diagram, click the Close button (with an X) on the text pane in the upper-right corner opposite the title Type Your Text Here. (You can always re-open this box if you need to edit any of the text by clicking the button that appears in the middle of the left side of the selected list or diagram after you close the text pane.)
If the style of the SmartArt list or diagram you select comes with more sections than you need, you can delete the unused graphics by clicking them to select them (indicated by the selection and rotation handles around it) and then pressing the Delete key.
Formatting a SmartArt graphic
After you close the text pane attached to your SmartArt list or diagram, you can still format its text and graphics. To format the text, select all the graphic objects in the SmartArt list or diagram that need the same type of text formatting. (Remember you can select several objects in the list or diagram by holding down Ctrl as you click them.) Then click the appropriate command buttons in the Font group on the Home tab of the Ribbon.
To refine or change the default formatting of the graphics in a SmartArt list or diagram, you can use the Layouts, Change Colors, and SmartArt Styles drop-down galleries available on the Design tab of the SmartArt Tools contextual tab:
Click the More button in the Layouts group and then click a thumbnail on the Layouts drop-down gallery to select an entirely new layout for your SmartArt list or diagram.
Click the Change Colors button in the SmartArt Styles group and then click a thumbnail in the drop-down gallery to change the colors for the current layout.
Click the More button in the SmartArt Styles group and then click a thumbnail on the SmartArt Styles drop-down gallery to select a new style for the current layout using the selected colors.


