Hackers know that protecting data is a challenge for SMBs, so it is no surprise that hackers increasingly target small businesses. A few years ago, ransomware from hackers who wanted a quick buck started out at around $5,000. Nowadays, with the availability of ransomware-as-a-service, victims have been asked to pay $1,500 to get their data back.
Although you can't stop hackers from being hackers, you can stop them from making you and your Office 365 tools their latest victim. The first step in protecting your environment is to assume that you will be attacked. With that mindset, you can begin securing your front door and letting hackers know they're not welcome.
Office 365 Advanced Threat Protection overview
Statista.com studies show that 48 percent of email traffic worldwide is spam. When you're using Office 365, the emails you see in your mailbox are mostly ones that have passed the cloud-based mail-filtering system for spam (unwanted mail) and malware (viruses and spywares). This filtering system is automatically configured in the subscription, but you, as an admin, can tweak the settings to fit your company's needs.Hackers, however, have become smarter. To bypass these filters, they've resorted to social-engineering techniques to try to breach your environment. They employ deceptive techniques to manipulate you — for instance, to get you to give them your password.
Office 365 Advanced Threat Protection (ATP) is a cloud-based solution that employs a multilayered approach to protecting not just email but also data across the Microsoft 365 Business environment, including SharePoint Online, OneDrive for Business, and Microsoft Teams. In the Microsoft 365 Business subscription, Office 365 ATP comes with two features: ATP Safe Attachments, and ATP Safe Links.
Secure Office 365 using ATP Safe Attachments
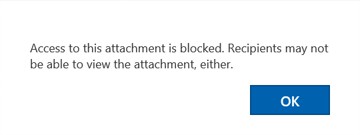
Here’s a story from a Microsoft 365 expert:“While traveling this year, I thought I’d use a 30-minute layover to be productive and check my email. I connected to the airport Wi-Fi and fired up Outlook; soon I was responding to emails and accomplishing a lot. As I was about to shut down my computer to start boarding my flight, I saw an email come in marked “Urgent.” It was from a colleague, with an attachment and a note saying she needed my immediate approval or the project we were working on would be delayed by four weeks. In my rush, I didn't verify the email associated with the sender and immediately double-clicked the attachment. As it turns out, even someone aware of phishing tricks can still fall prey to social-engineering tactics. Lucky for me, ATP Safe Attachments is running on my system, so instead of the hacker wreaking havoc, I was presented with a notification that the attachment was blocked.”
The moral of this story is…use ATP Safe Attachments.
 Attachment blocked by Safe Attachments in Office 365 ATP.
The ATP Safe Attachments feature took the appropriate action based on the policies that were configured in Exchange Online. The policy allowed the user to see the body of the email but blocked access to the malicious file. Sophisticated machine-learning technologies, artificial intelligence, and a host of other automated systems run in the background in real time to ensure that the policies are in effect — that is the beauty of cloud technologies. Imagine if you were to do this all by yourself. You'd have to spend a ton of money, time, brainpower, and — actually, you simply couldn't do what this technology does.
ATP Safe Attachments also works for files in SharePoint Online and OneDrive for Business document libraries. If someone loads malicious files in document libraries, the system detects them and prevents users from opening them.
Here's how to set up ATP Safe Attachments for Office 365.
- Log in as a global administrator.
- In the left pane, under Admin Centers, select Security & Compliance.
- In the left pane, in the Microsoft 365 Security & Compliance portal, expand Threat Management. Then select Policy, and click the ATP Safe Attachments card.
 ATP Safe Attachments card.
 - On the Safe Attachments page, select the box to the left of Turn on ATP for SharePoint, OneDrive, and Microsoft Teams.
This action enables Safe Attachments in SharePoint Online, OneDrive for Business, and Microsoft Teams.
- Click the New button (+ sign) to create a new policy.
- In the New Safe Attachments Policy window, specify the name and description.
Here, the policy has been named Deliver Right Away.
 Creating a Safe Attachment policy.
 - Choose the action that's appropriate for your organization.
In the example above, Dynamic Delivery was chosen. This choice delivers an email that contains an attachment immediately to the recipient. While the attachment is being scanned, a placeholder attachment is attached, and the user is notified that the attachment is being analyzed. After the scanning is complete, if the attachment is deemed safe, the attachment is reattached to the email. If the attachment is determined to be malicious, it is sent to quarantine, where the global administrator of Microsoft 365 Admin Center can review and manage it.
- In the Redirect Attachment on Detection section, select the Enable Redirect option and enter an email address.
This step is required if you want someone investigate malicious attachments.
- In the Applied To section, in the *If… box, select The Recipient Domain Is.
- In the domain picker window that pops us, select the domain for your Microsoft 365 Business tenant that ends with .onmicrosoft.com, and then click the OK button.
- Click the Save button.
A Warning window appears, reminding you that Dynamic Email Delivery is only for mailboxes hosted in Office 365.
- Click OK to close the window.
You return to the Safe Attachments page, where you can see the Safe Attachment policy you just created.
- In the Save Attachments page, click Save to save your changes.
If you're finished with creating policies for Safe Attachments, you can navigate away from the page by clicking any of the menus on the left or by closing the browser.
ATP Safe Links
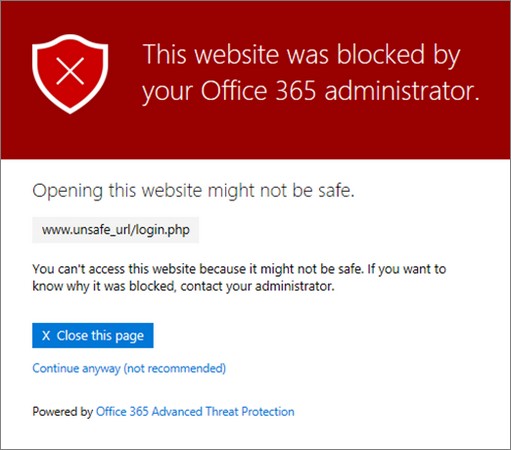
Hackers are persistent. They will continue to find ways to try to breach your environment. If you close the door with attachments, they will try to open another door by tricking you into clicking a link in the body of an email or inside a document to take you to a malicious site. They may even make it so that the first time you click the link, it takes you to a legitimate website. If you click the link again, it redirects you to a malicious site!ATP Safe Links, another security feature in Office 365 ATP, verifies the link each time you click it in real time. If the link is malicious, and ATP Safe Links is configured, a warning page will appear to notify the user that access to the website is blocked.
 ATP Safe Links alert.
Office 365 ATP comes with a default policy for ATP Safe Links that blocks malicious links based on sophisticated machine-learning algorithms, artificial intelligence, and a bunch of automated processes. This service is constantly being updated, so stay current to align your policies based on what's new.
As a cloud service, Office 365 ATP is updated regularly, so it's best to edit the default policy to ensure that all the new features are enabled for your company.To edit the default ATP Safe Links policy in Office 365, follow these steps:
- Log in as a global administrator.
- In the left pane, under Admin Centers, select Security & Compliance.
- In the left pane, under the Microsoft 365 Security & Compliance portal, expand Threat Management. Then select Policy, and click the ATP Safe Links card.
- On the Safe Links page, under the Policies that apply to the entire organization section, select Default and click the Edit icon (pencil).
- In the Safe Links Policy for Your Organization window, add any URLs you want to block.
- For added protection, select all boxes under Settings that apply to content except email heading.
This default policy does not apply to email messages. You can use this as a guide to create your own policy to apply to emails.
- Click the Save button to save your changes.
You return to the Safe Links page.
Using encryption to protect Office 365 email
Today, sending encrypted emails in Office 365 involves a few clicks. There is no software to install or keys to generate or share with others. All the magic happens in the backend.The IT admin doesn't even have to configure anything in the backend. That's because Microsoft 365 Business automatically comes with Office 365 Message Encryption as part of the Azure Information Protection service. Right out of the gate, licensed users can immediately take advantage of this security feature.
Azure Information Protection labels
As the name suggests, Azure Information Protection (AIP) is a cloud-based service designed to protect information. AIP includes a variety of features depending on the type of plan you subscribed to. One of the features of AIP is Office 365 Message Encryption (OME).Microsoft 365 Business includes AIP Premium 1, which includes OME. OME in turn, comes with the following four default labels:
- Encrypt: When this label is applied to an email, the entire email is encrypted and can be viewed only by the recipients of the email. Recipients can be people inside or outside your company. If the recipients of the encrypted email are using Microsoft cloud technologies such as Office 365 or Microsoft 365, no additional steps are required to decrypt and read the email. Recipients who are using another email system, such as Gmail or Yahoo, must complete a few simple steps to confirm their identity before the email is decrypted and becomes readable. Recipients of an encrypted email will not be able to remove the encryption.
- Do Not Forward: If the Do Not Forward label is applied to an email, the email will be encrypted and the recipient will not be able to forward the email to anyone.
- Confidential: The Confidential label allows anyone in your organization with a Microsoft 365 Business license to view, reply, forward, print, and copy the data. If an email labeled Confidential is accidentally sent to someone outside the organization, the recipient will still receive the email but the content will not be readable. The sender of the email will be able to track and revoke access to the email at any time.
- Highly Confidential: This label is similar to the Confidential label except that recipients will not be able to forward, print, or copy the data.
Sending an encrypted email in Office 365
No software installation, no key generation or distribution, and no admin setup and configuration. That's the promise of Office 365 Message Encryption. Sending encrypted messages from Outlook or Outlook Online is quick and easy with a Microsoft 365 Business subscription.To send an encrypted email in Outlook Online:
- In Outlook Online, click New Message to create a new message.
- Compose the email as you normally would.
Enter the recipient's email address in the To line, the subject, and the message. - In the top menu bar, click Encrypt.
 Protect your email with encryption.
The Encrypt label is automatically applied to the email. You can apply a different label by clicking Click Change Permission in the gray bar above the recipient's name.
- Click Send.
The email is sent and the screen reverts to Outlook's reading view.
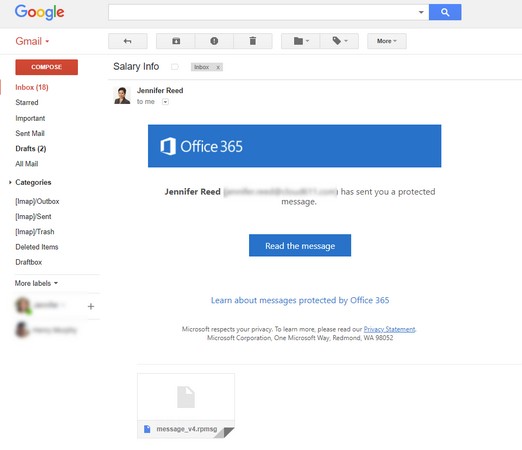
This image shows a recipient using Gmail. When the recipient clicks the Read the Message button, a new window opens. In the new window, the recipient is given two options for viewing the message: sign in with a Google account or use a one-time passcode. After one of these authentication requirements is met, the email is displayed.
 Email encryption in Gmail.


