For example, suppose you want to create some slides for a presentation you’re giving at a club meeting. You could write the outline in Word, and then copy the text over to PowerPoint to dress up with graphics and animation.
Here are two ways of moving and copying in Office 2019:
- Drag and drop: Use the mouse to drag selected text or graphics from one location to another.
To drag and drop between applications, both application windows must be visible onscreen at once. You may need to move and resize windows to make that happen. To move a window, drag its title bar. To resize a window, drag the bottom-right corner of the window. If it won’t resize, it’s probably maximized; click the Restore button to un-maximize it and make it resizable.
- The Clipboard: Cut or copy the content to the Clipboard (a temporary holding area in Windows), and then paste it into a different location.
- Dragging and dropping within a document: If you’re dragging and dropping content within a document but the source and the destination locations are too far apart to see at the same time, you might want to open another window that contains the same file, and then scroll them to two different spots. To do this in Word, Excel, or PowerPoint, choose View → Window → New Window. Because you need to be able to see both the starting and ending points at the same time, you might have to arrange and resize some windows onscreen.
If you open a new window with View → Window → New Window, the second window will have the same name but will have a number appended to it, such as Budget.xlsx:2. The second window is an alternate view of the first; any changes made in one are reflected in the other.
- Dragging and dropping between documents: Open both documents at the same time. You must be able to see both the starting and ending points at the same time, so you might have to arrange and resize some windows onscreen.
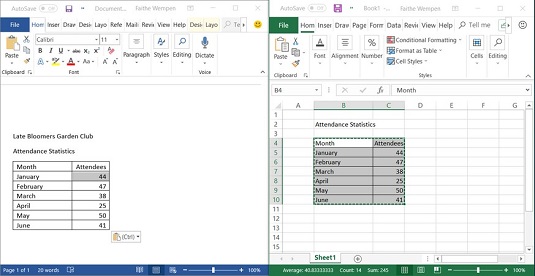
You aren’t limited to copying content between documents in the same application. That is, you can copy from Word to Word, Word to PowerPoint, and so on. The image below shows an example of copying content from a Word document to an Excel spreadsheet.

To make a copy of the selected text or graphic using drag-and-drop, hold down Ctrl while you drag. You’ll notice as you drag that the mouse pointer shows a tiny plus sign, indicating that you’re making a copy.
If setting up the display so that both the source and the destination appear onscreen at once is awkward, you’re better off using the Clipboard method of moving content. This method places the source material in a hidden temporary storage area in Windows, and then pastes it from there into the destination location. Because the Clipboard is nearly universal, you can use it to move or copy data from (almost) any application to any other application, even non-Microsoft programs.For example, you could copy text from Word and paste it into a graphics program such as Photoshop, and it would appear there as a graphic. Or you could copy spreadsheet cells from Excel and paste them into a website–building application such as Dreamweaver, and the cells would appear there as a web table.
The three Clipboard operations in Office 2019 are Cut, Copy, and Paste.
- To move something: Use Cut and then Paste.
- To copy something: Use Copy and then Paste.
Moving or copying via the Clipboard method is always a two-step process.
The table below summarizes the ways of issuing the Cut, Copy, and Paste commands. The Home tab’s Clipboard group on the Ribbon provides buttons for the commands, but you can also use keyboard or mouse methods if you find them easier.| Command | Keyboard Method | Mouse Method | Ribbon Method |
| Cut | Ctrl+X | Right-click and choose Cut | Home → Clipboard → Cut |
| Copy | Ctrl+C | Right-click and choose Copy | Home → Clipboard → Copy |
| Paste | Ctrl+V | Right-click and choose Paste | Home → Clipboard → Paste |

If you use the Ribbon buttons frequently for Cut, Copy, and Paste, consider adding them to the Quick Access toolbar so you can get to them without having to switch to the Home tab.


