Let’s say for example you have 10 users, each with a Microsoft 365 Business license. Here’s what your free cloud storage would look like:
10 users x 1TB per user in OneDrive for Business = 10TB
1TB in SharePoint Online
10 users x 10GB per user in SharePoint Online = 100GB (0.1TB)
Total cloud storage: 11.1TB
If you’re wondering how much data you can store in 1TB of storage, consider the infographic from IT Elementary School. In it, the author claims you’d have 60 piles of typed paper stacked as tall as the Eiffel Tower to consume 1TB of data.With that much storage, you might wonder why SMBs are still using file shares and third-party SaaS applications such as Dropbox. For a majority of small businesses, the challenge is moving their existing data to SharePoint Online or OneDrive for Business.
Traditionally, migrating data to SharePoint Online required complicated tools requiring senior engineers. If a business did not have a budget for such tools or expertise, an IT admin would have to spend an enormous amount of time manually moving files and dealing with sync issues.
The good news is that Office 365 is designed to break traditions. What was challenging a few years ago is now a simple, free, self-service tool. With a few clicks, an IT admin can now confidently migrate files to document libraries in SharePoint Online or OneDrive for Business.
Microsoft 365 Business: The SharePoint Migration Tool
The SharePoint Migration Tool is a handy application taking the guesswork out of moving files to Office 365 from either your hard drive, third-party SaaS storage provider, or on-premises SharePoint environment. You basically just need to download the tool and, with a few clicks, the tool will do its magic while you, depending on the size of data you are moving, grab a cup of coffee or turn on Netflix to watch your favorite show while you wait for the tool to finish its job.Here’s how the SharePoint Migration Tool works.
- Download Microsoft’s SharePoint Migration tool.
- Double-click the downloaded file to run the tool and then click the Sign In button.
 SharePoint Migration Tool sign-in screen.
The Where Is Your Data? screen appears.
- Select the source of your data (for this exercise, choose the File Share option):
- If you’re moving files from an on-premises SharePoint environment, choose SharePoint on-premises.
- If you want to move files from your hard drive or file shares, choose File Share. If you want to move files from Dropbox, make sure the Dropbox app is running on your desktop and select the File Share option.
- If you have multiple sources of data, choose JSON or CSV File for bulk migration. Note that you’ll need some programming skills to create a JSON file.
- In the Select a Source and Destination screen, click the Choose Folder button.
- In the Browse for Folder window, choose the folder you want to migrate and then click OK.
The Select a Source and Destination screen reappears.
- Click the Next button.
A new box appears in the same screen so you can paste the URL for SharePoint Online or OneDrive for Document.
- In the Enter a URL box, enter or paste the URL of the destination library.
In the Choose a Document Library drop-down menu, choose the appropriate document library. Then click the Add button.
- On the next screen, review the entries for the Source and Destination, and then click the Migrate button to start the migration process.
The tool displays the migration status. If you need to change the Source or Destination entry, you must restart the process.
- When the SharePoint migration is complete, click the Close button.
If you must close or accidentally close the tool before the SharePoint migration job is complete, you can resume the job from any computer, provided that the job has run for at least 5 minutes.
Another cool feature of the tool is its capability to perform future incremental SharePoint migrations. If someone in your team didn’t get the memo and continues to save files to your file share, you can run the tool again and move just the new or updated files from the source location. To take advantage of this feature, click Yes when the tool asks if you want to keep the migration settings for future incremental runs after the migration is finished.
Microsoft 365 Business: Syncing files with the OneDrive client
Another way to migrate files to SharePoint Online or OneDrive for Business is through the OneDrive sync client. After the sync client is running, you can simply drag files from the source location to the appropriate library in either OneDrive for Business or SharePoint Online.If Windows 10 has been deployed with the Microsoft 365 Business license, the OneDrive for Business sync client is automatically set up for the account using the device. As such, OneDrive for Business folders will be available in File Explorer.
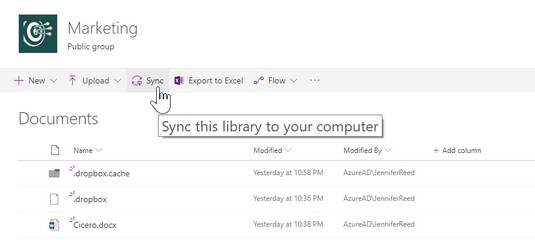
If you’re migrating files to a SharePoint Online document library by using the OneDrive sync client, you first need to sync the SharePoint document library to your desktop. You do this by navigating to the SharePoint Online document library, and then clicking the Sync icon on the command bar. The sync client will prompt you through the rest of the steps, which are straightforward.
 Sync icon on the command bar in SharePoint Online.


