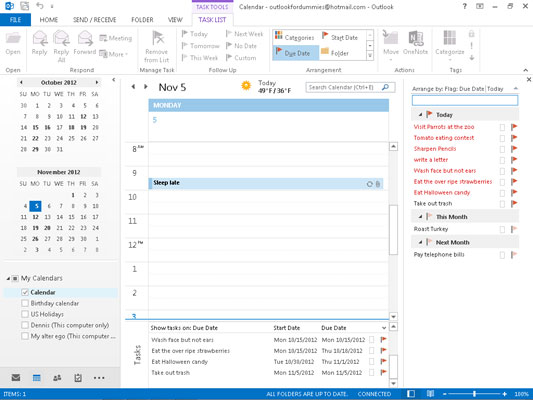
Outlook 2013 has a feature called the To-Do bar that pulls together all the things you need to do and displays them in a single part of the Outlook screen. The goal of the To-Do bar is to let you know what you need to do at a glance rather than making you check your calendar, then check your e-mail Inbox, and then check your Task list.
The items you’ll see most often in the To-Do bar include
Tasks you’ve entered
Your next few appointments
E-mail messages you’ve flagged for action

At first, the To-Do bar can seem a little confusing because things turn up there that you may not have put there directly. For example, if you receive an e-mail message on a Monday and apply the flag labeled This Week, it’ll turn up for action two Fridays later, when you might have forgotten about it. That’s what the To-Do bar is for — to prevent you from forgetting.
Add a new task to the To-Do bar
Adding a new task to the To-Do bar in Outlook isn’t such a big to-do. Even though you can store gobs of information about your tasks in Outlook, you have both a quick way and a really quick way to enter a new task.
There’s a little box in the To Do bar on the right side of the screen that says Type a New Task. Do what the box says. (If you can’t see the box, go on to the following section to discover the regular, slightly slower way to enter the task.)
To enter a task by using the quick-and-dirty method, follow these steps:
Click the box that says Type a New Task.
The words disappear and you see the insertion point (a blinking line).
Type the name of your task.
Your task appears in the To-Do bar Task list.

Press Enter.
Your new task moves down to the To-Do bar Task list with your other tasks.
Isn’t that easy? If only the tasks themselves were that easy to do. Maybe in the next version of Outlook, the tasks will get easier, too.

Of course, all you have is the name of the task — no due dates, reminders, or any of the cool stuff that really helps you get things done.
In previous versions of Outlook, you had the option to shrink the To-Do bar to a ribbon either across the bottom of the screen or vertically down the right side of the screen. Microsoft has removed that option in Outlook 2013, so you’ll have to live with the To-Do bar displayed, or hidden. Make your choice and, as Mom used to say, like it!
Hide the To-Do bar
Although the To-Do bar is handy, it takes up quite a bit of space on the screen, which is a nuisance when you’re reading e-mail or checking your calendar. You can clear the To-Do bar out of the way by clicking the To-Do Bar icon on the View tab of the Ribbon and choosing Off from the drop-down list. This hides the To-Do bar, which you can always make appear again just by clicking on the To-Do Bar icon and choosing Calendar, People, or Tasks.
When you hide the To-Do bar, you don't delete any information. All you're doing is getting the To-Do bar out of the way so you can see more of your other information on the screen.


