To forward a message, follow these steps:
1. In the Mail module, click the title of the message you want to forward.
The message you selected appears in the Reading pane. You can forward the message as soon as you read it.
2. Click the Forward button.The Forward screen opens, replacing the Reading pane. The subject of the original message is now the subject of the new message, except the letters FW: (for Forward) are inserted at the beginning.
3. Click the To text box and type the email address of the person to whom you’re forwarding the message.If the person to whom you’re forwarding the message is already in your Address Book, just start typing the person’s name, and Outlook figures out the email address for you.
4. Click the Cc text box and type the email addresses of the people to whom you also want to forward a copy of your message.Many people forward trivia (such as jokes of the day) to their friends by email. Most recipients are included as Cc addresses.
Remember, business email etiquette is different from home email etiquette. Many employers have strict policies about appropriate use of their corporate email systems. If you work for such a company, be aware of your company’s policies.
If you want to pester your friends by sending silly trivia from your home computer to their home computers, that’s your own business.
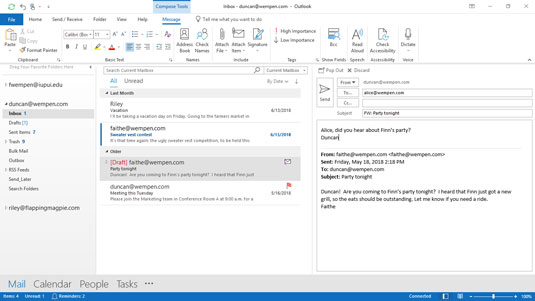
5. In the text box, type any comments you want to add to the message.The text of the original message appears in the text box. You can preface the message that you’re forwarding if you want to give that person a bit of explanation; for example: “This is the 99th message I’ve had from this person. Somebody needs to get a life.” The figure shows the message ready to send.
6. Click the Send button.Your message is on its way.

The Forward screen is nearly identical to the Reply screen except the recipient isn’t filled in automatically (it’s been manually entered in this figure).


