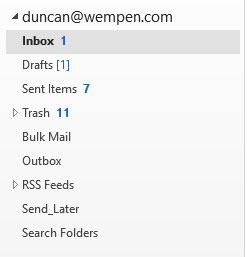
 Numbers next to your Inbox icon tell you how many unread messages you have.
To open and read an email message, follow these steps:
1. In the Mail module, double-click the title of the message you want to read.
The message opens in its own window.
Opening the message by double-clicking it is optional because you can read it perfectly well in the Reading pane, so an alternative to this step would be to simply click the desired message to select it in the Inbox message list.
2. Click the Close tab (X) or press Esc to close the message when you’re done.How to preview Outlook message text
When you start getting lots of email, some of it will be important, but some of it will be relatively unimportant — if not downright useless. When you first see the mail in your Inbox, it’s helpful to know which messages are important and which are not so you can focus on the important stuff. You can’t count on the people who send you email to say “Don’t read this; it’s unimportant” (although a Low importance rating is a good clue). Outlook tries to help by letting you peek at the first few lines of a message.By default, Message Preview is turned on and set to 1 line, as you’ve seen in the figures that show the Mail module so far in this book. You can change that to 2 lines, 3 lines, or Off. Message Preview is redundant if you have the Reading pane turned on, but if you don’t, you might find the preview helpful.
To control the previews of your unread messages, follow these steps:
- In the Mail module, select the View tab on the Ribbon.
- Click the Message Preview button. A menu appears.
- Click the desired setting (1 line, 2 lines, 3 lines, or Off).
- If prompted to change the settings in All Mailboxes or This Folder, choose whichever is your preference. This figure shows the Inbox with the Reading pane turned off (View, Reading pane, Off) and Message Preview set to 3 lines.
 You can see a preview of your unread messages after enabling Message Preview.
Every module in Outlook has a collection of views you can use to make your information easier to use. The Message Preview is a good way to browse your incoming email if you don’t use the Reading pane.
An even better way to zoom through your Inbox is to use the Reading pane — an area of the Outlook screen that displays the contents of any message you select. It’s on by default, and positioned to the right of the message list. You can turn it off, or you can position it below the message list.
To set up your Reading pane, follow these steps:- In the Mail module, select the View tab on the Ribbon.
- Click the Reading pane button.
- Choose Right, Bottom, or Off.
You can’t go wrong with any of the three choices; if you don’t like one, change to another. When you turn on the Reading pane, you can skim through your messages by pressing either the ↑ or ↓ key.
How to send a reply from Outlook 2019
The thing I love about email is that sending a reply is so easy. You don’t even need to know the person’s address when you’re sending a reply; just click the Reply button and Outlook takes care of it for you.To reply to a message, follow these steps:
1. In the Mail module, click the title of the message to which you want to reply.
The message you clicked appears in the Reading pane, and you can see the contents of the message. I’m assuming here that the Reading pane is enabled; if it’s not, enable it as described in the preceding section.
2. Choose one of these options:- To reply to the people in the From field, click the Reply button.
- To reply to the people in the Cc field and the From field, click the Reply All button.
A Reply screen opens in the Reading pane area, where the original message was just seconds ago.
You may receive (or send) email that’s addressed to a whole bunch of people all at one time. Ideally, at least one person should be named in the To field; more than one person can also be in the Cc field, which is for people to whom you’re sending only a copy. Little difference exists between what happens to mail that’s going to people in the To field and mail that’s going to the people in the Cc field — all of them can reply to, forward, or ignore the message. You don’t always need to reply to the people in the Cc field or you may want to reply to only some of them. If you do, click the Reply button and add them again to the Cc field. Or you could click the Reply All button and delete the users from the Cc field you don’t want to include.
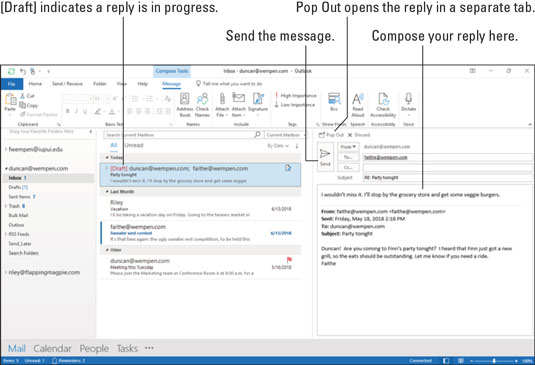
If you want to compose the reply in its own window, click Pop Out. That gives you a little more room to see what you are doing in the Message box.
3. Type your reply in the Message box.Don’t be alarmed when you discover some text already in the Message box — it’s part of the message to which you’re replying. Your blinking cursor is at the top of the screen, so anything you type precedes the other person’s message. (This arrangement means the person who gets your message can review the original message as a memory-jogger when he or she receives your reply.) The figure shows a reply ready to send.
 The Reply screen.
4. Click the Send button.
Your message is sent, the Message form disappears, and the message you replied to reappears.
5. Press Esc to close the Message screen.The message you replied to disappears and your Inbox reappears.
How to resend messages in Outlook
One of the great things about email is the way it makes it so easy to ask people to do what you want. Unfortunately, people often overlook things because they get so much email. When you find yourself making repeated requests, it’s time to take advantage of Outlook’s Resend feature. That way, you don’t have to completely retype your original request; you can simply find the original message and resend it, along with a cheerful reminder about how long ago you sent the original request.To resend a message, follow these steps:
- In the Mail module, click the Sent Items folder in the Folder pane.
- Find the message in which you made the original request and double-click it. That opens the original message on its own window. This is required; unfortunately, resending a message isn’t something you can do from the Reading pane.
- Click the Actions button on the Message tab and then choose Resend This Message. That automatically opens a new copy of your previous message.
- Type a quick reminder, or change the message if appropriate.
- Click the Send button. If you do this enough times, it becomes impossible for people to ignore you.


