Most animations in PowerPoint 2013 are initiated by mouse clicks. However, you can set up several animations to activate automatically — in sequence or all at the same time. To do so, you must use PowerPoint’s Animation Timing features.
The first trick to controlling animation timing is to get the effects listed in the custom animation list in the correct order. Effects are added to the list in the order you create them. If you plan carefully, you might be able to create the effects in the same order that you want to animate them. More likely, you’ll need to change the order of the effects.
Fortunately, you can do that easily enough by dragging the effects up or down in the Custom Animation task pane.
After you get the effects in the right order, choose an option from the Start drop-down list that’s near the top of the Custom Animation task pane to set the Start setting for each effect. This setting has three options:
Start On Click: Starts the effect when you click the mouse or press Enter
Start With Previous: Starts the effect when the effect immediately above it starts
Use this option to animate two or more objects simultaneously.
Start After Previous: Starts the effect as soon as the preceding effect finishes
Starting with the first effect in the list, click each effect to select it and then choose the Start setting for the effect. If all the effects except the first are set to With Previous or After Previous, the entire slide’s animations run automatically after you start the first effect by clicking the mouse.
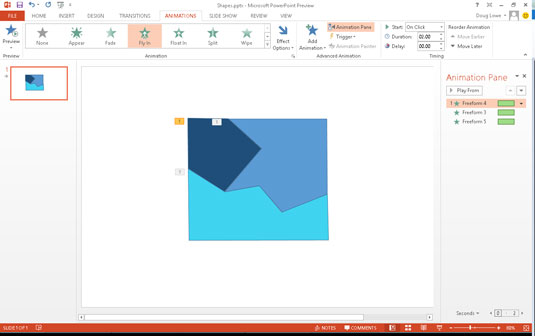
For example, the figure shows a slide with three polygons drawn to resemble pieces of a puzzle. You can animate this puzzle so that the three pieces come together at the same time.

Follow these steps to set up an animated puzzle like the one shown:
Add a Fly In entrance effect for the top-left piece with the following settings:
Start: On Click
Direction: From Top-Left
Duration: 2 Seconds
Add a Fly In entrance effect for the top-right piece with the following settings:
Start: With Previous
Direction: From Top-Right
Duration: 2 Seconds
Add a Fly In entrance effect for the bottom piece with the following settings:
Start: With Previous
Direction: From Bottom
Duration: 2 Seconds
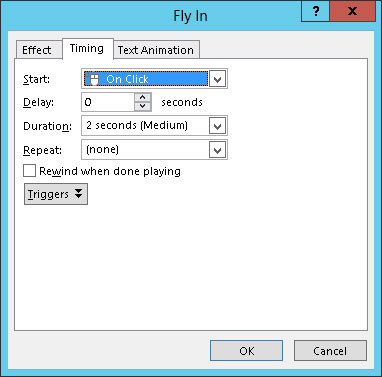
For even more control over an effect’s timings, click the down arrow to the right of the effect and then choose Timing.

Here’s the lowdown on the timing settings:
Start: This is the same as the Start setting in the Custom Animation task pane.
Delay: This lets you delay the start of the animation by a specified number of seconds.
Duration: This is the same as the Speed setting in the Custom Animation task pane.
Repeat: This lets you repeat the effect so that the object is animated several times in succession.
Rewind When Done Playing: Certain effects leave the object in a different condition than the object was when you started. For example, the object might change color or size or move to a new position on the slide. If you select the Rewind When Done Playing option, the object is restored to its original condition when the animation finishes.


