To help you create well-ordered slides, PowerPoint 2013 lets you display a grid of evenly spaced lines over the slide. These grids aren’t actually a part of the slide, so your audience won’t see them when you give your presentation. They exist simply to make the task of lining things up a bit easier.
In addition to the grid, PowerPoint also lets you use guides. The guides are two lines — one horizontal, the other vertical — that appear onscreen. Although the gridlines are fixed in their location on your slides, you can move the guides around as you want.
Any object that comes within a pixel’s breadth of one of these guidelines snaps to it. Like the grid, the guides don’t show up when you give your presentation. They appear only when you’re editing your slides. Guides are a great way to line up objects in a neat row.
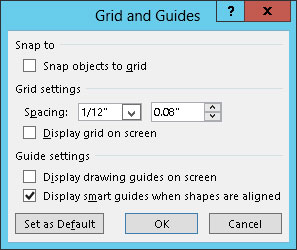
To display the grid or guides, click the dialog box launcher in the bottom-right corner of the Show section of the View tab on the Ribbon. This click summons the Grid and Guides dialog box.

To activate the grid, select the Snap Objects to Grid check box and then adjust the grid spacing to whatever setting you want. If you want to actually see the grid onscreen, select the Display Grid on Screen check box.
To fire up the guides, select the Display Drawing Guides on Screen check box. After the guides are visible, you can move them around the slide by clicking and dragging them.
You can also uncheck Display Smart Guides When Shapes Are Aligned to disable the guidelines that appear when you move shapes into alignment with each other. This is a useful feature, however.


