Microsoft Project 2019's Ribbon and Ribbon tabs
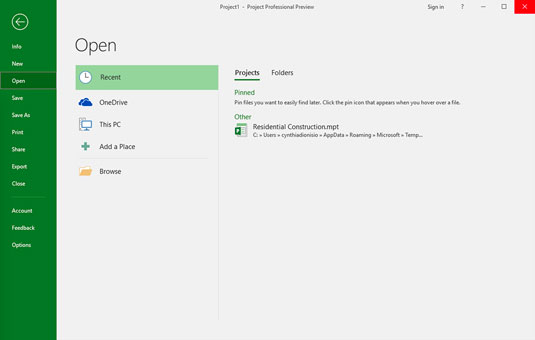
Each of the Ribbon tabs in Project shows different options on the Ribbon. Each Ribbon tab has a different group of controls or functions. You can navigate from one tab to another by clicking on the tab name.The first tab on the left is the File Ribbon tab. After you click this tab, you see the Navigation plan down the left side, as shown here.
 The File Ribbon tab menu.
The Ribbon tab puts you into Backstage view, where you find choices for working with files and changing options. For example, you can create a new project, open an existing project, save your current project, or print your current project. From Backstage view, you can also share, export, or close your current project. If you’re feeling adventurous, you can click Options and customize the Ribbon and the Quick Access toolbar.
The Task Ribbon tab is where you spend a lot of your time in Project. As you can see here, on the far left side of the Task Ribbon tab is the View. The default view is Gantt Chart view. It shows the task information and the chart that displays a bar chart representing the duration of each task.
 The Task Ribbon tab.
In addition to Gantt Chart, you can choose these views:
| Calendar | Network Diagram |
| Resource Sheet | Resource Usage |
| Resource Form | Resource Graph |
| Task Usage | Task Form |
| Task Sheet | Team Planner |
| Timeline | Tracking Gantt |
The Resource Ribbon tab, shown here, helps you organize resources, such as assigning and leveling resources across tasks. In Project, resources include people, equipment, material, locations, and supplies. You can assign costs and calendars to resources.
 The Resource Ribbon tab.
The Report Ribbon tab, shown here, is where you can create reports on resources, costs, or progress, or put them all together in a dashboard report. You can create a report that compares your current status to previous versions of your project.
 The Report Ribbon tab.
On the Project Ribbon tab, shown here, you find commands to help you manage your project as a whole, rather than by task or resource. For example, you can enter or change the project start and finish dates and the baseline. If you need to change working time or add a subproject, this is the place to do it.The View Ribbon tab, shown here, lets you see some standard views. Examples are Task views, such as Gantt Chart, and Resource views, such as Resource Usage or Team Planner. You can use the View Ribbon tab to look at information sorted by date or a specific period. This tab also lets you see the entire project, show or hide the Timeline, and set the timescale you see.
 The View Ribbon tab.
The Format Ribbon tab, shown here, has commands that help you present your schedule, such as text styles, Gantt chart styles, and column settings.

You can either show or hide the Ribbon to produce more real estate on your screen. The pushpin to the far right of the Ribbon pins it to your display, keeping it open and visible (as shown here). The upward-facing arrow (^) on the far-right side hides the Ribbon. If your Ribbon is closed, click on any tab, look in the lower-right corner of the Ribbon and you will see a pushpin. Click on the pushpin to keep your Ribbon open. You can also press Ctrl+F1 to show or hide the Ribbon.
 Keeping your Ribbon visible.
How to display tools like the Microsoft Project Timeline in Microsoft Project 2019
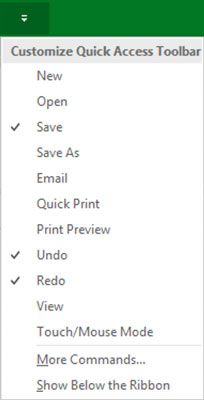
The Quick Access toolbar, which appears onscreen at all times, initially contains the Save, Undo, and Redo buttons. You can customize the Quick Access toolbar by clicking the down arrow at the right end of the toolbar and clicking the option you want to hide or display.If you don’t see the option you want, click More Commands near the bottom of the menu to display the Quick Access Toolbar category in the Project Options dialog box. This shows you a full list of commands you can add. This figure shows the list of commands you can choose from.
 Customizing the Quick Access toolbar.
The nifty Timeline tool shows the entire scaled time span of the project. To show the Timeline, go to the View Ribbon tab, in the Split View group and click the check box that says Timeline. You can add tasks or milestones to the Timeline. You can also copy the Timeline and paste it into reports or other presentations. To hide the Timeline, uncheck the Timeline box. You can also work with the Timeline by right-clicking to insert tasks, copy the Timeline, change the font, or view detailed information. This figure shows the Timeline with summary tasks and milestones.
 The Timeline.
The status bar, shown here, sits at the bottom of the project, to indicate whether your tasks are manually or automatically scheduled. The status bar also lets you move quickly to some of the most popular views, such as Gantt, Task Usage, Team Planner, Resource Sheet, and Reports. You can also adjust the time scale from a high-level, time scaled view to a detailed time-scaled view with the View slider, on the far-right end of the status bar.


