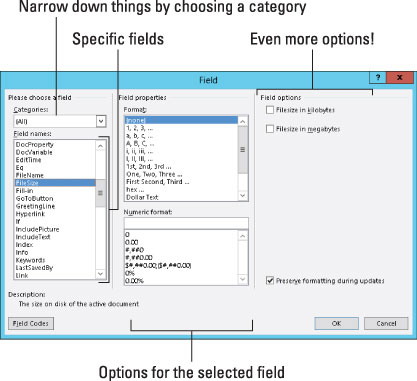
The phrase “carved in stone” refers to text that doesn’t change. But, with fields, what you write in Word 2013 isn’t carved in stone. To liven things up a bit, Word has a way to let you add dynamic (changing) elements to your document. Unlike the text you normally compose, dynamic text changes to reflect a number of factors. These dynamic elements are added to a document by using fields.
Understand fields
To take advantage of fields, you use the Field dialog box. To summon this dialog box, click the Insert tab, and then choose Explore Quick Parts→Field. The Explore Quick Parts button is found in the Text group.

The left side of the Field dialog box contains scrolling lists of categories in the Field Names list. These categories represent various dynamic scraps of text you can insert into your document. When you choose a category, the right side of the dialog box changes to show more detailed options.
After you click the OK button, the field is inserted into your document. It looks like regular text, but it’s not: The field reflects some changing aspect of the document or other conditions, like the date and time.
Many other commands in Word insert fields into a document, such as the Page Number commands. The Field dialog box, however, lists them all.
Your best clue that you have a field and not text comes when you try to delete a field.
How to update a field
Just because a field contains dynamic text doesn’t mean that the field is always accurate. Occasionally, fields need updating. It happens in two ways: First, you can update a field by closing your document and opening it again; second, you can manually update a field.
To ensure that a field displays up-to-date information, right-click it and choose the Update Field command. The field’s text is refreshed.
If you’re unsure which text in your document is a field, click the mouse on that text. Fields are highlighted in Word with a dark gray background.
How to change a field
You cannot edit text in a field, which kind of ruins the point of the field. Instead, you can adjust the field’s contents: Right-click the field and choose Edit Field from the pop-up menu. The Field dialog box is redisplayed, allowing you to make whatever modifications you deem necessary.
Just as those mutants at the end of Beneath the Planet of the Apes removed their human masks, you can remove a field's mask by right-clicking it and choosing the Toggle Field Codes command. For example, the FileSize field looks like this:
<b>{</b> FILESIZE * MERGEFORMAT <b>}</b>
To restore the field to human-readable form, right-click it again and choose the Toggle Field Codes command. All praise be to the bomb.
How to delete fields
Removing a field works almost like deleting text. The main difference is that you have to press the Delete or Backspace key twice. For example, when you press Backspace to erase a field, the entire field becomes highlighted. It’s your clue that you're about to erase a field, not regular text. Press Backspace again to erase the field (and its text).
Field content controls
Word’s fields aren’t the only gizmos you can stick into a document that contains dynamic text. Another gizmo is the content control. It’s not really a field, though it can be inserted as though it’s a field and then updated. The primary difference is how a content control looks, which is something like this:
Content controls are usually inserted by Word commands, such as those that automatically create headers or footers or insert page numbers. You can also choose the Quick Parts→Document Property command to insert a property control. The Equation menu, found in the Insert tab’s Symbols group, also inserts content controls.
You can edit a content control's contents, if you like, and some controls are designed that way. But editing the text in other controls changes the thing to plain text, so be careful.
Time-sensitive content controls can be updated by pressing the F9 key.
Some Date content controls have a pick-the-date button, displaying a tiny calendar from which you can set the property's date.
How to put various fields in a document
Of all the zillions of fields you can insert and use in Word, you might use only a smattering. It assumes that the Field dialog box is open and ready for business as you start working the steps.
Page numbers
My favorite fields are page number fields. To ensure that the document accurately reflects the current page number, insert a current page number field:
In the Field dialog box, select Numbering from the Categories drop-down list.
Select Page from the Field Names list.
In the Field Properties section of the Field dialog box, select a format for the page number.
Click OK.
The current page number dynamically appears in your document. Of course, the page number can also land in a header or footer or anywhere else.
Total number of pages
To insert the total number of pages in your document, heed these directions:
Select Document Information from the Categories drop-down list.
Select NumPages from the Field Names list.
Select a format.
Click OK.
Word count
Getting paid by the word? Stick an automatic word count at the end of your document:
From the Categories list, select Document Information.
Select NumWords from the Field Names list.
Click OK.
Document filename
Many organizations place the document’s filename into a document header or footer. Rather than guess, why not use a field that contains the document’s exact name? Do this:
From the Categories list, select Document Information.
Select FileName from the Field Names list.
In the field properties, choose the format (text case).
Optionally, put a check mark by the option Add Path to Filename.
Click OK.
The FileName field is updated even when you change the filename; the field always reflects the file’s name. It’s an advantage of using fields over typing static text.


