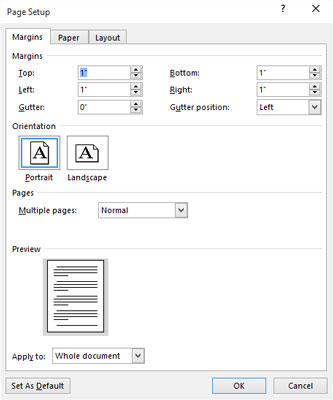
When you want more control over page formatting in Word 2016, you must beckon forth the Page Setup dialog box. Specifically, you use the Margins tab in that dialog box, which is shown in the figure.

To use the Page Setup dialog box to specifically set page margins, obey these steps:
Click the Layout tab.
Click the dialog box launcher in the lower-right corner of the Page Setup group.
The Page Setup dialog box appears, Margins tab forward.
Type the margin offsets in the Top, Bottom, Left, and Right boxes.
Or you can use the spinner gizmo to set the values.
Use the Preview to check the margins as they relate to page size.
Ensure that Whole Document is chosen from the Apply To menu button.
You can reset margins for only a section or selected text if you instead choose those options from the menu.
Click the OK button to confirm your new settings and close the Page Setup dialog box.
The Gutter settings help set margins when you need extra space on one edge of the page for binding. For example, if you plan on using a 3-hole punch on the left side of a page, choose Left from the Gutter Position menu. Then increase the Gutter margin to accommodate for the three holes in the page without affecting the left margin setting.
The keyboard shortcut to summon the Page Setup dialog box is Alt+P, S, P.
The Page Setup dialog box sports three tabs: Margins, for setting margins, Paper, for selecting the page size, and Layout, for dealing with other page-formatting issues.


