Though Word 2012 isn’t quite as flexible with toolbars, it still allows you to control a few specific parts of the Quick Access Bar. Back in the old days, you could really mess with the way the Word window looked. You could add or remove toolbars, modify toolbars, create your own toolbars, and generally use the word toolbars over and over again until it lost its meaning.
Discover the Quick Access toolbar
The Quick Access toolbar is a small strip of command buttons dwelling near the document window’s title bar. This territory is yours, free to modify at your whim and according to your needs.

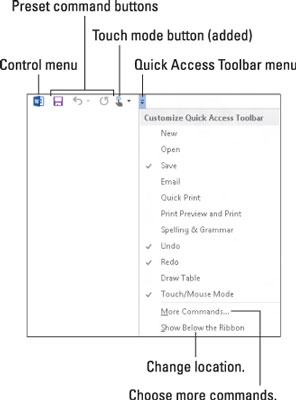
The Quick Access toolbar is preset to dwell above the Ribbon, on the far-left edge of the Word window’s title bar.
You can change the Quick Access toolbar’s location from above the Ribbon to below the Ribbon and back again. To make the move, choose the command Show Below the Ribbon from the toolbar menu. To move the Quick Access toolbar back atop the Ribbon, choose the command Show Above the Ribbon.
Put the Quick Access toolbar below the Ribbon when it contains so many custom buttons that it begins to crowd into the document’s title.
Three command buttons naturally reside on the toolbar: Save, Undo, and Redo. You’re free, however, to remove them.
The item to the left of the Quick Access toolbar is the window control button. It’s a part of most windows, not something unique to the Quick Access toolbar.
The last item on the toolbar is the menu button.
You can customize icons that appear on the Quick Access toolbar. The key is to find a command you use often, or a command that is otherwise tedious to access, and add it. It’s quite easy to do, if you know how to right-click the mouse.
How to add commands to the Quick Access toolbar
To add a command to the Quick Access toolbar, locate its command button anywhere on the Ribbon. Right-click the command and choose Add to Quick Access toolbar from the shortcut menu that pops up.
You can also add a command to the Quick Access toolbar by using its menu: Choose a common command from that menu, such as the Quick Print command, to add it to the toolbar.
Word remembers which commands you add to the toolbar. These same commands will be there the next time you start Word, in every document window.
Some commands place buttons on the toolbar, and others place drop-down menus or text boxes.
How to remove commands from the Quick Access toolbar
To remove a command from the Quick Access toolbar, right-click its command button and choose Remove from Quick Access toolbar.
Likewise, you can choose a command with a check mark from the Customize Quick Access Toolbar menu. Doing so removes that command from the toolbar.
Removing the Undo or Redo commands from the toolbar isn’t recommended, unless you've truly committed the Ctrl+Z and Ctrl+Y keyboard shortcuts to memory.
How to customize the Quick Access toolbar
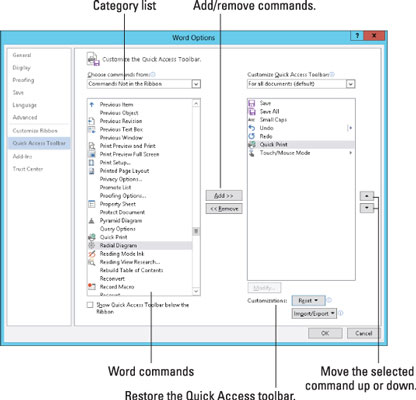
For vast control over the Quick Access toolbar, you summon the Quick Access toolbar portion of the Word Options dialog box. To summon this window, choose More Commands from the Quick Access toolbar’s menu.

The Word Options dialog box lets you not only add any of the bazillion commands to the toolbar (including lots not found on the Ribbon) but also change the toolbar’s button order.
When you're done making changes, click the OK button to close the Word Options dialog box. There, you can view and treasure your new Quick Access toolbar.
Choose the All Commands item from the Choose Commands From menu to view every possible command in Word. Sometimes, a missing command that you think could be elsewhere ends up being available in the All Commands list — for example, the popular Save All command or the Tabs command, which quickly displays the Tabs dialog box.
When your command list grows long, consider organizing it. Use the
item to help group similar commands. The appears as a vertical bar on the Quick Access toolbar. Yes, some commands lack specific graphics on their buttons; they show up as green dots on the toolbar.
My personal Quick Access toolbar contains these commands: Save, Save All, Small Caps, Undo, Redo, Quick Print, and Touch Mode.
To return the Quick Access toolbar to the way Word originally had it, choose Reset→Reset Only Quick Access toolbar from the Word Options window.


