


Like any paragraph style, a border sticks to the paragraph it’s applied to: Add a border to the left of the current paragraph, press Enter, and the next paragraph inherits the same border.
Borders can also be part of a style, applied to text like any other format.

To control the border format, click the Home tab. In the Paragraph group, look for the Borders button. The button reveals the current paragraph’s border style, such as No Border. Click this button to apply the format shown. To choose another border style, and view other options, click the triangle next to the button. The Borders menu is shown here.
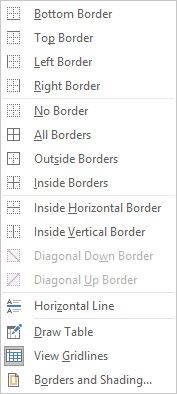 The Borders and Shading menus.
The final item on the Borders menu summons the Borders and Shading dialog box. Use that dialog box to gain more flexibility when formatting paragraph borders.
Putting borders around a paragraph in Word 2019
To apply a border to any or all sides of a paragraph, follow these steps:- Place the insertion pointer in a paragraph.
- Click the Home tab.
- In the Paragraphs group, click the triangle next to the Borders command button. The Borders menu appears.
- Choose a border style from the menu. For example, to place a line atop the paragraph, choose Top Border.
To apply multiple lines, choose both border styles sequentially. For example, to add lines above and below a paragraph, first choose the Top Border command, and then click the Borders command again and choose Bottom Border.
- Horizontal borders stretch between the paragraph’s left and right margins. These margins are different from the page margins.
- A common use of paragraph borders is to set off a document title or heading.
- When multiple paragraphs are selected, the border is applied to all paragraphs as a group. Therefore, a top or bottom border appears on only the first or last paragraph in the selected block.
- If you press Enter to end the paragraph, the border formatting is applied to the following paragraph. For top and bottom borders, the effect is that only the first or last paragraph displays the border line.
Boxing multiple paragraphs

To stick a box around a paragraph, use the Outside Borders command, found on the Borders menu. When multiple paragraphs are selected, the box wraps around the group.

If you desire to box several paragraphs in a row and keep lines between the paragraphs, use the All Borders command instead of Outside Borders. The All Borders icon is shown in the margin.
- More and fancy options for boxing paragraphs can be found in the Borders and Shading dialog box.
- Before you go paragraph-boxing crazy, what you might need in your document instead is a table
Removing borders

To peel away the border format from one or more paragraphs of text, apply the No Border format: Select the paragraph(s), click the Borders button, and then choose No Border.
To remove specific parts of a border, use the Borders and Shading dialog box.


