How to adjust Physical Counts and Inventory Values
Inventory shrinkage, spoilage, and (unfortunately) theft all combine to reduce the inventory that you physically have. To record these inventory reductions, you periodically physically count your inventory and then update your QuickBooks records with the results of your physical counts.To record your physical count information in QuickBooks, you use a special tool. Specifically, you use the Adjust Quantity/Value on Hand command. This command is available to you in two places. If you display the Item list, click the Activities button (which appears at the bottom of the Item List window) and choose the Adjust Quantity/Value on Hand command. You can also choose the Inventory→Adjust Quantity/Value on Hand command. (The Inventory menu item was added to the 2018 version of QuickBooks, so it’s more convenient than in previous versions.) Choosing either command displays the Adjust Quantity/Value on Hand window.
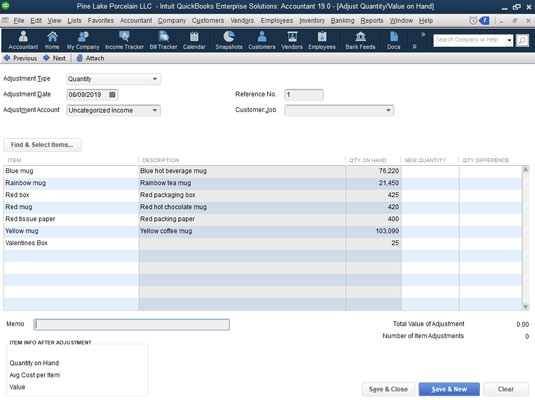 The Adjust Quantity/Value on Hand window.
To use the Adjust Quantity/Value on Hand window, follow these steps:
- Use the Adjustment Type drop-down list to indicate what you’re adjusting. You can adjust the quantity or the value or both the quantity and the value of the items you’re holding in inventory. Just choose the appropriate entry from the Adjustment Type drop-down list: Quantity, Total Value, or Quantity and Total Value.
- Use the Adjustment Date box to record the date of your physical count. In other words, you want to adjust your quantities as of the day you took or completed the physical inventory count.
- Use the Adjustment Account drop-down list to identify the expense account that you want to use to track your inventory shrinkage expense.
- (Optional) Provide a reference number (if you use numbers) to uniquely and meaningfully identify or cross-reference the transaction.
- (Optional) Identify the Customer:Job and class. If it’s appropriate (in many cases, it won’t be), use the Customer:Job drop-down list to identify the customer and job associated with this inventory shrinkage. In a similar fashion, if appropriate, use the Class drop-down list to identify the class that you want to use for tracking this inventory shrinkage.
- Supply the correct inventory quantities.
The Item, Description, and Qty on Hand columns of the Adjust Quantity/Value on Hand window identify the inventory items that you’re holding and the current quantity counts. Use the New Quantity column to provide the correct physical count quantity of the item. After you’ve entered the new quantity, QuickBooks calculates the quantity difference and shows this value in the Qty Difference column.
You can actually enter a value in the New Quantity column or the Qty Difference column. QuickBooks calculates the other quantity by using the current quantity information that you supply. If you enter the new quantity, QuickBooks calculates the quantity difference by subtracting the new quantity from the current quantity. If you enter the quantity difference, QuickBooks calculates the new quantity by adjusting the current quantity for the quantity difference.
- Adjust the value.
If you chose Total Value or Quantity and Total Value from the Adjustment Type drop-down list in Step 1, QuickBooks displays an expanded version of the Adjust Quantity/Value on Hand window. This window lets you enter both the correct physical count quantity and the updated value for the inventory item. You enter the physical count quantity, obviously, in the New Quantity column. You enter the new updated value in the New Value column. You probably use this version of the Adjust Quantity/Value on Hand window only if you’re using a lower-of-cost or market inventory valuation method. Both financial accounting standards and tax accounting rules allow you to mark down your inventory to the lower of its original cost or its fair market value. If you’re doing this, you enter the new inventory value in the New Value column.
Essentially, using the lower-of-cost or market inventory evaluation method just means that you do what it says. You keep your inventory valued at its original cost or, if its value is less than its original cost, at its new value. Obviously, assessing the value of your inventory is a little tricky. But if you have questions, you can ask your CPA for help. One thing to keep in mind, however, is that you can’t go changing your accounting methods willy-nilly without permission from the Internal Revenue Service. And changing your inventory valuation method from cost, say, to lower-of-cost or market is a change in accounting method.
- Provide a memo description. If you want to further describe the quantity or value adjustment, use the Memo box for this purpose. You may want to reference the physical count worksheets, the people performing the physical count, or the documentation that explains the valuation adjustment.
- Save the adjustment. After you’ve used the Adjust Quantity/Value on Hand window to describe the quantity changes or value changes in your inventory, click either the Save & Close button or the Save & New button to save the adjustment transaction. As you probably know at this point in your life, Save & Close saves the transaction and closes the window. Save & New saves the transaction but leaves the window open in case you want to make additional changes.
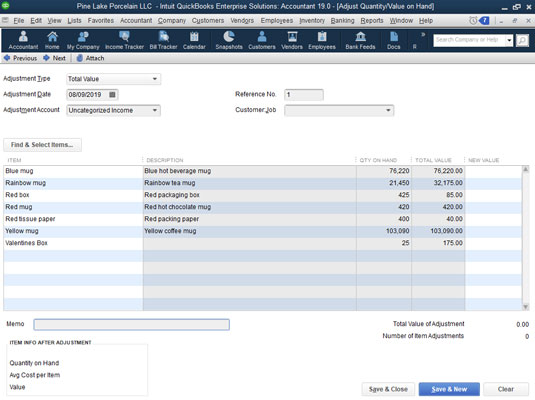 The expanded version of the Adjust Quantity/Value on Hand window.
Adjust Prices and Price Levels in QuickBooks 2019
QuickBooks provides a couple of handy commands and tools that you can use to change the prices that you charge customers for your products and services.How to use the Change Item Prices command
The Change Item Prices command, which appears on the Customers menu, displays the Change Item Prices dialog box, as shown. This dialog box lets you change prices of a bunch of items at one time by an amount or percentage. To use the Change Item Prices dialog box, first select the items whose prices you want to change by clicking the check-mark column. Next, use the Adjust Price of Marked Items by (Amount or %) box to specify the dollar amount or the percentage amount by which you want to change the price. If you want to change the price of selected items by $2, for example, enter $2 in the box. If you want to change the price of selected items by 5 percent, enter 5% in the box. Use the Based On drop-down list to indicate the base to which you want to add the amount of percentage. After you identify the items that you want to reprice and the way that you want to reprice them, click the Adjust button. QuickBooks recalculates the prices and displays this information in the New Price column. If you want to change the prices for the items selected, click OK.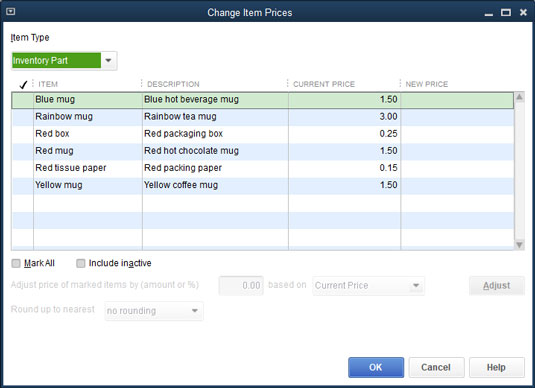 The Change Item Prices dialog box.
If you don’t like the prices listed in the New Price column, you can keep tinkering with the value in the Adjust Price of Marked Items by (Amount or %) box, clicking the Adjust button to refresh the numbers in the New Price column, and clicking OK only when you’re satisfied.
How to use price levels in QuickBooks 2019
Price levels are kind of weird; they let you individually adjust the price of an item up or down. If you’ve agreed to discount items by 10 percent for a certain customer, for example, you can easily do this by using a price level to knock the price down by 10 percent whenever you’re invoicing that customer.To use price levels, you first have to set up the price levels by using the Price Level List command. After you set up your price levels, you adjust prices by using price levels when you create an invoice.
Creating a price level
To create a price level, choose the Lists →Price Level List command. When you do, QuickBooks displays the Price Level List window (not shown). To create a price level, click the Price Level button and then choose Price Level → New. QuickBooks displays the New Price Level dialog box, as shown. Name the price level change by using the Price Level Name box. Select the items to which you want to apply the price level by clicking them. (QuickBooks marks selected items with a check.) Then use the Adjust Price of Marked Items to Be boxes to indicate that this price level increases or decreases the sales price some percentage higher or lower than the standard price. Finally, use the Round Up to Nearest drop-down list to specify whether and how QuickBooks should round off its calculations. The figure, for example, shows a price level change that decreases the sales price by 10 percent. Once you select the items that the price level should affect, click the Adjust button to see the new price for each item in the custom price column.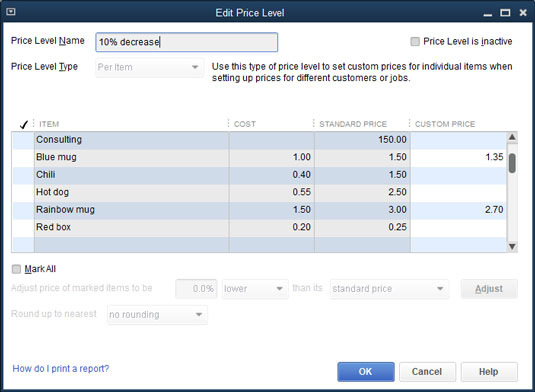 The New Price Level window.
Using a price level
To use a price level, you create an invoice in the usual way. Click the Price Each column for the item that you want to reprice by using the price level. When you do, QuickBooks turns the Price Each column into a drop-down list. If you click the arrow button that opens the drop-down list, QuickBooks displays both the base rate price and any price levels. If you choose a price level, QuickBooks adjusts the price for the price level change. In the figure, selecting the 10 percent price level change bumps the price from $3.00 to $2.70. In other words, the “10% Decrease” price level change decreases the default price by 10 percent, or 30 cents.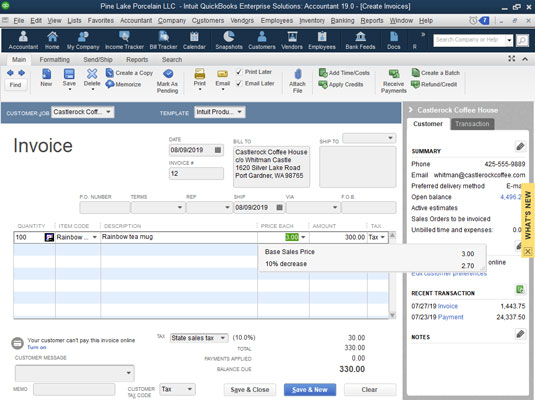 Choosing a price level with the Create Invoices window.
QuickBooks also lets you set a default price level for a customer. When such a default price level is set, QuickBooks automatically uses the appropriate price level when you choose that customer. The Price Level box appears on the Additional Info tabs of the New Customer and Edit Customer windows.
How to enable advanced pricing for QuickBooks Items
One more thing you should know about setting prices. QuickBooks also provides an advanced pricing function, which you turn on by choosing the Edit →Preferences command, selecting the Sales & Customers preference, clicking the Company Preferences tab, and then selecting the Enable Advanced Pricing button.When you enable advanced pricing, you convert any price levels you’ve previously defined (see preceding paragraphs) to price rules that you can tell QuickBooks to apply to items, item types, particular vendors, customers, customer types, and job types.
After you turn on advanced pricing, you can choose the Lists →Price Rule List command to display the Price Rule List window. To convert a price level to a working price rule, double-click the new price rule and then use the Edit Price Rule dialog box (not shown) to describe the rules QuickBooks should use for automatically repricing some item according to your specified rules. This feature is Enterprise-only.


