In the following steps, I describe how to create the most complicated and involved invoice around: a product invoice. Some fields in the product invoice don’t appear in the service or professional invoice, but don’t worry about whether your business is service or professional. Creating a service or professional invoice works basically the same way as creating a product invoice; you just fill in fewer fields. And keep in mind that you start with Steps 1 and 2 no matter what type of invoice you create. Without further ado, here’s how to create an invoice:
1. Display the Create Invoices window by choosing Customers→Create Invoices.The Create Invoices window appears, as shown.
2. Choose the template or invoice form that you want to use from the Template drop-down menu.QuickBooks comes with predefined invoice form types, including Product, Professional, Service, and (depending on how you set up QuickBooks and which version of QuickBooks you’re using) a handful of other specialized invoice templates. Which one appears by default depends on what you told QuickBooks about your business during QuickBooks Setup. You can also create your own custom invoice template (or modify an existing one).
3. Identify the customer and, if necessary, the job by using the Customer: Job drop-down menu.Scroll through the Customer: Job drop-down menu until you see the customer or job name that you need; then click it.
4. (Optional) Assign a class to the invoice.If you use classes to track expenses and income, activate the Class drop-down menu and choose an appropriate class for the invoice. To turn this handy way of categorizing transactions on or off (which is overkill for some businesses), choose Edit→Preferences, click Accounting on the left side, click the Company Preferences tab, and then select or clear the Use Class Tracking check box. (The figure doesn’t show the Class menu.)
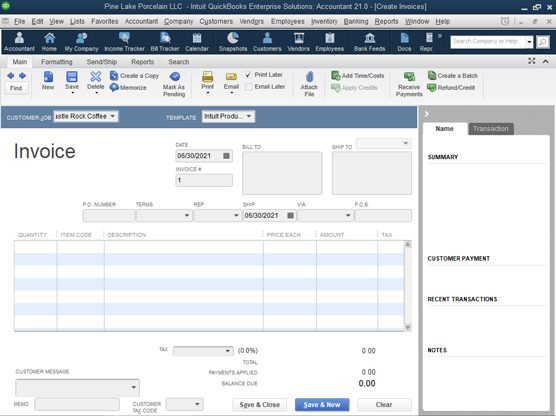 The Create Invoices window
5. Give the invoice date.
Press Tab several times to move the cursor to the Date text box. Then enter the correct date in MM/DD/YYYY format. You also can use the following secret codes to change the date:
-
- Press + (the plus symbol) to move the date ahead one day.
- Press – (the minus symbol) to move the date back one day.
- Press T to change the date to today’s date (as specified by the system time that your computer’s internal clock provides).
- Press M to change the date to the first day of the month (because M is the first letter in the word month).
- Press H to change the date to the last day of the month (because H is the last letter in the word month).
- Press Y to change the date to the first day of the year (because, as you no doubt can guess, Y is the first letter in the word year).
- Press R to change the date to the last day of the year (because R is the last letter in the word year).
You can also click the button at the right end of the Date field to display a small calendar. To select a date from the calendar, just click the date you want. Click the arrows in the top-left and top-right corners of the calendar to display the previous or next month.
6. (Optional) Enter an invoice number in the Invoice # text box.QuickBooks suggests an invoice number by adding 1 to the last invoice number that you used. You can accept this addition or, if you need to have it your way, tab to the Invoice # text box and change the number to whatever you want.
7. Fix the Bill To address, if necessary.QuickBooks grabs the billing address from the Customer list. You can change the address for the invoice by replacing some portion of the usual billing address. You can, for example, insert another line that says Attention: William Bobbins, if that’s the name of the person to whom the invoice should go.
8. Fix the Ship To address, if necessary.I feel like a broken record, but here’s the deal: QuickBooks also grabs the shipping address from the Customer list. So, if the shipping address has something unusual about it for just this one invoice, you can change the address by replacing or adding information in the Ship To address block. Note that QuickBooks will keep track of each of the shipping addresses you use for a customer, so if you used a shipping address before, you may be able to choose it from the Ship To drop-down menu.
9. (Optional . . . sort of) Provide the purchase order number in the P.O. Number text box.If the customer issues purchase orders (POs), enter the number of the purchase order that authorizes this purchase. (Just for the record, PO is pronounced pee-oh, not poh or poo.)
10. Specify the payment terms by choosing an option from the Terms drop-down menu.11. (Optional) Name the sales representative.
Rep doesn’t stand for reputation, so don’t put three-letter editorial comments here (although I’d love to see what you can do with three letters). If you want to track sales by sales representative, use the Rep drop-down menu. Simply activate the menu by clicking its arrow and then choose a name. Sales representatives can include employees, but they can also include other people whom you’ve entered in your other lists. To add a sales rep quickly, choose Add New and then use the handy-dandy dialog boxes that QuickBooks displays. To work with the Sales Rep list, choose Lists→Customer & Vendor Profile Lists→Sales Rep List.
12. Specify the shipping date, if it’s something other than the invoice date.To specify the date, simply move the cursor to the Ship text box and then type the date in MM/DD/YYYY format. You can move the cursor by pressing Tab or by clicking the text box.
One other quick point: Remember all those secret codes that I talk about in step 5 for changing the invoice date? They also work for changing the shipping date.
13. Specify the shipping method.You can probably guess how you specify the shipping method, but parallel structure and a compulsive personality force me to continue. So, to specify the shipping method, move the cursor to the Via drop-down menu and then choose a shipping method from it.
By the way, you can add new shipping methods to the menu by choosing Add New and then filling out the cute little dialog box that QuickBooks displays. Setting up new shipping methods is really, really easy.
14. Specify the FOB point by using the F.O.B. text box.FOB stands for free on board. The FOB point is more important than it first seems — at least in a business sense — because the FOB point determines when the transfer of ownership occurs, who pays freight, and who bears the risks of damage to the goods during shipping.
If a shipment is free on board at the shipping point, the ownership of the goods being sold transfers to the purchaser as soon as the goods leave the seller’s shipping dock. (Remember that you’re the seller.) In this case, the purchaser pays the freight and bears the risk of shipping damage. You can specify the FOB shipping point as FOB Shipping Point or as the name of the city. If the shipping point is Seattle, for example, FOB Seattle is the same thing as FOB Shipping Point. Most goods are shipped as FOB Shipping Point, by the way.
If a shipment is free on board at the destination point, the ownership of the goods that are being sold transfers to the purchaser as soon as the goods arrive on the purchaser’s shipping dock. The seller pays the freight and bears the risk of shipping damage. You can specify the FOB destination point as FOB Destination Point or as the name of the city. If the destination point is Omaha, for example, FOB Omaha is the same thing as FOB Destination Point.
15. Enter each item you’re selling.Move the cursor to the first row of the Quantity/Item Code/Description/Price Each/Amount/Tax list box. (Okay, I know that isn’t a very good name for it, but you know what I mean, right?) You need to start filling in the line items that go in the invoice. After you move the cursor to a row in the list box, QuickBooks turns the Item Code field into a drop-down menu. Activate the Item Code drop-down menu of the first empty row in the list box and then choose the item.
When you select the item, QuickBooks fills in the Description and Price Each text boxes with whatever sales description and sales price you’ve entered in the Item list. (You can edit the information for this particular invoice if you need to.) Enter the number of items sold in the Quantity text box. (After you enter this number, QuickBooks calculates the amount by multiplying Quantity by Price Each.) If you need other items in the invoice, use the remaining empty rows of the list box to enter each one. If you selected the Taxable check box when you added the item to the Item list, the word Tax appears in the Tax column to indicate that the item will be taxed. If the item is nontaxable (or you feel like being a tax evader for no good reason), click the Tax column and choose Non.
You can put as many items in an invoice as you want. If you don’t have enough room on a single page, QuickBooks adds as many pages as necessary to the invoice. Information about the invoice total, of course, goes only on the last page.
Click the Add Time/Costs button on the ribbon at the top of the form to display the Choose Billable Time and Costs dialog box. Use this dialog box to select costs that you’ve assigned to the customer or job. Use the Items tab to select items purchased for the job. Use the Expenses tab to select reimbursable expenses and enter markup information. Use the Time tab to select billable time recorded by the Timer program, the Weekly Timesheet, or the Time/Enter Single Activity window.
16. Enter any special items that the invoice should include.If you haven’t worked much with the QuickBooks item file, you have no idea what I’m talking about.
To describe any of the special items, activate the Item Code drop-down menu of the next empty row and then choose the special item. After QuickBooks fills in the Description and Price Each text boxes, edit this information (if necessary). Describe each of the other special items — subtotals, discounts, freight, and so on — that you’re itemizing in the invoice by filling in the empty rows in the list box.
If you want to include a Discount item and have it apply to multiple items, you need to stick a Subtotal item in the invoice after the inventory or other items that you want to discount. Then stick a Discount item directly after the Subtotal item. QuickBooks calculates the discount as a percentage of the subtotal.
17. (Optional) Add a customer message.Click the Customer Message box, activate its drop-down menu, and choose a clever customer message. To add customer messages to the Customer Message menu, choose the Add New option and then fill in the dialog box that QuickBooks displays. Click OK when you’re done.
18. Specify the sales tax.If you specified a tax rate in the Customer list, QuickBooks uses it as a default. If it isn’t correct, move the cursor to the Tax list box, activate the drop-down menu, and choose the correct sales tax.
19. (Truly optional) Add a memo.You can add a memo description to the invoice if you want to. This memo doesn’t print in invoices — only in the Customer Statement. Memo descriptions give you a way of storing information related to an invoice with that invoice. The figure shows a completed Create Invoices window.
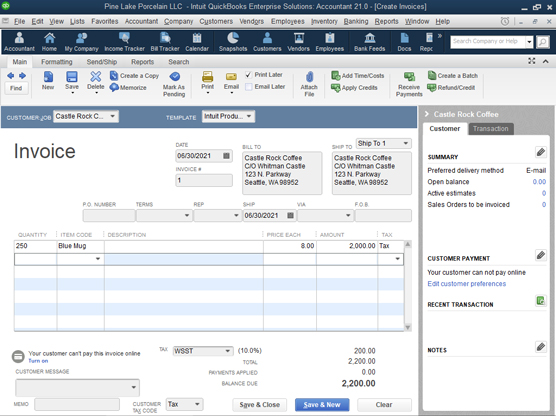 A completed Create Invoices window
20. If you want to delay printing this invoice, select the Print Later check box that appears on the ribbon of buttons and boxes above the main part of the Create Invoices window.
21. Save the invoice by clicking the Save & New button or the Save & Close button at the bottom of the window.
QuickBooks saves the invoice that’s onscreen. If you click Save & New, QuickBooks displays an empty Create Invoices window so that you can create another invoice.
You can page back and forth through invoices that you created earlier by clicking the Next and Previous buttons (which look like left and right arrows).
The History panel that appears along the right edge of the Create Invoices window provides two tabs that are useful when you’re creating invoices. The Customer tab (shown in the preceding figure) provides high-level summary information about the customer. The Transaction tab (not shown) provides more detailed information about the customer’s activity and buttons you can click to drill down into the details.
When you’re done creating invoices, you can click the invoice form’s Save & Close button or press the Esc key.