Fortunately, the steps for creating new accounts are quite straightforward. To set up a new account within your Chart of Accounts list, follow these steps:
Choose the Lists→Chart of Accounts command.

QuickBooks displays the Chart of Accounts window.
Click the Account button at the bottom of the window.
QuickBooks displays the Account menu. One of the Account menu options is New, which is the command that you use to add a new account.
Add a new account by choosing Account → New.

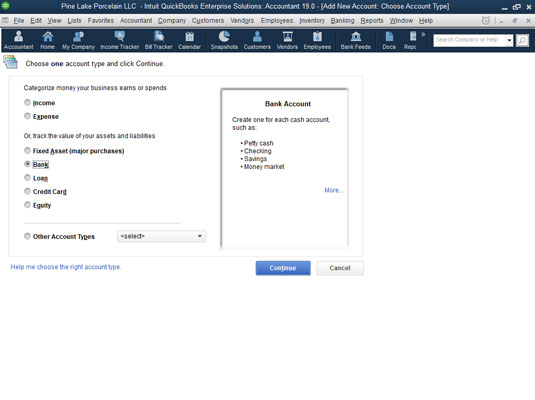
QuickBooks displays the first Add New Account window.
Use the account-type buttons to identify the type of account that you’re adding.
QuickBooks supplies the following account types: Income, Expense, Fixed Asset, Bank, Loan, Credit Card, and Equity, as well as (if you select Other Account Types and open the Other Accounts Types drop-down list) Accounts Receivable, Other Current Asset, Other Asset, Accounts Payable, Other Current Liability, Long Term Liability, Cost of Goods Sold, Other Income, and Other Expense. If you have a question about which account type your new account fits into, you should review how financial statements work.
These account groups essentially tell QuickBooks the area of a financial statement account in which data gets reported. Note, too, that the first Add New Account window shows examples of the selected account type in the box above the Continue and Cancel command buttons.
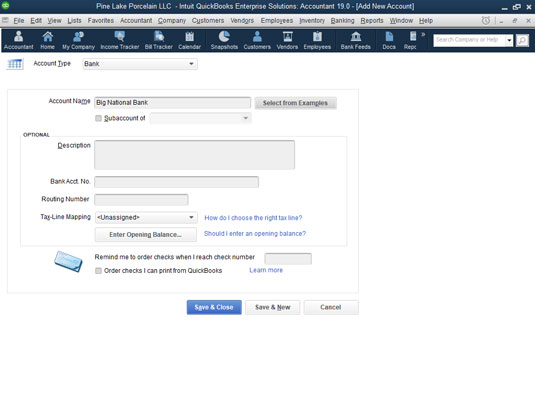
Click Continue. Use the Account Name box to give your new account a unique name.

QuickBooks displays the second Add New Account window.
The name that you give the account will appear on your financial statements.
If the account you’re adding is a subaccount of a parent account, identify the parent account by selecting the Subaccount Of check box.
After you select the Subaccount Of check box, name the parent account by using the Subaccount Of drop-down list.
(Optional) If you’re setting a bank account that uses a currency other than your home-country currency, choose the bank account currency from the Currency drop-down list.
If you told QuickBooks that you work in multiple currencies (you would have done this during the QuickBooks EasyStep Interview setup process), QuickBooks wants you to identify those bank accounts, customers, and vendors that use a currency different from your home currency.
To turn on the multiple-currency feature, choose the Edit →references command, select the Multiple Currencies preferences settings, click the Company Preferences tab, and then select the Yes I Use More Than One Currency radio button.
(Optional) Provide a description for the new account.
You don’t need to provide a description. Without a description, QuickBooks can still use the account name in financial statements. If you want a more-descriptive label placed in accounting reports, however, use the Description box for this purpose.
Provide other account information.
The credit card account type version of the Add New Account window lets you store the card number, for example. If you do have another box or two in which to store account information, use that space, if necessary, to collect the bits and pieces of data that you want to save.
Identify the tax line on which the account information is to be reported by choosing a tax form and tax line from the Tax-Line Mapping drop-down list.
You may not need to assign a particular account to a tax line if that account data isn’t reported on the business’s tax return. Cash account balances aren’t reported on a sole proprietor’s tax return, for example, so a bank account for a sole proprietor doesn’t have any required tax line data. Cash account balances are recorded on a corporation’s tax return, however. So if you’re adding a bank account for a corporation, you use the Tax-Line Mapping drop-down list to identify the tax line on which the bank account information gets reported.
After you describe the new account that you want to set up, click either Save & Close or Save & New to save the new account to the Chart of Accounts list.
You also can click the Next button to save the account information and then redisplay the Add New Account window so that you can add another account.


