Identifying your vehicles
By law, you’re required to track your mileage by vehicle. QuickBooks 2020, accordingly, provides a Vehicle list. To add items to the Vehicle list, follow these steps:-
Choose Lists→ Customer & Vendor Profile Lists → Vehicle List.
 The Vehicle List window
QuickBooks displays the Vehicle List window, as shown. Initially, because you haven’t yet added any vehicles, the list shows no assets.
-
Click the Vehicle button (bottom-left corner), and choose New from the drop-down menu that QuickBooks displays.
 The New Vehicle window
QuickBooks displays the New Vehicle window.
-
Enter a name for the vehicle in the Vehicle text box, and enter a description of the vehicle in the Description text box.
Identify the vehicle by its make and maybe the year of manufacture. I suppose that if you have a fleet of cars or trucks, you may want to provide more identifying information than this.
-
Save the vehicle description by clicking OK.
Recording vehicle miles
After you add your business vehicles to the Vehicle list, you record each trip by using the Enter Vehicle Mileage window. To do this, follow these steps:-
Choose Company → Enter Vehicle Mileage.
 The Enter Vehicle Mileage window
QuickBooks displays the Enter Vehicle Mileage window.
-
From the Vehicle drop-down menu, choose the vehicle in which you took the trip.
-
Provide the starting and ending dates of the trip.
Enter the starting date of the trip in the Trip Start Date field and the ending date of the trip in the Trip End Date field. Note that you can click the little calendar buttons at the right ends of these two text boxes to display the QuickBooks pop-up calendar.
-
Enter the starting mileage of the odometer in the Odometer Start field and the ending mileage of the odometer in the Odometer End field.
After you enter the two mileage readings, QuickBooks calculates the total trip miles.
-
(Optional) Identify the customer and job.
If the trip’s miles should be billed to or associated with a particular customer or job, choose the customer or job from the Customer:Job drop-down menu.
-
(Optional) Associate the trip miles with a particular invoice item.
If you bill the trip miles on an item, choose the invoice item that should be used from the Item drop-down menu.
-
Provide additional information as necessary.
Use the Notes text box to collect or store any additional information needed for the vehicle mileage record keeping.
-
Save the trip information by clicking the Save & Close button.
Using the vehicle reports
If you click the Reports button at the bottom of the Vehicle List window, QuickBooks displays a drop-down menu that lists four vehicle mileage reports: Mileage by Vehicle Summary, Mileage by Vehicle Detail, Mileage by Job Summary, and Mileage by Job Detail.You can access another menu of commands that produce these same reports by clicking the Mileage Reports button that appears at the top of the Enter Vehicle Mileage window.
To produce a particular vehicle mileage report, choose one of the reports from either of these menus.
Updating vehicle mileage rates
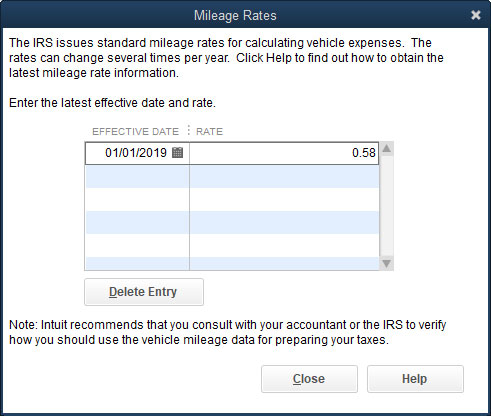
If you click the Mileage Rates button at the top of the Enter Vehicle Mileage window, QuickBooks displays the Mileage Rates dialog box. The Mileage Rates dialog box lists Internal Revenue Service (IRS) mileage rates and their effective dates. You can enter a new mileage rate by clicking the next open row of the mileage rate schedule and then entering the effective date in the Effective Date column and the standard rate in the Rate column. You can find the current year’s business mileage rate at the IRS website.
 The Mileage Rates dialog box
Note: In 2019, the standard mileage rate equaled 58 cents a mile, but the IRS usually updates this figure once and sometimes twice a year. So, you want to check for the rate that’s current when you do your calculations. In other words, don’t use one of the old, out-of-date standard mileage rates. Please.


