Activity-based costing (ABC for short) may be the best new accounting idea in the past three decades. The approach is actually really straightforward if you’ve already been using QuickBooks. In short, all you do to implement a simple ABC system in QuickBooks is what you’re doing right now. In other words, just keep on tracking your operating expenses by using a good, decent chart of accounts. That’s 90 percent of the battle.
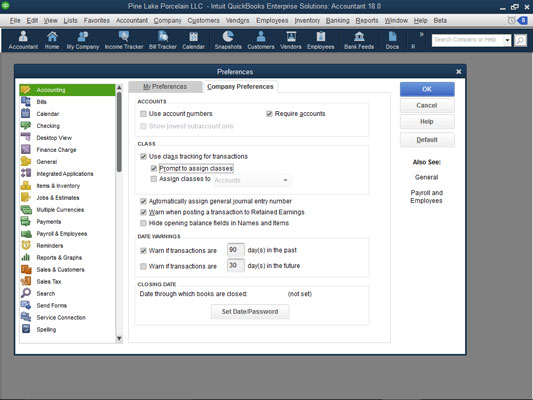
The Company Preferences check boxes for setting your accounting preferences.
First, you turn on the QuickBooks Class Tracking feature. Class Tracking lets you categorize income and expense transactions as falling not just into income and expense accounts, but also into particular classes.
To turn on Class Tracking in QuickBooks, follow these steps:
- Choose Edit --> Preferences. QuickBooks displays the Preferences dialog box.
- Tell QuickBooks you want to work with the accounting preferences. To tell QuickBooks that you want to change one of its accounting preferences — Class Tracking, in this case — click the Accounting icon, which appears in the list box along the left edge of the Preferences dialog box. The figure shows the Company Preferences tab for the accounting preferences. (If the Company Preferences tab doesn’t appear on your screen, simply click the tab name.)
- Select the Use Class Tracking for Transactions check box to turn on Class Tracking.
- You may as well also select the Prompt to Assign Classes box so that QuickBooks reminds you to use the classes.
- Click OK. From this point forward, QuickBooks adds a Class drop-down list or field to the windows that you use to record revenues and expenses (such as the Create Invoices window, the Write Checks window, the Enter Bills window, and so on). All you do is tag transactions as they fit into a particular class.

The Company Preferences check boxes for setting your accounting preferences.


