For example, if you take an Apple loop in the key of G at 120 beats per minute and put it into a project in the key of E at 100 beats per minute, the Apple loop will automatically adjust to the project tempo and key. Apple loops are flexible. They do a lot of yoga when you’re not using them. It would be a shame for all that stretching to go to waste, so please use Apple loops.
Apple loops can be beats, instrument parts, sound effects, or anything that you want to repeat. You can build an entire Logic Pro project with only Apple loops, or you can use them as accents to live instruments. As limber as they are with time and key signatures, they’re equally able to fit into your project needs.
Navigating the Logic Pro X loop browser
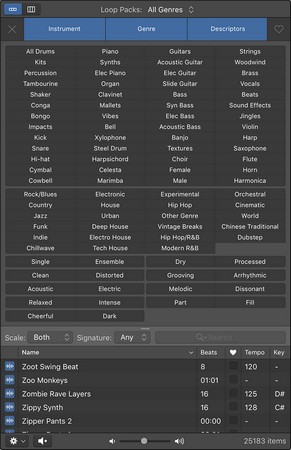
Logic Pro X gives you a special loop browser to search and find Apple loops. To open the loop browser, choose View → Show Loop Browser or press O. You can also open the loop browser by clicking the loop browser icon in the control bar. If you don’t see the loop browser icon, you can customize the control bar. The loop browser.
Here’s a description of the loop browser and its functions:
- View icons: At the top-left of the loop browser are two view icons that let you switch between button view and column view. The button view, which is the default state, displays clickable keyword buttons to refine your loop search. The column view lets you navigate through loops by category.
- Loop Packs drop-down menu: At the top of the loop browser is a drop-down menu where you can select different loop collections installed on your computer. To view only loops that you've created, choose the My Loops category. At the bottom of the menu, you can choose Reindex All Loops to rebuild the catalog. You may want to reindex your loops after you’ve added loops to your system.
- Keyword buttons: While in button view, you can click multiple keyword buttons to filter the search results. The top-left button (the x icon) is the Reset button, which clears all button choices. The top-right button (the heart icon) is the Favorites button, which filters the search results to any loop that has been selected as a favorite.
- Category columns: While in column view, you can filter search results by navigating through categories of loops.
- Scale menu: Filter your search by scale type, including Major, Minor, Neither, or Both.
- Signature menu: You can filter your search by time signature.
- Search bar: Search for loops by name or keyword with the search bar.
- Results list: This area displays the loops. It has six columns: loop type, loop name, beats, favorites, tempo, and key. Loop types are divided into blue audio Apple loops and green MIDI Apple loops.
- Play In pop-up menu: The gear icon at the bottom left of the loop browser is the Play In pop-up menu. You can select the auditioned loop to play in the song key (the key of the current project), the original key (the key of the Apple loop), or a specific key.
- Speaker icon: You can play or mute the selected Apple loop.
- Volume slider: Selecting a loop automatically plays it. The volume slider adjusts the loudness of the loop as you audition it.
- Count: The number of loops that fit your search criteria is displayed at the bottom right of the loop browser.
Adding audio loops in Logic Pro X
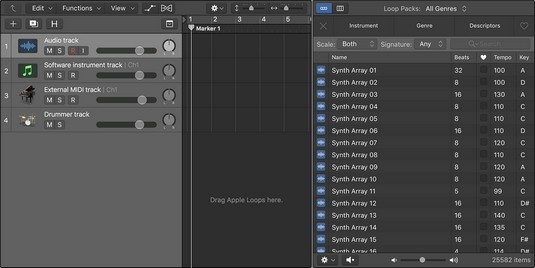
Audio loops are audio files and can be added to audio tracks. In the loop browser, you can spot an audio Apple loop by its blue icon containing a waveform. You can edit audio Apple loops just as you can a recorded audio region. To add an audio Apple loop to your Logic Pro project, do one of the following:- Drag an audio Apple loop from the loop browser to an empty area of the tracks area or track list. An audio track will be created and the loop will be added to a region on the track.
- Drag an audio Apple loop from the loop browser to an existing audio track. The Apple loop will be added to the tracks area at the position where you drop the loop.
 Drag Apple loops to the tracks area.
You can’t drag an Apple loop to a software instrument track or an external MIDI track from the loop browser. Logic Pro is thoughtful enough to warn you if you try. After the loop is in the tracks area, however, you can drag an Apple loop region to a software instrument track or an external MIDI track but it will not play. So if you drag an Apple loop into your project and it’s not playing, make sure it’s on the right type of track.
If you stretch an audio Apple Loop too far from its original key or tempo, your loop may end up with a pulled muscle. An audio Apple loop doesn’t always sound good when it's stretched too far, but it still makes a great placeholder until you can replace it.
Adding MIDI loops for Logic Pro X
MIDI loops can be added to software instrument tracks or external MIDI tracks. You can identify MIDI Apple loops by their green icon in the loop browser. To add MIDI Apple loops to your Logic Pro project, do one of the following:- Drag a MIDI loop to an external MIDI track. A MIDI region is created on the track with the Apple loop contents.
- Drag a MIDI loop to a software instrument track or to an empty area of the tracks area or track list. A software instrument track is created, the corresponding software instrument is added to the track, and the loop is added to a MIDI region on the track.
If you drag a MIDI Apple loop to an audio track, the loop will be converted to audio and added to the tracks area at the position where you drop the loop.
Adding drummer loops in Logic Pro X
Drummer loops can be added to drummer tracks. You can identify drummer loops by their yellow icon in the loop browser. To add drummer loops to your Logic Pro project, do one of the following:- Drag a drummer loop from the loop browser to an empty area of the tracks area or track list. A drummer track is created and the loop is added to a region on the track.
- Drag a drummer loop from the loop browser to an existing drummer track. The drummer loop is added to the tracks area at the position where you dropped the loop.
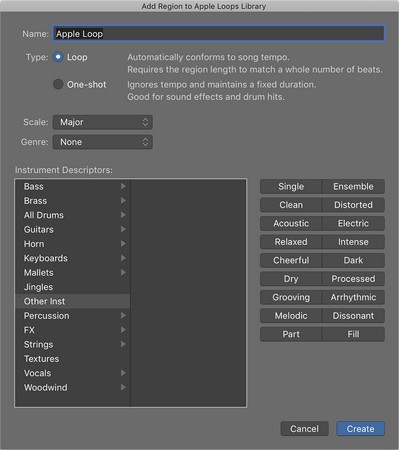
 The Add Region to Apple Loops Library window.
You can create the following:
- Loop: A loop will follow the project tempo. Loops are great for regions you want to repeat again and again.
- One-shot: A one-shot will not follow the tempo and will play until the region completes. One-shots are great for sound effects or sounds that don’t have rhythmic content.


