Enabling Elastic Audio
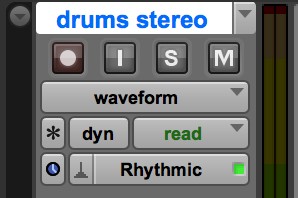
Before you can use Elastic Audio, you must enable it in each track you want to work with. Follow these steps:- Choose the Elastic Audio algorithm appropriate for your material from the Elastic Audio Plug-in Selector pop-up menu located at the bottom of the track.You have four options:
 Choose the Elastic Audio processing algorithm most like your material.
- Polyphonic: Polyphonic is for material that has harmonic content, such as rhythm guitar or keyboards, playing chords.
- Rhythmic: Rhythmic is ideal for drums and percussion instruments, as well as other highly percussive parts.
- Monophonic: Monophonic is your choice for bass or lead guitar or any other instrument playing single notes.
- Varispeed: Varispeed is used when you want to change the speed of the track for special effects.
- Choose Real-Time or Rendered processing from the Elastic Audio Plug-in Selector pop-up menu.
The default is Real-Time. This is the option you want to use while you’re working on your track. Real-time processing requires processing power. After you’re done adjusting your track, you may want to switch to Rendered to free up the resources for other tasks. You can always switch back to Real-Time if you want to make other changes. When Real-Time processing is chosen, you’ll see a green dot to the right of your Elastic Audio algorithm selection.
 Real-time processing is indicated with the green light.
Viewing Elastic Audio events
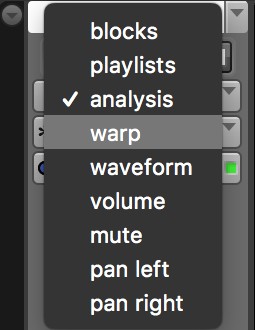
There are two views that you can have of your Elastic Audio events in a track: Analysis and Warp. You can find them in the track view pop-up menu. Both views show you the detected event markers for your material and let you add subtract or move them, but each has it benefits: You can view Elastic Audio events two ways in your tracks: Warp and Analysis.
- Analysis view: Analysis view is ideal for when you have material that doesn’t have clear transients for the automatic detection of events. In this view, you can easily add or edit the events so you can then apply Elastic Audio processing.
- Warp view: Warp view is the view you should begin with. You can easily warp and time-adjust your audio from this view.
Quantizing audio tracks in Pro Tools
There are a number of ways you can adjust the timing of an audio track in Pro Tools, but the easiest (not to mention, most easily reversible) way to do this is with the Elastic Audio Quantize feature. Here is how it’s done:- Enable Elastic Audio on your track by choosing the algorithm from the Elastic Audio pop-up menu that most closely matches your material.
- Choose Real-Time processing if it’s not already chosen.
- Select Warp View from the Track view selector pop-up menu.
- Take a look at the event markers that are detected for your track and adjust any that are not where you want them.
There won’t be anything to adjust unless your material doesn’t have clear transients, such as with legato passages of polyphonic instruments.
- Select Waveform View from the Track view pop-up menu and select the material you want to edit with one of the selection tools.
- Choose Event → Event Operations → Quantize from the main menu or press Option+0 (Mac) or Alt+0 (PC) to open the Quantize menu.
 The Event Operation Quantize menu lets you adjust the timing of selected material.
 - Select a note value appropriate for your material from the Grid pop-up menu.
- Click Apply to apply the quantization to your track.
Elastic Audio is nondestructive so if you don’t like what you see, you can undo it, adjust the quantize value, and redo as often as you like.


