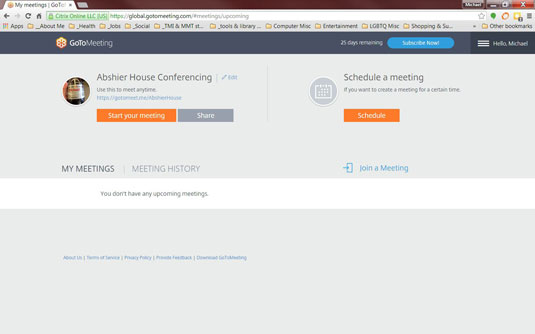
After you’ve set up a GoToMeeting account and your profile, scheduling your first meeting is really easy. To get started, sign in to your account so you can end up at your home page.
To use the professional editions of GoToMeeting, you may need to download a plug-in or add-in for your browser or an app for your smartphone at various points in the process. If this is your first time logging in, allow an extra couple of minutes to get your device or PC ready. It’s not complicated; GoToMeeting will do most of the work for you.
Sign in to your account.
Source: GoToMeeting.com
On your GoToMeeting account home page, click the orange Schedule button to open the Schedule a meeting dialog box.
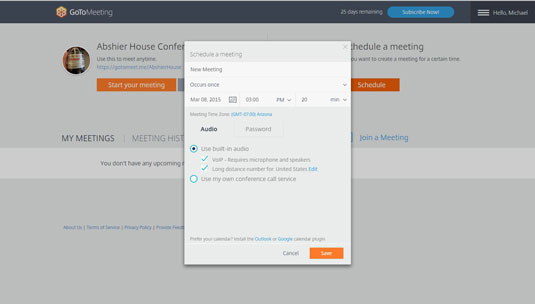
Schedule the meeting.
Source: GoToMeeting.com
On your GoToMeeting account home page, click the orange Schedule button to open the Schedule a meeting dialog box.
Fill in the information for the meeting from the top to the bottom of the dialog box and then save your changes:
Give the meeting a name that will describe it to your attendees.
Choose whether the meeting will be recurring or a one-time thing.
Set the date, time, and duration.
Change the time zone, if needed (otherwise, it will use the same time zone as your computer).
Tell GoToMeeting if you’ll use the built-in audio system, or if you brought your own service.
Click the Password tab to tell GoToMeeting if attendees will need a password to access the call.
Sometimes it’s easier to not use a password, especially when it’s just a small meeting. But if you want to prevent eavesdropping, it’s best to require a password.
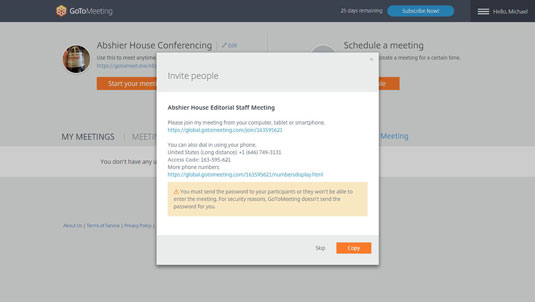
Copy the meeting information.
Source: GoToMeeting.com
After you save the meeting information, the summary information about the meeting will appear. Click the Copy button to capture the info to your clipboard. You’ll need this info to paste into the email or calendar entry you’ll use to invite meeting participants.
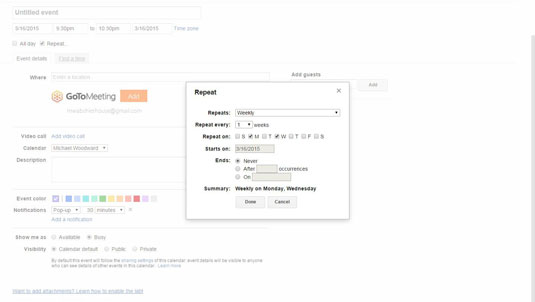
Paste the info into your calendar.
Source: GoToMeeting.com
Whether you use Outlook, Google, or something else entirely for your scheduling needs, it doesn’t really matter. Paste the meeting info into the description or notes field of the calendar entry, and use the other calendar features to set the time, date, recurring meeting settings, and add people to invite.
Don’t forget to actually send the info to the people you want to attend. That’s one thing GoToMeeting doesn’t do automatically.
If you don’t use an online calendar, you can always just email the information to them.
Launch the meeting.
Source: GoToMeeting.com
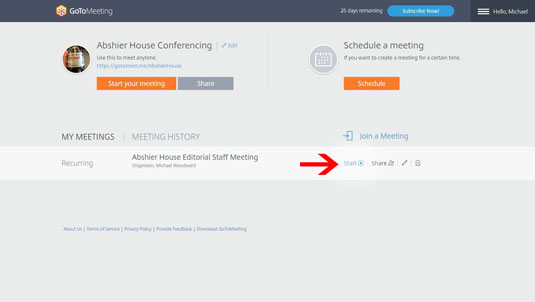
When it’s time for the meeting, you can launch the meeting from your calendar item (if you’ve installed the GoToMeeting plug-in), or you can launch it from your Home page at GoToMeeting. Find the meeting you want to launch and click Start.
Chances are, GoToMeeting will ask to install another plug-in for your browser to run the actual conferencing software. If so, let it. And if the invitation required a password, you’ll have to provide that, too, even if you’re the administrator.
Eventually, the meeting will begin, and the GoToMeeting control panel will appear on the right side of your screen.
Whatever windows were open on your desktop will remain open. So, if you decide to share your screen with other meeting attendees, be sure you know what is open on the screen! (You probably shouldn’t be doing that at work anyway.)
Adjust your options.
Source: GoToMeeting.com
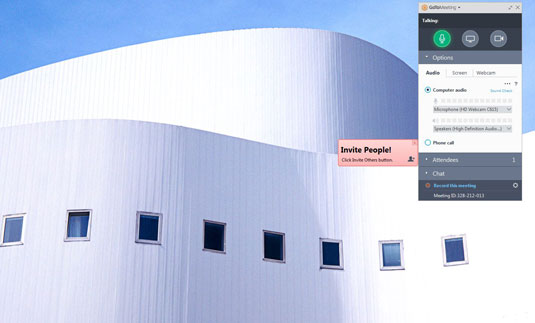
From the control panel, you control everything that happens during the meeting.
Use the Audio tab to test your microphone and speaker to ensure that you can hear and be heard.
Use the Webcam tab to make any adjustments to your camera.
Use the Screen tab to control what your attendees see. You can display an entire screen or one application and choose between monitors. After attendees arrive, you also can use this tab to hand over control of the presentation, or just the keyboard and mouse, to another attendee.
Turn your mic, screen display, or camera on or off.
Source: GoToMeeting.com
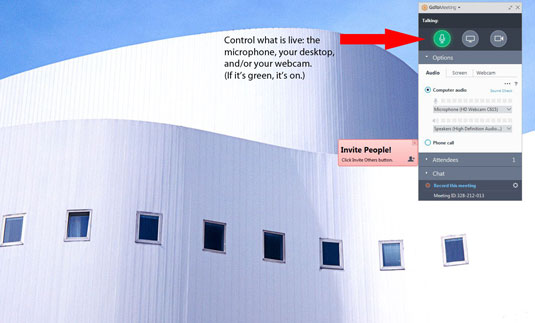
The three icons across the top of the GoToMeeting control panel indicate how you are being broadcast.
If the microphone is green, you (the host) are broadcasting your voice (or whatever sound is being pumped into the computer via the microphone). If it’s red, you’re muted.
If the screen button in the middle is green, it means you are sharing your screen using the settings you selected on the Screen tab. To stop sharing, just click that button, and it will be grayed.
See who is present and chat with them.
Source: GoToMeeting.com
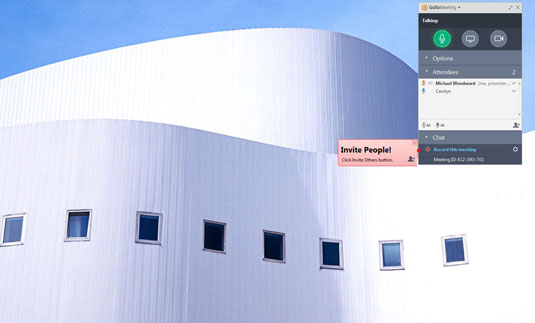
If you expand the Attendees list, you can see who all has joined the meeting as well as control their microphones individually or all at once. You also can invite new participants from here.
Expand the Chat list to instant message with either individual participants or with the entire group. The messages will appear in the same place on their control panel.
Record the session.
Source: GoToMeeting.com
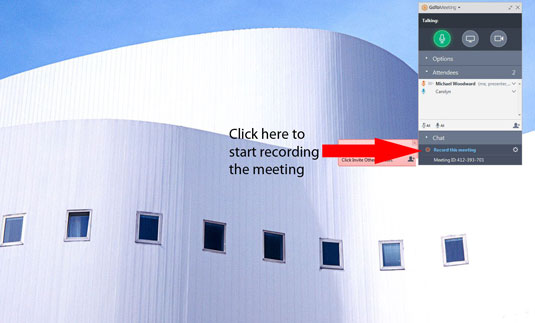
You can record the meeting and play it back later, email it to those who could not attend, or post it on your company website or blog.
End the meeting.

Source: GoToMeeting.com
When you’re done yakking, it’s easy to hang up. Just click the GoToMeeting logo at the top of the control panel and choose Exit – End Meeting.
Confirm the ending.
Source: GoToMeeting.com
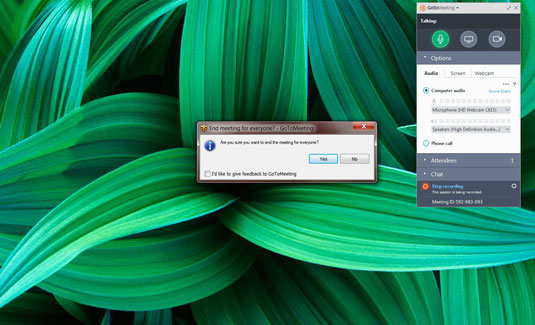
Just in case you didn’t mean to actually exit the call, you can redeem yourself here. If you’ve had technical problems on the call, it’s also a good place to tell GoToMeeting you want to provide some comments about your session. Check the I’d like to give feedback to GoToMeeting, and a survey will pop up after you’ve disconnected.
Do you need to convert the recording?
Source: GoToMeeting.com
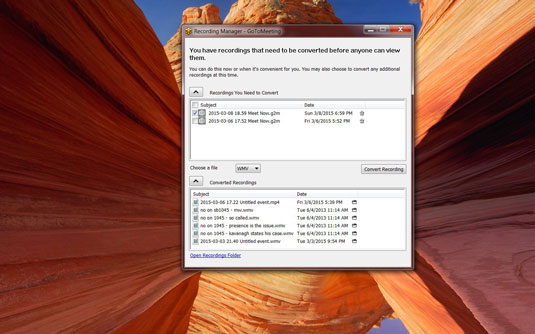
If you were recording the meeting, GoToMeeting will ask if you want to convert the file to something actually useful, such as WMV or MP4. If so, set the options and click Convert Recording.
To find the recordings on your hard drive, click on Open Recordings Folder.


