 The Audio Tools Playback tab.
Control when a sound is played
By default, sounds are not played until you click the sound icon that appears on the slide. If you want a sound to play automatically when the slide is displayed, change the option in the Start drop-down list (found in the Audio Options group on the Audio Tools Playback tab) from On Click to Automatically.If you select On Click or Automatically, the sound automatically stops when you move to the next slide. To allow the sound to continue over several slides, select the Play Across Slides option from the Start drop-down list.
Loop a sound
If the sound file isn’t long enough, you can loop it so that it plays over and over again. This feature is most useful when you have a subtle sound effect, such as the sound of waves crashing, that you want to continue for as long as you leave the slide visible. To loop an audio clip, just select the Loop Until Stopped check box found in the Audio Options group.Hide the sound icon
By default, the icon representing an audio clip is visible on the slide during your slide show. Assuming that you have set the sound to play automatically, you probably don’t want the icon visible.The Audio Options group includes a check box titled Hide While Not Playing, but it hides the icon only when the sound is not playing; the icon is visible when the sound is playing.
The easiest way to get the icon off of your slides altogether is to simply drag the icon off the edge of the slide that contains it. The sound will still be a part of the slide, so it will play automatically when the slide is displayed. But because the icon is off the edge of the slide, it won’t be visible to your audience.
Fade the sound in and out
The Fade In and Fade Out controls let you gradually fade your audio clip in and out. By default, these controls are both set to 0, so the audio clip begins and ends at full volume. By changing either or both of these controls to a value such as 2 or 3 seconds, you can smoothly fade the sound in or out for a more subtle effect.Trim an audio clip
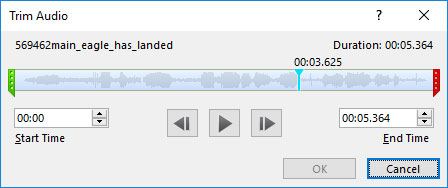
Clicking the Trim Audio button brings up the Trim Audio dialog box, shown here. This dialog box enables you to select just a portion of the audio clip to play in your presentation by letting you choose start and end times. You can choose the start and end times by dragging the green start pointer or the red end pointer over the image of the audio file’s waveform. (You can often tell where to stop or end the audio clip by looking at the waveform that’s displayed in the Trim Audio dialog box.) You can also enter the time (in seconds) in the Start Time and End Time boxes. (Ideally, you should select the start and end trim points during silent portions of the audio file, to avoid abrupt starts and ends.) The Trim Audio dialog box.


