- Contacts (known as Address Book in earlier versions of Mac OS X)
- Calendar (known as iCal in earlier versions of Mac OS X)
- Reminders
- Notes
- Safari bookmarks, reading list, tabs, and viewing history
- Photos from both iPhoto and Aperture
- iTunes music and television shows
- iWork apps (Pages, Numbers, and Keynote)
- Preview
- TextEdit
- Keychain
- GarageBand
iCloud also works with third-party iCloud-enabled apps, such as iA Writer.
Here are some situations where iCloud can make your life easier:- You want to back up the songs you add to the Music app and TV show collections.
- You use both a Mac and an iOS device, such as an iPhone, iPad, or iPod touch.
- You want to access Contacts, Calendar, and Mail from more than one computer — Mac or Windows — say, one for work and one at home.
- You keep a calendar that other people need to see and maybe even edit.
- You want to activate Find My Mac to keep tabs on your Mac’s location and re-locate it should it be lost or stolen.
If you use a Windows PC in addition to your Mac, you can download the iCloud Control Panel 3.0 for Windows, which enables iCloud storage and syncing in Windows. You then access the iCloud apps through iCloud.com and Microsoft Outlook.
How to configure iCloud preferences
You can choose which apps you want to use with iCloud and how they can be used. For example, you may want to keep Contacts and Calendars synced across all your devices but prefer that Notes stay separate because you use Notes on your iPhone for shopping lists that you don’t need on your Mac. Here’s how to customize how you work with iCloud:1. Choose Apple→System Preferences and then click the Internet Accounts button.
The Internet Accounts window appears.
2. If you haven’t signed in to iCloud, click the Sign In button, enter your Apple ID and password, and click Sign In.3. Click iCloud.
The iCloud window appears displaying your iCloud account information.
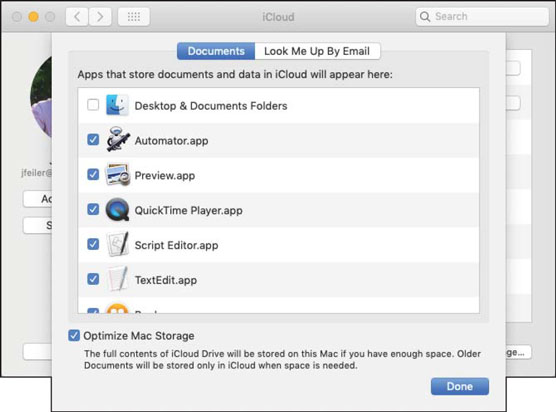
4. Click the Options button that is to the right of the iCloud Drive icon.The iCloud Drive options window appears. This window enables you to choose which documents are stored in iCloud.
 Specify which documents are stored in your iCloud drive.
5. Specify which documents you want to store in your iCloud drive.
Click the check mark that corresponds to each app that contains documents that you want to store in your iCloud drive.
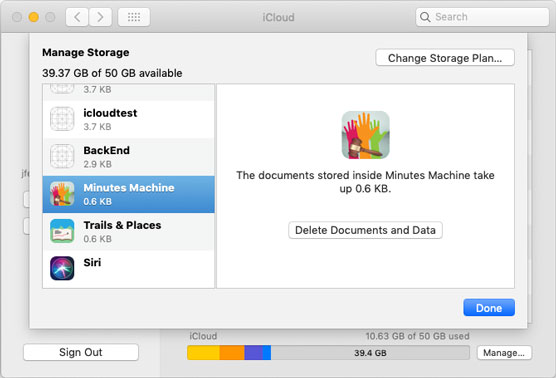
6. (Optional) Click the Manage button in the lower right to see the data that occupies your allotted iCloud storage, as shown.Click each item in the list on the left to see the files for each. Backups (top of this list) keeps the backups of your iOS devices — not your Mac. iCloud keeps documents and data for iCloud-enabled apps but does not back up your entire Mac.
 Manage storage for the apps you want to use with iCloud.
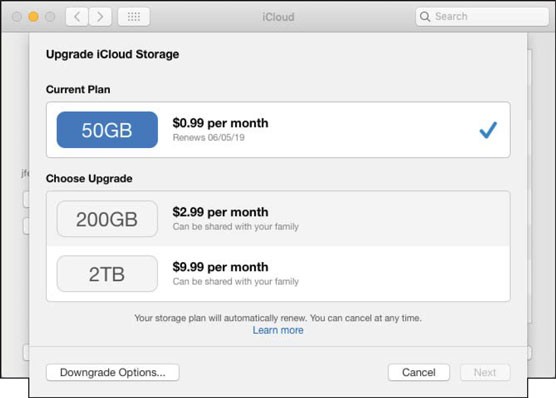
7. (Optional) Click the Buy More Storage button.
A free iCloud account gives you 5 gigabytes (GB) of storage — but songs purchased from the Apple Music Store or up to 25,000 tracks in iTunes Match (if you’re subscribed) plus photos in PhotoStream don’t count toward that amount. In PhotoStream, iCloud stores up to 1,000 photos from the last 30 days. You can purchase additional storage for a yearly subscription fee if necessary, as shown.
If you decide to purchase additional storage, click the desired storage amount and then click Next. Follow the onscreen instructions to add your personal and payment information.
 Upgrade and increase your iCloud storage here.
8. Click Done.
9. Click the Close button in the upper left to quit System Preferences.
Syncing with your other devices
The only reason this topic has a heading is so it stands out because it couldn’t be simpler. To sync iCloud app specific documents, such as Pages documents, and data from apps such as Calendar and Contacts with your iOS devices, do the following:1. Tap Settings on the Home screen of the device you want to sync with iCloud.
2. Tap iCloud.
3. Sign in to your iCloud account.
4. Tap the apps you want to use to the on position.
The data in each app is automatically synced between your Mac and your iOS device.
You must have an Internet connection to use iCloud.
Using the iCloud website
To manage your data on iCloud, you can go to the iCloud website. Follow these steps:1. Click the Safari icon on the Dock or from Launchpad.
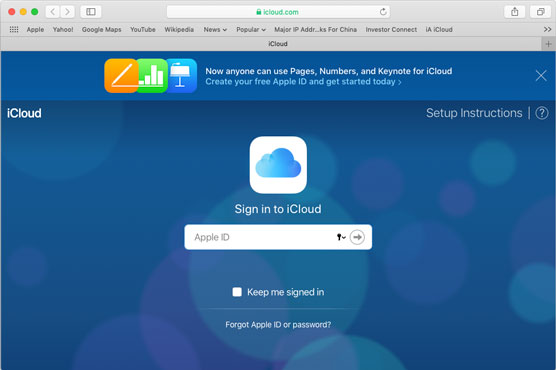
2. Type www.icloud.com in the URL field in Safari.
The iCloud website opens with the sign in fields.
3. Type in your Apple ID or the email you used when you set up your iCloud account, and then type your password. Signing in to an iCloud account.
4. (Optional) Select the Keep Me Signed In check box if you want to stay connected to iCloud even when you go to other websites or quit Safari.
5. Press the Enter key or click the arrow button.
Your name appears in the upper-right corner, and icons that take you to your activated services appear in the window, as shown.
6. Click any of the icons to go to the app you want.
7. From the app window, click the cloud button in the upper-left corner to return to the opening iCloud web page.
8. Click the arrow to the right of your name and choose Sign Out to close iCloud.com.
Note that when you sign out, you have the option to trust the browser you’re using and won’t need to trust the browser the next time you sign into the iCloud website.


