Word's dynamic field feature
Word’s dynamic field feature is part of the Quick Parts tools. To add a field to a document, click the Insert tab and in the Text group and click the Quick Parts button.
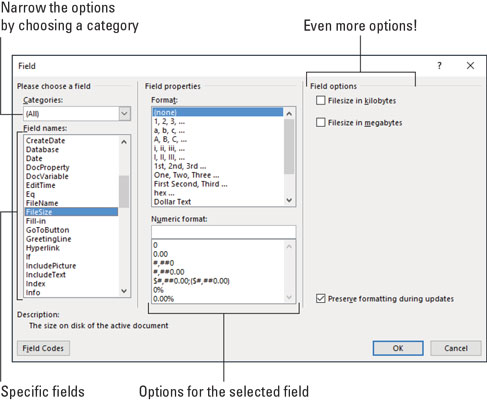
Choose the Field command to behold the Field dialog box, shown here.
 The Field dialog box.
The scrolling list on the left side of the Field dialog box shows categories. These represent various dynamic nuggets you can insert in a document. Choose a specific category to narrow the list of Field Names.
The center and right part of the dialog box contain formats, options, and other details for a selected field.
To insert the field, click the OK button. The field appears just like other text, complete with formatting and such, but the information displayed changes to reflect whatever the field represents. For example, a page number field always shows the current page.
When the insertion pointer is placed inside a field, the text is highlighted with a dark gray background. It’s your clue that the text is a field and not plain text.
How to add useful fields
Word offers an abundance of fields you can thrust into a document. Of the lot, you might use only a smattering. These subsections assume that the Fields dialog box is open.Page numbers
To ensure that the document accurately reflects the current page number, insert a current page number field:- In the Field dialog box, select Numbering from the Categories drop-down list.
- Select Page from the Field Names list.
- In the Field Properties section of the Field dialog box, select a format for the page number.
- Click OK.
Total number of pages
To insert the total number of pages in a document, heed these directions:- Select Document Information from the Categories drop-down list.
- Select NumPages from the Field Names list.
- Select a format.
- Click OK.
Word count
Getting paid by the word? Stick an automatic word count at the end of the document:- From the Categories list, select Document Information.
- Select NumWords from the Field Names list.
- Click OK.
Document filename
Many organizations place the document’s filename into a document header or footer. Rather than guess, why not use a field that contains the document’s exact name? Do this:- From the Categories list, select Document Information.
- Select FileName from the Field Names list.
- In the field properties list, choose a text case format.
- Optionally (though recommended), put a check mark by the option Add Path to Filename.
- Click OK.
How to update a field
Not every field updates automatically, like the page number fields. For some fields, you must perform a manual update to keep the content fresh. To do so, right-click the field and choose the Update Field command. The field’s text is refreshed.Printing fields update when you print the document. They don’t need to be manually updated.
How to change a field
When you don’t get the field’s text quite right — for example, you desire a date format that displays the weekday name instead of an abbreviation — right-click the field and choose the Edit Field command. Use the Field dialog box to make whatever modifications you deem necessary.How to view a field’s raw data
Just as those mutants at the end of Beneath the Planet of the Apes removed their human masks, you can remove a field's mask by right-clicking it and choosing the Toggle Field Codes command. For example, the FileSize field looks like this:
{ FILESIZE \* MERGEFORMAT }
To restore the field to human-readable form, right-click it again and choose the Toggle Field Codes command. The keyboard shortcut is Alt+F9. All praise be to the bomb.
How to delete fields
Removing a field works almost like deleting text. Almost. The main difference is that you must press the Delete or Backspace key twice.For example, when you press Backspace to erase a field, the entire field is highlighted. It’s your clue that you're about to erase a field, not regular text. Press Backspace again to remove the field.


