Coupled with the disappointment and frustration that everyone experiences with Windows, you find a few laptop-specific issues.
The big Windows picture
Windows is easy to use in the same way that a nuclear reactor control room is easy to use: You see knobs and buttons and dials, and you can operate these items easily. Knowing what they do and the potential danger involved is the problem.Viewing the desktop
The desktop is the traditional place where Windows programs lurk; it’s the spot where you get your work done. After signing in to Windows, the next thing you see is the desktop.Windows 10 also offers a Tablet mode interface, which looks like the old, disliked Windows 8 Start screen. Most adult laptops use the desktop, as illustrated.
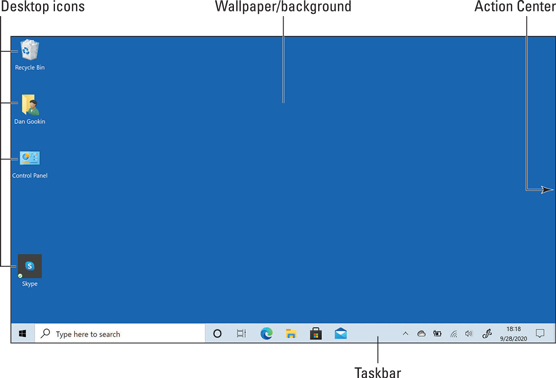 The Windows desktop
Here are a few important things to note on the desktop:
Icons: These tiny pictures represent files, folders, or programs. Microsoft wants you to call them apps in Windows 10. They’re programs.
Wallpaper, or background: The wallpaper is the image you see on the desktop, or it may be a solid color, such as the one used in the preceding figure. You change the background when the mood hits you.
Action Center: This panel is hidden off to the right. Swipe in, right-to-left from the right edge of the screen to view various notifications or access options. See the later section “Visiting with the Action Center.”
The taskbar: This doohickey skirts the bottom of the desktop, displaying a host of icons and controls. Buttons appear on the taskbar that represent programs or windows open on the desktop; plus, it plays home to lots of junk. See the later section “Working on the taskbar” for specific knowledge nuggets.
Take a moment right now to find each item on your laptop screen. Don't touch the display! Just find them and point. (And maybe even say, “Oh, there it is!”)- The desktop is the workspace background. Programs and apps appear on top of the desktop as you work.
To quickly view the desktop, press the Win+D key combination.
- The Win+D keyboard shortcut is disabled when the laptop is in Tablet mode.
Exploring the Start button menu
The most important gizmo on the Windows desktop is the Start button, found on the left end of the taskbar at the bottom of the screen. Click the Start button to behold the Start button menu, lovingly illustrated here.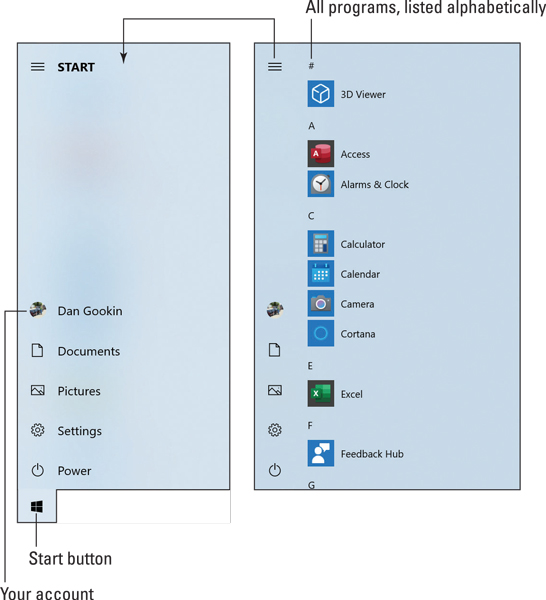 Things to look for on the Start button menu
The Start button menu is a fun slab-o-stuff that includes a list of programs, fun places to visit in Windows, and other things to start. Primarily, the Start button lists programs to start (get it?), arranged alphabetically, as illustrated in Figure 8-2. Scroll or swipe the list to view the lot.
If you tap the three-line, or hamburger, button atop the Start menu, the icons on its left side expand, as shown. Each icon is a shortcut to an important place in Windows, such as the Documents folder or the Settings app. The Power item shows options for ending your computer day.
Not shown in the figure on the right are program and promotional tiles, which is how the Start menu is originally configured. I have removed these tiles, a painstaking process involving right-clicking a tile and choosing the Unpin from Start command. To add program tiles, right-click a program in the Start button list and choose Pin to Start.
- Dismiss the Start button menu by clicking the mouse on the desktop or tapping the Esc key on the keyboard.
- Tablet mode changes the appearance of the Start button and the Start button menu. All apps and programs run full-screen.
Working on the taskbar
An important tool for working on your laptop is the Windows taskbar. It’s home to a smattering of important locations, but its largest role is in helping you work with multiple programs at a time.The following figure illustrates the major provinces on the taskbar.
 The Windows taskbar
Here’s how each taskbar goober works:
Start button: This button is the main control on the desktop. Click the Start button to pop up the Start button menu. This menu contains options for controlling the computer and for starting programs.
Search box: Use this item to search for files on the computer or items on the Internet.
Cortana: This button is your gateway to the Cortana voice-activated search thing.
Taskbar pin area: In this region, you find icons representing popular programs or features, such as the web browser, File Explorer, and Microsoft Store.
Notification icons: These teensy icons pester you with pop-up balloons from time to time. They can also help you do things or monitor events and show you the date and time.
Date/Time: Use this item to check the date and time, or click it to view a pop-up calendar.
Action Center: Tap this icon to view the Action Center. Its appearance changes to indicate pending notifications visible in the Action Center.
In addition to the pinned programs, buttons appear on the taskbar for each program or window you open. Click the button to switch to that program, or right-click it for a pop-up menu of common activities, recently opened files, and other goodies.The taskbar isn’t welded to the bottom of the screen. It can hippity-hop to any screen edge, but traditionally it’s stuck to the bottom of the screen. That’s probably gravity in action, though I’m not certain.
- To move the taskbar, or relocate it to the bottom of the screen, you must first unlock it: Right-click the taskbar and choose the Lock the Taskbar command. After it’s unlocked, you can drag the taskbar to any edge of the screen. Choose the Lock the Taskbar command again to cinch it down.
- The icons in the notification area serve two purposes. First, they can notify you with pop-up bubbles. Or you can simply point the mouse at an icon to view status information, such as whether the network is connected or how much battery juice remains. Second, the icons provide instant access to some common features, such as networking, antivirus, volume control, and others to keep handy.
- To use the icons in the notification area, click the mouse. Either you see a pop-up menu of options or something else happens. The icon’s behavior is grossly inconsistent, so sometimes you right-click, sometimes you left-click, and sometimes you double-click.
Visiting with the Action Center
The notification icons are a traditional Windows feature. Messages, updates, and controls are offered in the Action Center to supplement the notification icons. When new information is available, an icon appears on the far right edge of the taskbar.To view the Action Center, swipe in from the right edge of the screen. The keyboard shortcut is Win+A. And you can click or tap the Action Center icon.
This figure illustrates the Action Center. It features two parts. The upper part lists ongoing notifications, such as new email, calendar reminders, instant messages, and other constant annoyances.
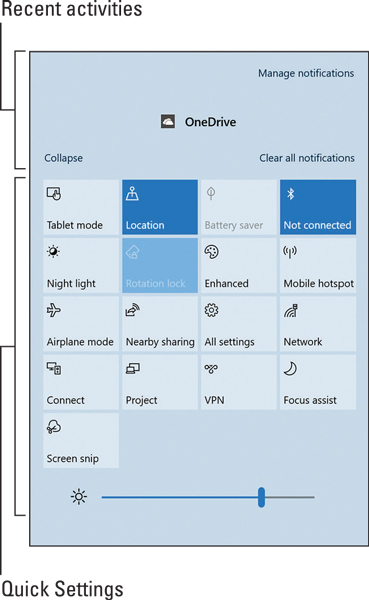 The Action Center
The lower part of the Action Center contains Quick Settings. These tiles let you instantly activate or deactivate various laptop features. Some tiles give you quick access to certain apps, such as the All Settings button, which launches the Settings app.
Swipe the Action Center to the right to dismiss it, tap the Esc key, or press Win+A a second time.
Using the supersecret shortcut menu
If you’re an old hand at Windows, you can appreciate what I call the supersecret shortcut menu. It appears in the lower left corner of the screen when you press the Win+X keyboard shortcut or right-click the Start button.
The supersecret shortcut menu lists locations that let you control various aspects of Windows, such as the Settings app, Mobility Center, and the all-cryptic PowerShell. The commands and locations can be difficult to get to, which is why the supersecret shortcut menu is so handy.Shouting at Cortana
Windows features a voice control and search system named Cortana. It’s interactive, so you can bellow directions to your laptop and, hopefully, Cortana obeys, by either responding verbally or displaying additional information or websites. This tool has nothing to do with Apple’s Siri or Android’s Google Now, which are incredibly similar, and that’s merely a coincidence.Cortana dwells on the taskbar, as illustrated earlier. Click its icon to activate Cortana and work the configuration process. After Cortana is set up, tap its icon to use it. Type a question, or tap the Microphone icon to pronounce your dictates. For example, ask Cortana what the weather will be like tomorrow.
Cortana works best with a headset. By using such a handy peripheral, you can ensure that the technology hears your utterances. Further, when you have headphones on, Cortana’s replies aren’t broadcast so that everyone in the café knows that you’re a Dolphins fan.
Windows and your stuff
One key part of any computer system is storage. Storage is important because it’s where all your stuff is kept on the laptop. Yes, the stuff is “inside there, somewhere.” All the programs, the Windows operating system, and all the files you create must be put somewhere inside the laptop.Exploring your laptop’s storage
In Windows, you can view the gamut of storage devices available to your laptop in a single, handy place. It’s the This PC window, shown.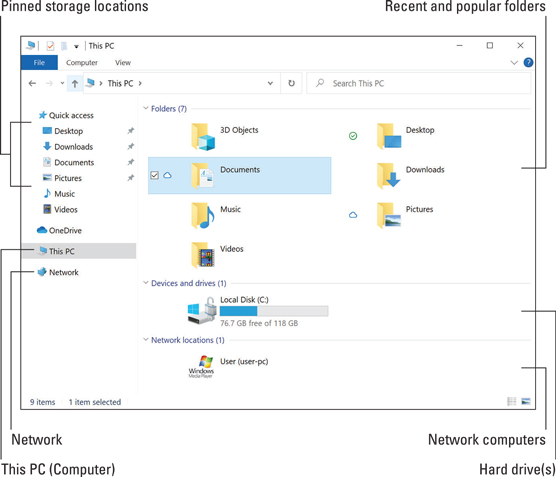 The This PC window
To open the This PC window, follow these steps:
- Press the Win+E keyboard shortcut. This shortcut opens a File Explorer window.
- From the left side of the window, click the item titled This PC.
- You can also open a Windows Explorer window by choosing the File Explorer icon on the taskbar.
- You can also choose File Explorer from the Start button menu to open a Windows Explorer window.
The This PC window is your gateway to the laptop's storage devices. When you're told to “examine Drive C,” for example, you open the This PC window, where you behold the Drive C icon.
- The Windows Explorer program opens to the Quick Access folder. This folder lists popular and frequently accessed folders and files.
- To add a folder to the Quick Access list, right-click the Folder icon and choose the command Pin to Quick Access.
- Another popular storage location is the Network window. It lists computers and other resources available to your laptop on the local network. See Chapter 17 for details.
Accessing your User Profile folder
In Windows, the User Profile folder is home to all your files and stuff. It’s your personal storage area on the laptop’s mass storage system.The User Profile folder is given the same name as your user account name. So, if your login ID is Sponge Bob, the folder is named Sponge Bob. On my laptop, the folder name is Dan Gookin, which is also my human name but not my cartoon name.
To open your User Profile folder, follow these steps:
- Open a Windows Explorer window. The quick way is to press the Win+E keyboard shortcut.
- Click the first chevron on the left end of the address box. The chevron is illustrated in the following figure. Clicking this icon displays a menu of top-level locations in the laptop’s storage system.
- Choose your account name from the menu.
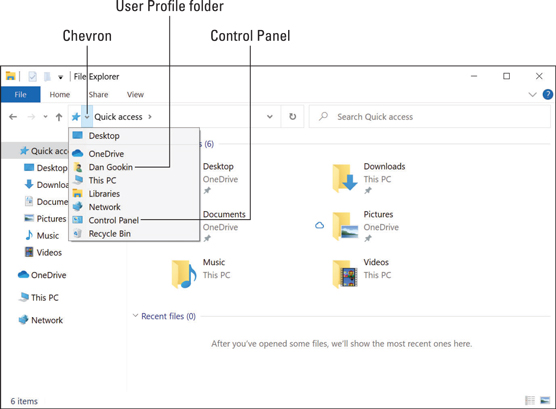 The User Profile folder
The folders in your User Profile folder help you organize your stuff. Some of the folders are used automatically by various programs, such as the Paint program, which saves and opens its graphics files in the Pictures folder. And you’re free to create new folders, such as the Programming folder I use on my laptop.
Among the folders available in your User Profile folder, you find
Documents: The main place where you store documents and other random files.
Music: A place to store all audio files, especially songs stolen from the Internet or “borrowed” from your friend Skeetch.
Pictures: The folder where graphics files live. Most graphical applications automatically store images in this folder.
Videos: A special folder for storing digital video.
Even more custom folders are available: 3D Objects, Contacts, Desktop, Downloads, Favorites, Links, Saved Games, and Searches. Each of these folders is used somehow by one or another program in Windows or by Windows itself. You’re also free to create and use your own folders or to create subfolders within the folders that are created for you.Finding programs
As with your own stuff, the laptop stores all your programs, software, and applications. These items are accessed from the Start button menu, covered earlier in this chapter.To run a program, summon the Start menu by heeding these steps:
- Press the Windows key on the keyboard, or click or tap the Start button on the taskbar.
- Scroll to locate a program in the list.
- Click or tap the program’s icon to start it.
To quickly locate a program, summon the Start button menu and type the first few letters of the program’s name. For example, press the Win key and type chro to display matching program names. If Google Chrome is the top choice, press the Enter key to run the program.
- I keep my most common programs pinned to the taskbar, including Word, the web browser, and my email program. To do so, locate the program on the Start menu and right-click its icon. Choose More, Pin to Taskbar.
Internally, the laptop stores programs on the primary storage device, either the hard drive or SSD. They’re located in the Program Files folder or Program Files (x86) folder. Windows itself is found in the Windows folder. Though you can use the Windows Explorer program to browse to these folders, I strongly recommend that you not mess with any files located there.


