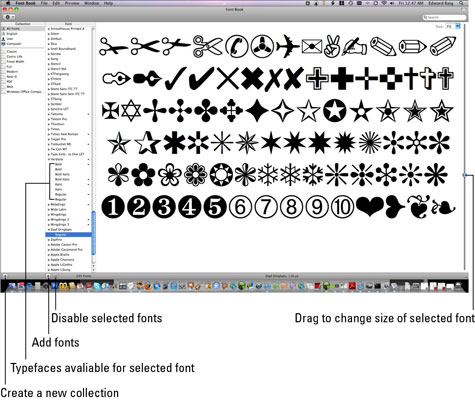
You can use the Mac OS X program Font Book to manage and organize all your fonts, whether they came with your Mac or you downloaded them on the Internet. Located in the Applications folder, Font Book lets you preview and group your fonts.

Here’s what you can do in Font Book:
Group your fonts into User (private fonts unique to your user account) and Computer (public fonts available to anyone who uses this Mac) groups.
Sort your fonts into font collections, including Web, PDF, and Classic. The Classic collection assembles classic fonts with names such as Baskerville, Copperplate, and Didot. You can create your own font collections by choosing the File and then New Collection commands and typing a name for the collection. Then just drag fonts from the Font column into your new collection.
Preview your font of choice by clicking the font name in the Font column. Drag the slider to the right of that pane to adjust the type size of the fonts you're sampling.
If you happen to be in Finder, another nifty way to preview fonts is via Quick Look. You’ll see the entire uppercase and lowercase alphabet (plus numerals 0 through 9) in the font you’ve selected.
Disable the fonts you rarely or never use by clicking the little box with the check mark under the Font list. The word Off appears next to the font’s newly grayed-out name. If you change your mind, choose the command Edit and then Enable font you disabled. (Don’t worry if you come across an application that requests a disabled font. Leopard will open the font on your behalf and shut it down when you close the program.)
If you want to add fonts to the machine, click the + button under the same column and browse to the font’s location on your computer. You can also open new fonts you’ve downloaded or purchased with the Font Book application by simply double-clicking them.
When a dot appears next to a name in the Font list, duplicates of that font family are installed. To eliminate doubles, select the font in question and choose Edit and then Resolve Duplicates.
You can also preview a font family (or families) in the Font Book by printing them. Choose File and then Print and then, from the pop-up menu, select how you’d like to display these fonts:
Catalog: A line of sample text (in uppercase and lowercase) is printed. Drag the Sample Size slider to alter the size of the sample text.
Repertoire: Prints a grid of all the font glyphs. This time you can drag a Glyph Size slider.
Waterfall: An entire font alphabet is printed in increasingly larger font sizes until there is no more room on the printed page. You can choose the sample sizes of the text.


