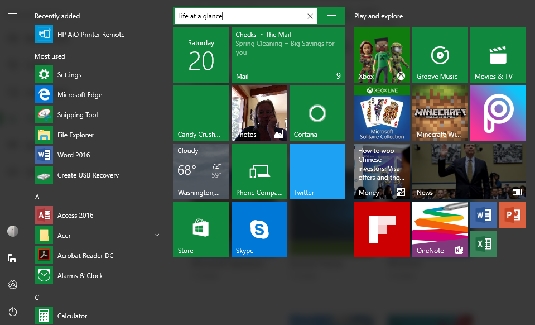
Name tile groups
If you like, you can rename the group.- Click the Start button to display the Start menu.
- Click a group title; it opens for editing.
- Press the Backspace button on your keyboard to delete the current title and then type a new title.
- Click anywhere outside the title to save the new name.

If you want to use the Start menu full screen, right-click the desktop and choose Personalize. In the resulting Personalization window, click Start in the left panel and then click the Use Start Full Screen switch to turn it on. When you click the Start button, the Start menu will open in full screen. You can click the Start button again to return to the desktop.
Rearrange tiles in the Start Menu
If you want the apps you use most often near the top of the Start menu, you can rearrange tiles.- Click the Start button to open the Start menu.
- Click, hold, and drag a tile to a new location.
- Release the tile and it moves to its new spot in the Start menu.
If you want to move a whole group of tiles, click the title just above the tiles, such as Life at a Glance. Click the button labeled with two stripes on the right side of the group title bar and drag the group to a new location. Release the mouse to finish the move.
Resize tiles
Tiles come in different sizes by default. You may want to resize them to be smaller to fit more in the Start menu or larger to make a more frequently used app easier to find.- Click the Start button to open the Start menu.
- Right-click a tile. In the pop-up menu that appears, click Resize.
- From the side menu that appears, choose Small, Medium, or Wide.
If you don’t need a tile that Windows displays by default, it’s simple to remove it from the Start menu. Right-click a tile and choose Unpin from Start in the menu; the tile is removed.


