Don't be intimidated by all the dials and buttons on your new Canon EOS Rebel. Having all of those controls makes using your digital camera easier; there’s no digging through tons of internal menus before you can start clicking pictures. Taking photographs with your EOS Digital Rebel is a breeze once you tour the external controls.
Topside controls

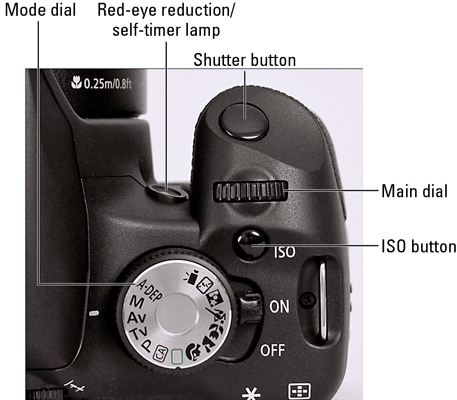
On/Off switch: Move the switch to On to fire up the camera and then back to Off to shut it down.
Mode dial: Rotate this dial to select an exposure mode, which determines whether the camera operates in fully automatic, semi-automatic, or manual exposure mode when you take still pictures. To shoot a movie, you set the dial to Movie mode.
Main dial: Just forward of the Mode dial, you see a black dial that has the official name Main dial. You use this dial when selecting many important camera settings.
ISO button: During normal, still photography, this button provides one way to access the camera’s ISO speed setting, which determines how sensitive the camera is to light. When you’re shooting movies, pressing the button instead initiates AE Lock, a feature that locks autoexposure at its current setting.
Shutter button: This button controls the camera’s shutter; pressing it allows you to take the actual photographs.
Red-Eye Reduction/Self-Timer Lamp: When you set your flash to Red-Eye Reduction mode, this little lamp emits a brief burst of light prior to the real flash to lessen the chances of red-eye. If you use the camera’s self-timer feature, the lamp blinks to provide you with a visual countdown to the moment at which the picture will be recorded.
Back-of-the-body controls

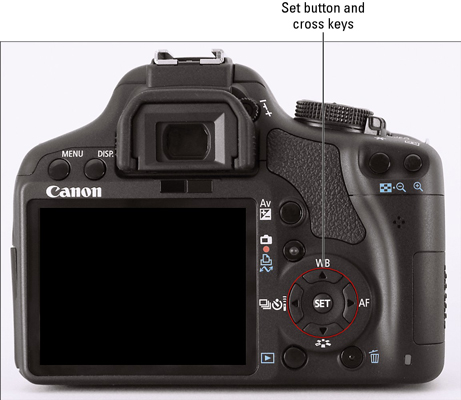
AF Point Selection/Magnify button: The left button on the top right of the camera's back, when you use certain advanced shooting modes, you press this button to specify which of the nine auto-focus points you want the camera to use when establishing focus. In Playback, Live View, and Movie mode, you use the button to magnify the image display (thus the plus sign in the button’s magnifying glass icon).
AE Lock/FE Lock/Index/Reduce button: The right button on the top right of the camera's back, you use the button to lock in the autoexposure (AE) settings and to lock flash exposure (FE) while capturing still images. When using Live View and Movie modes, the button serves as the autofocus and autoexposure trigger. When viewing images, this button switches the display to Index mode, enabling you to see multiple image thumbnails at once, and it reduces the magnification of images when displayed one at a time.
Exposure Compensation/Aperture button: The topmost button to the right of the LCD screen, when you work in M (manual) exposure mode, you press this button and rotate the Main dial to choose the aperture setting, better known as the f-stop. In the other advanced exposure modes, you instead use the button and dial to apply Exposure Compensation, a feature that enables you to adjust the exposure selected by the camera’s autoexposure mechanism.
Live View/Movie/Print/Share button: Just below the Exposure Compensation button, you press this button to shift the camera into Live View mode and, when shooting movies, to start and stop recording. This button is also involved when you transfer images to your computer or print pictures directly from the camera.
Set button and cross keys: These buttons team up to perform several functions, including choosing options from the camera menus. You use the cross keys to navigate through menus and then press the Set button to select a specific menu setting. The cross keys and the Set button also have non-menu responsibilities, as follows:
Set button: If you are in the Shooting Settings menu, press the Set button to shift to the Quick Control screen. You also can customize the function of the Set button.
Up cross key: Press the up cross key to change the White Balance setting, which enables you to ensure that your photo colors are accurate and not biased by the color of the light source.
Right cross key: Press the right cross key to adjust the AF mode. This option controls the camera’s autofocus behavior.
Down cross key: Press the down cross key to change the Picture Style, which you can use to adjust color, contrast, and sharpness of your pictures.
Left cross key: Press the left cross key to change the Drive mode. The Drive mode settings enable you to switch the camera from single-frame shooting to continuous capture or self-timer/remote-control shooting.
Playback button: With an icon similar to the play button on most other devices, press this button to switch the camera into picture-review mode.
Erase button: Sporting a trash can icon, the universal symbol for delete, this button lets you erase pictures from your memory card. In Live View and Movie mode, this button is involved in the focusing process.
Menu button: Press this button to access the camera menus.
DISP button: The Shooting Settings display appears automatically on the monitor when you turn on the camera. The screen shuts off after a period of inactivity, after which you can bring it back to life by either pressing the DISP button or pressing the shutter button halfway and then releasing it. Also, when navigating the camera’s menus, pressing the DISP button takes you to the Camera Settings display. In Playback, Live View, and Movie modes, pressing the button changes the picture-display style.
Front-left buttons

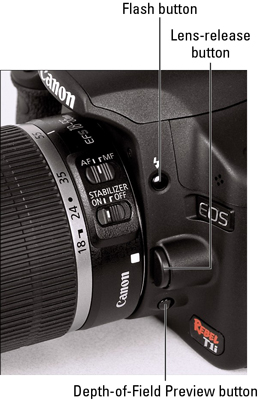
Flash button: Press this button to bring the camera’s built-in flash out of hiding when you use the advanced exposure modes (P, Tv, Av, M, or A-DEP).
Lens-release button: Press this button to disengage the lens from the lens mount so that you can remove it from the camera.
Depth-of-Field Preview button: When you press this button, the image in the viewfinder offers an approximation of the depth of field that will result from your selected aperture setting, or f-stop. Depth of field refers to how much of the scene will be in sharp focus.


