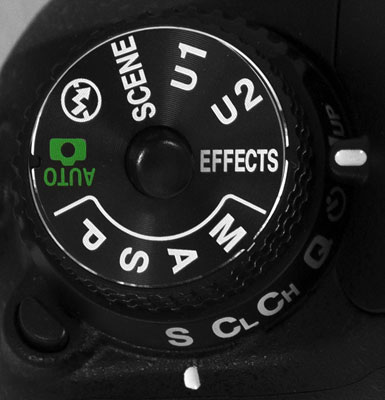
When you set the Mode dial on your Nikon D7200 to Effects, as shown in the following figure, you can apply special effects on the fly — that is, the effect is added as the camera writes the picture to the memory card.

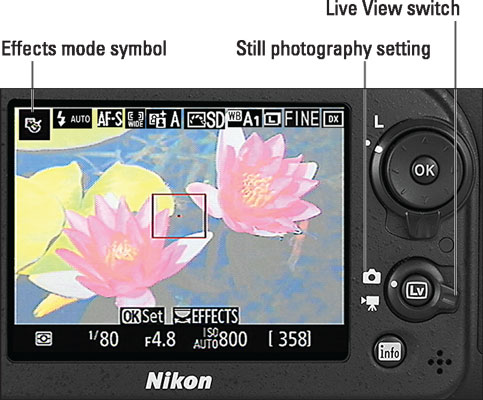
Using Effects mode involves a special setup routine. Start by setting the camera to the Live View still photography mode, as shown in the following figure. You can't adjust effect settings unless you're in this mode. In Movie mode, you can't even select a different effect, let alone tweak its settings.
An icon representing the selected effect appears in the upper-left corner of the Information display, as shown. (The icon in the figure represents the Color Sketch effect.) Rotate the Main command dial to select a different effect.

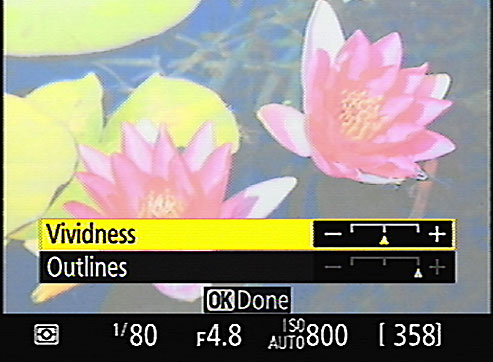
An OK/Set symbol at the bottom of the display indicates that you can fine-tune the effect. Press OK to access the settings. For example, the following figure shows settings available for the Color Sketch effect. Use the Multi Selector to adjust the settings and then press OK to return to the live preview. You can then exit Live View if you want and use the viewfinder to take the photo or, if you want to record a movie, rotate the Live View switch to the movie-camera position and press the movie-record button to start recording.

You can choose from these effects:
Night Vision: Use this setting in low-light situations to produce a grainy, black-and-white image.
Because the camera needs to use a slow shutter speed to record the image in dim lighting, use a tripod to avoid camera movement, which can blur your photo. Moving subjects may appear blurry even if the camera is on a tripod. Flash is disabled, and the image is recorded in the JPEG format. You can't record a Night Vision photo in the Raw (NEF) format.
Color Sketch: This setting produces an effect similar to what you see in earlier figures. As with the Night Vision mode, photos are recorded in the JPEG format. Movies play back as a series of still images rather than a standard movie. Autofocusing during movie recording is disabled.
Miniature Effect: This one produces results similar to its counterpart on the Retouch menu.
As with the Retouch menu version, this effect works by blurring everything but a small area of the image. To set up the shot, focus on the area that you want to remain sharp. Then press OK to display yellow bars that indicate the boundaries of the sharp-focus region. Press the Multi Selector up or down to adjust the size of the focus region; press right or left to change the orientation of the focus boundary. Press OK to exit the settings screen.
Flash is disabled, as is the AF-assist lamp. You can capture a still image in the JPEG mode only, and in Continuous Release mode, the frames per second rate is reduced.
For movies, sound recording is disabled, and autofocus isn't possible during recording. Perhaps most important, movie frames are compressed and play back at very high speed. Record about 45 minutes of footage, for example, and you end up with about a 3-minute clip.
Selective Color: This effect creates an image in which all but one to three colors are desaturated, just like the Selective Color option on the Retouch menu.
In Effects mode, you see the same controls for selecting the colors you want to retain as when you use the Retouch menu tool. Three color swatches, each neighbored by a color-range adjustment setting, appear at the top of the screen, and a small color-selector box appears in the middle of the screen. The process of selecting colors is a little different, though:
Choose a color to retain: Frame the image so that the selection box is over the color you want to preserve. Then press the Multi Selector up.
Set the color range: After your selected color appears in the color box, the range value becomes active. Press the Multi Selector up and down to change the value. The higher the value, the more a pixel can vary in color from the one you chose and still be retained in the photo.
Choose an additional color to retain: Rotate the Main command dial to select the second swatch box and repeat the process of choosing a color and setting its range value.

Deselect a color: Change your mind about retaining one of your chosen colors? Rotate the Main command dial to highlight its color swatch and then press the Delete button. Or hold down the button for a few seconds to delete all your selected colors.
Press OK to lock in your decisions and hide the options. Press OK again to revisit the settings.
As with the preceding Effects settings, you're limited to using JPEG as the file type, and flash is disabled.
Silhouette: Choosing this setting ensures that backlit subjects are captured in silhouette. To ensure that the subject is dark, flash is disabled.
High Key: A high key photo is dominated by white or very light areas, such as a white china cup resting on a white doily in front of a sunny window. This setting is designed to produce a good exposure for this type of scene, which the camera otherwise tends to underexpose in response to all the high brightness values. Flash is disabled.
How does the name relate to the characteristics of the picture? Well, photographers refer to the dominant tones — or brightness values — as the key tones. In most photos, the midtones, or areas of medium brightness, are the key tones. In a high key image, the majority of tones are at the high end of the brightness scale.
Low Key: The opposite of a high key photo, a low key photo is dominated by shadows. Use this mode to prevent the camera from brightening the scene too much and thereby losing the dark and dramatic nature of the image. Flash is disabled.


