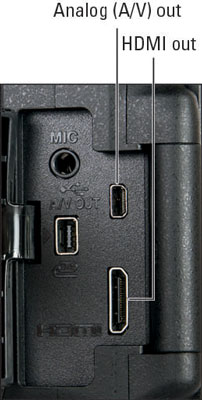
Your Nikon D5300 is equipped with a feature that allows you to connect your camera and play your pictures and movies on a television screen. In fact, you have three playback options:
Regular (standard definition) video playback: Haven't made the leap yet to HDTV? No worries: You can set the camera to send a regular standard-definition audio and video signal to the TV. The cable you need is even provided in the camera box. Look for the cable that has yellow, red, and white plugs at one end.
HDMI playback: If you have a high-definition television, you need to purchase an HDMI cable to connect the camera and television. You need a Type C mini-pin HD cable; prices start at about $20. Nikon doesn't make its own cable, so just look for a quality third-party version.
By default, the camera decides the proper video resolution to send to the TV after you connect the two devices. But you have the option of setting a specific resolution as well. To do so, select HDMI from the Setup menu, press OK, and then choose Output Resolution, as shown in Figure8-26. Press the Multi Selector right to access the available settings.

For HDMI CEC TV sets: If your television is compatible with HDMI CEC, your D5300 enables you to use the buttons on the TV's remote control to perform the functions of the OK button and Multi Selector during full-frame picture playback and slide shows.
To make this feature work, you must enable it via the Setup menu. Again, start with the HDMI option, but this time, select Device Control and set the option to On.
You need to make one final preflight check before connecting the camera and television: Verify the status of the Video Mode setting on the Setup menu. You have two options: NTSC and PAL. Select the video mode used by your part of the world. (In the United States, Canada, and Mexico, NTSC is the standard.)
After you select the necessary Setup menu options, grab your video cable, turn off the camera, and open the little rubber door on the left side of the camera. There you find two connection ports: one for a standard audio/video (A/V) cable and one for the HDMI cable.

The smaller plug on the A/V cable attaches to the camera. The yellow plug goes into your TV's video jack; the white one, to the left audio channel jack; and the red one, to the right audio channel jack. For HDMI playback, a single plug goes to the TV.
At this point, you’ll need to check out your TV manual to find out exactly which jacks to use to connect your camera. You also need to consult the manual to find out which channel to select for playback of signals from auxiliary input devices. Then just turn on your camera to send the signal to the TV set.
If you don't have the latest and greatest HDMI CEC capability (or you lost your remote), control playback using the same techniques as you normally do to view pictures on your camera monitor. You can also run a slide show.


