You can control this aspect of the autofocus system in all exposure modes except the Miniature and Selective Color Effects modes. You have the following Focus mode options:
- AF-A (auto-servo autofocus): This mode gives the camera control over whether focus is locked when you press the shutter button halfway or is adjusted until you snap the picture. The camera bases its decision on whether it detects motion in front of the lens. AF-A is the default setting for most exposure modes and is the only option when you shoot in the Miniature and Selective Color exposure modes.
The problem with AF-A mode is that if your subject is stationary but people or objects are moving nearby, the camera may see that surrounding movement and mistakenly switch to continuous autofocus. By the same token, if the subject is moving only slightly, the camera may not select continuous autofocusing. So my advice is that in exposure modes that give you the choice, select one of the next two Focus modes instead.
- AF-S (single-servo autofocus): Designed for shooting stationary subjects, this mode locks focus when you depress the shutter button halfway. (Think S for still, stationary.)
In AF-S mode, the camera insists on achieving focus before it releases the shutter. If this behavior annoys you, open the Custom Setting menu, choose Autofocus, and then choose AF-S Priority Selection. If you change the setting to Release, the picture is then recorded when you fully depress the shutter button even if focus isn't yet achieved.
- AF-C (continuous-servo autofocus): Geared to capturing moving targets, AF-C mode adjusts focus as needed as long as the shutter button is pressed halfway. (Think C for continuous motion.) Remember that a focus-adjustment occurs only if the subject moves closer to or farther from the camera. If the subject is moving but only shifts a short distance in a horizontal direction, no adjustment is needed because the focusing distance remains the same.
By default, the camera records the shot in AF-C mode the instant you fully depress the shutter button, regardless of whether focus is set. As with AF-S mode, though, you can alter the focus/shutter-release connection. Again, head for the Autofocus section of the Custom Setting menu, but this time choose AF-C Priority Selection. Change the setting from Release to Focus to prevent the shutter from being released before focus is set.
To decide which shutter-release option is right for you, consider whether you'd rather have any shot, even if it's out of focus, or capture only those that are in focus. I prefer the latter, so I set both AF-S and AF-C modes to Focus. Why waste battery power, memory card space, and inevitable time deleting out-of-focus pictures? Yes, if you're shooting rapid action, you may miss a few shots waiting for the focus to occur — but if they're going to be lousy shots, who cares? Sports shooters who fire off hundreds of shots while covering an event, though, may want to unlock shutter release for both AF-C and AF-S modes. Again, you may wind up with lots of wasted shots, but you increase the odds that you'll capture that split-second "highlight reel" moment.
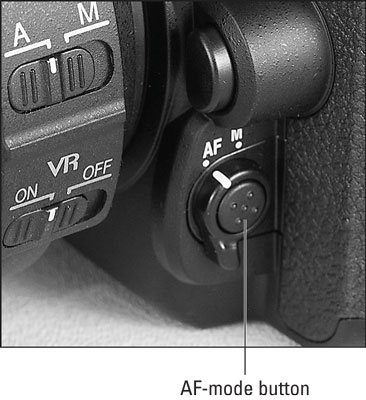
To change the Focus mode, press and hold the AF-mode button, labeled here. Given that the button is the only way to access both the Focus mode and AF-area mode setting, it's odd that it bears no identifying label to remind you of its purpose. Lurking in the center of the Focus-mode selector switch, the AF-mode button offers access to both the Focus mode and AF-area mode settings.
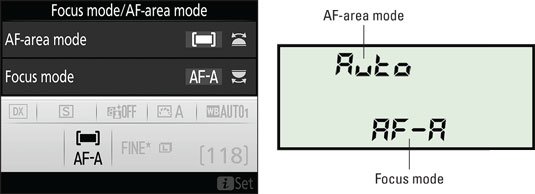
At any rate, when you press the AF-mode button, the selection screen shown on the left of the following figure appears. In the Control panel, all data but the Focus mode and AF-area mode settings disappear, as shown on the right.
 While the options screens are displayed, rotate the Main command dial to change the Focus mode.
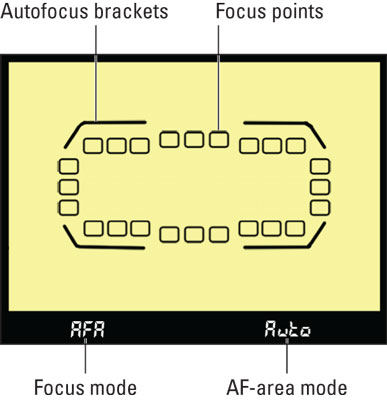
The viewfinder display also changes when you press the AF-mode button, showing the Focus mode and AF-area mode settings in the areas labeled here. The autofocus brackets, which indicate the area of the frame that contains the camera's autofocus points, also appear, as do rectangles representing the active points. One quirk to note: In the default AF-area mode, AF-A (Auto Area), all 51 autofocus points are active. But the viewfinder displays points only around the perimeter of the autofocus brackets, as shown in the figure, so that you can get a good view of your subject. The hidden points are spaced evenly throughout the area enclosed by the autofocus brackets.
 The viewfinder also shows the current Focus mode and AF-area mode settings while you press the AF-mode button.


