After you take landscape images for a panorama, you stitch them together to make a single image. Many newer cameras have stitching software as part of the package. If your camera doesn’t have stitching software, or you’re looking for a different solution, consider using Photoshop Elements Photomerge Panorama.
Choose File→New→Photomerge Panorama.

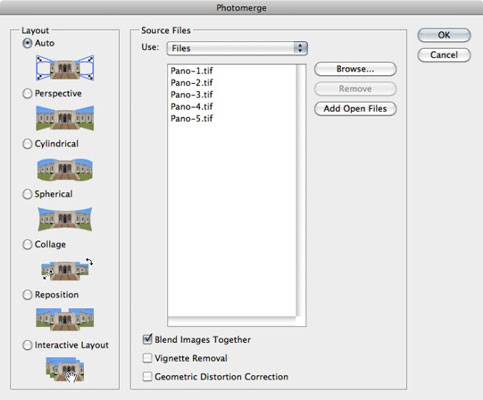
The Photomerge dialog box appears.
Click Browse.
The Open dialog box appears.
Navigate to the images you photographed for your panorama and open them.
The filenames appear in the Photomerge dialog box.
Choose a layout.
Accept the default Auto layout if you photographed your images as outlined in the preceding section.
Accept the default Blend Images Together option and choose any additional options.
The Vignette Removal option is handy if the lens you used to photograph panoramas produced a dark corner at the edge of each image. This option removes the dark corner before merging the images together. Geometric Distortion Correction is not needed if you photograph the images for your panorama with a lens that is the 35mm equivalent of 50mm.
Click OK.
Photoshop Elements merges the images together, the Photomerge dialog closes, and the stitched image appears in the Photoshop Elements main window. This takes a while even on a fast computer. After the image appears, Photoshop Elements displays the Clean Edges dialog box.
Accept the default option to fill in the edges of your panorama.
This option tidies up the image and fills in any blank spaces at the edge of the panorama. Alternatively, you can choose No and crop the image to the desired size.


