In Photoshop Elements, you use selection tools to create selections of pixels in a photo. Unlike the objects you find in programs such as Microsoft PowerPoint, graphics you import in Microsoft Word, or artwork you create in illustration programs such as Adobe Illustrator or CorelDraw, photos are composed of tiny pixels.
Geometric selection tools
The geometric selection tools include the Rectangular Marquee tool and the Elliptical Marquee tool. By default, the Rectangular Marquee tool appears “on top” in the Tools panel, whereas the Elliptical Marquee tool is hidden from view.
So how do you find the hidden tool? Easy — look down at the Tool Options panel. In the Tool Options panel, you see all tools within the selected tool’s group as well as attribute choices for setting options for the tools, as shown in the figure.

Using geometric selection tools is straightforward. Click either the Rectangular Marquee tool or the Elliptical Marquee tool and drag on a photo to create a rectangle or ellipse.
Lasso tools
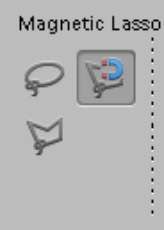
Whereas the geometric selection tools restrict you to creating rectangles and elliptical shapes, the Lasso tools are used to create irregular selections — similar to freehand drawing with a pencil. The following three types of Lasso tools are shown in the Tool Options panel in the figure:

Lasso: Click this tool and draw on a photo in a free-form fashion to select pixels around irregular shapes.
Magnetic Lasso: With this tool, you can click and drag around a shape, and Elements magically hugs the shape as you draw. If you have a foreground figure that you want to isolate from the background, you can drag this tool around the shape. Elements automatically refines the selection to grab the shape you’re selecting.
Polygonal Lasso: This tool behaves like a Polygon tool that requires you to click and release the mouse button and then move the cursor to click in another area on the photo. As you continue clicking, the selection shape takes the form of a polygon.
In the figure, the Magnetic Lasso tool is selected in the Tool Options panel, and the tool name appears above the tool. As you select a tool, the tool name appears similarly in the Tool Options panel.
Magic Wand tool
The Magic Wand tool is truly magical. This tool performs a few different actions. For example, when you click the tool in an area of a blue sky, the area you click is sampled for the selected pixel value. Immediately following the mouse click, Elements travels outward in a contiguous area to find pixels of similar value and includes them in the selection.
To determine the amount of variance of the pixel values picked up by the Magic Wand tool, tweak the Tolerance value in the Tool Options panel, as shown in the figure. You can change (by moving the slider or typing in the text box) the value so that the Magic Wand tool selects a wider range of pixels (a higher number) or narrower range of pixels (a lower value).

By default, the Tolerance value is set to 32, which means that the pixel you click produces a selection of 16 pixel values lower than the sample and 16 pixel values higher than the sample.
After you create a selection with the Magic Wand tool and you want to add another selection to the first selection, press the Shift key and click the Magic Wand tool in another area on the photo. If you grab too many pixels, you can press the Alt (Option) key and click the area you don’t want to be selected.
If you need to refine the selection, you can adjust the Tolerance value in the Tool Options panel before clicking the mouse button each time you add to or subtract from a selection.
Suppose that you make a selection with the Magic Wand tool and the selection appears with tiny gaps (unselected areas). You can quickly grab those tiny areas that were not selected by using a menu command. Choose Select→Modify→Expand and type a small number in the Expand Selection dialog box (1 or 2 pixels). The selection expands.
Now return to the Select menu and choose Modify→Contract. Type the same value in the dialog box (1 or 2 pixels) to contract the selection.
Quick Selection tool
The Quick Selection tool is similar to the Magic Wand tool. Click the tool in an area of a photo, and three check boxes in the Tool Options panel permit you to start a new selection, add to the current selection, or subtract from the current selection.
If the Quick Selection tool isn’t visible in the Tools panel, click the Selection Brush or the Magic Wand tool and click the Quick Selection tool in the Tool Options panel (refer to the figure).
In this figure, the Quick Selection tool was used to click a few times in the sky area of the photo to create the selection.

After you have a selection — regardless of the tool you used to create the selection — other edits you perform in Photoshop Elements apply to only the active selection. If no selection appears on your photo, edits are made to the entire layer.
Using this figure as an example, you can add a little more character to the sky. First, set the foreground color to a light blue, and then apply the Filter→Render→Clouds filter to artificially create a better sky.

Selection Brush tool
Use the Selection Brush tool like a brush to change shapes and diameters and paint over an area in an image. The result is a selection.

