The fonts you use in MATLAB can say a lot about your presentation. Here are the four ways in which you can modify the appearance of fonts in MATLAB to good effect:
Bold
Monospace
Italic
Underline
Bold
The use of emphasis, normally associated with bold type, can make data stand out. However, in MATLAB, the term bold actually refers to font weight. The strength of the font you use provides a level of emphasis. In fact, you can set a font to four different levels of emphasis:
Light
Normal
Demi
Bold
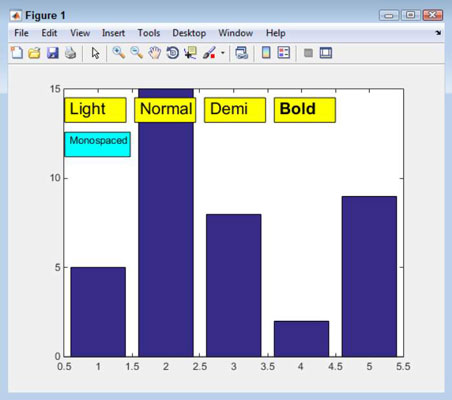
The following steps help you see the varying levels of emphasis that you can achieve using MATLAB.
Type Bar1 = bar([5, 15, 8, 2, 9]); and press Enter.
MATLAB creates a new bar chart.

Type TBox1 = annotation(‘textbox’, [.13, .825, .14, .075], ‘String’, ‘Light’, ‘FontName’, ‘Arial’, ‘FontSize’, 16, ‘FontWeight’, ‘light’, ‘BackgroundColor’, [1, 1, 0]); and press Enter.
You see a new annotation of type textbox added to the plot. The various entries that you typed change the default font, the font size, the font weight, and the background color. To see the various weights side by side, the next few steps add three more textboxes, each with a different font weight.
Type TBox2 = annotation(‘textbox’, [.29, .825, .14, .075], ‘String’, ‘Normal’, ‘FontName’, ‘Arial’, ‘FontSize’, 16, ‘FontWeight’, ‘normal’, ‘BackgroundColor’, [1, 1, 0]); and press Enter.
You see the next annotation placed on the second bar. In most cases, you won’t see much difference between the light and normal settings because few fonts support both light and normal. However, some do, so it’s important to experiment.
Type TBox3 = annotation(‘textbox’, [.45, .825, .14, .075], ‘String’, ‘Demi’, ‘FontName’, ‘Arial’, ‘FontSize’, 16, ‘FontWeight’, ‘demi’, ‘BackgroundColor’, [1, 1, 0]); and press Enter.
Type TBox4 = annotation(‘textbox’, [.61, .825, .14, .075], ‘String’, ‘Bold’, ‘FontName’, ‘Arial’, ‘FontSize’, 16, ‘FontWeight’, ‘bold’, ‘BackgroundColor’, [1, 1, 0]); and press Enter.
You see the final annotation placed on the plot. Looking at the four different annotations, you can see a progression of weights and emphasis.

Monospace
A monospace font is one in which the characters take up precisely the same amount of space. The reason that monospace is still useful is because getting elements to line up is easy. That’s why code is often presented in monospace: You can easily see the indentation that the code needs to look nice and work properly. The way that monospace is set for an element is through the font.
Here are some commonly used monospace fonts:
Anonymous Pro
Courier
Courier New
Fixedsys
Letter Gothic
Lucida Sans Typewriter Regular
Lucida Console
Monaco
Profont
Ubuntu
Check here for additional monospace fonts. To obtain a monospace font appearance, you simply change the FontName property to a monospace font. For example, type TBox5 = annotation(‘textbox’, [.13, .72, .15, .075], ‘String', ‘Monospaced', ‘FontName', ‘CourierNew’, ‘BackgroundColor', [0, 1, 1]); and press Enter to produce a text box containing monospace text.

Italic
To create an italic font, the person creating the font must design a separate set of letters and place them in a file containing the italic version.
Some fonts don’t have an italic version. When you encounter such a situation, you can ask the computer to skew the font programmatically. The font file hasn’t changed, but it looks italicized onscreen. This version of italics is called oblique. The italic version of a font always gives a better visual appearance because the italic version is hand tuned.
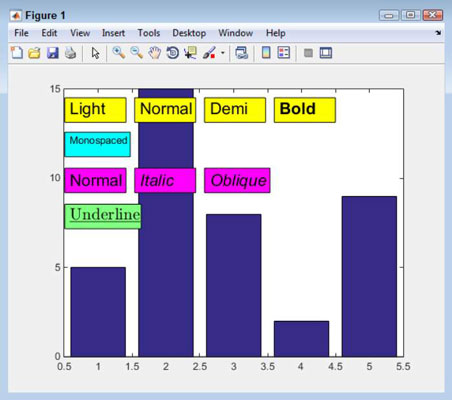
To configure a font for either italic or oblique, you use the FontAngle property. The following steps help you see the differences between the standard, italic, and oblique versions of a font.
Type TBox6 = annotation(‘textbox’, [.13, .61, .14, .075], ‘String’, ‘Normal’, ‘FontSize’, 16, ‘FontAngle’, ‘normal’, ‘BackgroundColor’, [1, 0, 1]); and press Enter.
You see a textbox annotation containing a normal version of the default MATLAB font for your system.
Type TBox7 = annotation(‘textbox’, [.29, .61, .14, .075], ‘String’, ‘Italic’, ‘FontSize’, 16, ‘FontAngle’, ‘italic’, ‘BackgroundColor’, [1, 0, 1]); and press Enter.
You see a textbox annotation containing either a normal or an italic version of the default MATLAB font for your system. The italic version appears only if the font happens to have an italic version (most do).
Type TBox8 = annotation(‘textbox’, [.45, .61, .15, .075], ‘String’, ‘Oblique’, ‘FontSize’, 16, ‘FontAngle’, ‘oblique’, ‘BackgroundColor’, [1, 0, 1]); and press Enter.
You see a textbox annotation containing an oblique version of the standard font. You may see a slight difference in angle between the italic and oblique versions.

Underline
Interestingly enough, MATLAB doesn’t provide a simple method to underline text. For example, you can’t easily perform this particular task using the GUI. In fact, the default method of creating text using code doesn’t provide a method for underlining text, either. However, you have a way to accomplish the goal using a special interpreter called LaTeX.
The LaTeX interpreter is built into MATLAB, but it isn’t selected by default, so you must set it using the Interpreter property. In addition to underlining text, you use the underline() LaTeX function. To see how this works, type TBox9 = annotation(‘textbox’, [.13, .5, .175, .075], ‘String', ‘underline{Underline}’, 'FontSize’, 16, ‘BackgroundColor’, [.5, 1, .5], ‘Interpreter', ‘latex’); and press Enter.
Notice that the output differs quite a bit when using the LaTeX interpreter. That’s because LaTeX ignores many of the formatting properties supplied by MATLAB — you must set them using LaTeX functions. However, the problem is more serious than simply setting a font because MATLAB appears to lack the required font files for LaTeX.
The bottom line is that you should avoid underlining text unless you truly need to do so. Use bold, italic, and font colors in place of the underline as often as possible. The discussion at MathWorks.com can provide you with additional information about this issue and some potential work-arounds.


