You also look at group settings, such as whether you are open to receiving invitations to join a LinkedIn group or whether you want your network to know when you join a group. Finally, you check out the Messages section, where you can decide whether you want to receive invitations for LinkedIn research efforts.
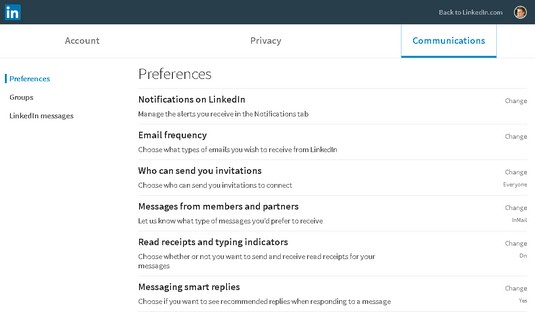
To begin reviewing the Communications settings, click the Me icon on the top navigation bar of any LinkedIn page. Below the Account heading, click Settings & Privacy, and then click the Communications header. The Communications screen appears.
 Review all the LinkedIn communication settings here.
You can make the following changes to your communications settings:
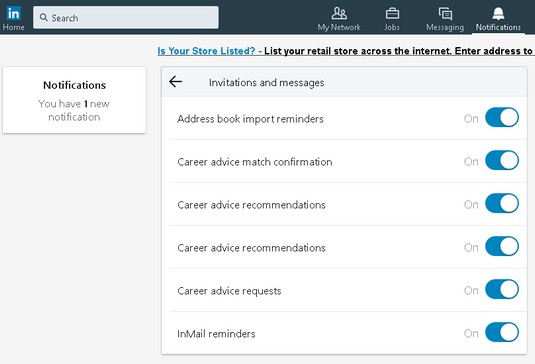
- To decide which actions on LinkedIn will appear on your LinkedIn Notifications screen: Click Change next to Notifications on LinkedIn. The screen shown below appears, displaying the major categories of events that can create notifications.
 See the categories of events that could result in LinkedIn notifications.
 Decide when you want LinkedIn to notify you when certain events occur.
Click a category in the Notifications screen. You see a list of events in that category that could trigger a notification. Each option has a slider button that you can set to On or Off. If you want to be notified when the event occurs, set it to On; otherwise, set it to Off.
- To determine how often LinkedIn emails you and for what reasons:
- Click the Change link next to E-Mail Frequency. The Email Frequency page appears. Each section, such as Invitations, has universal On and Off settings.
 Decide when you want LinkedIn to email you based on event category.
 - Click the Details link to expand the list of options.
 Decide what messages you want emailed and their email frequency.
- Review the list of options and decide in each circumstance how you want to receive your emails. The available choices follow:
- Recommended: Based on the category, LinkedIn will send you a summary of messages if you have a lot of incoming messages or notify you only of items you may have missed when using the site.
- Individual Email: As soon as something occurs in a given category, such as an introduction, an invitation, or a job notification, LinkedIn sends you an email with that one item in the email.
- Weekly Digest Email or Daily Digest Email: Instead of individual emails, LinkedIn groups activities in a given category and sends you one email in a digest format, with a summary at the top and the detailed activities below. Note that daily digests are for group updates, and weekly digests are for general and group updates. Not every category has a digest option.
If you don’t want to receive any emails for a given circumstance, set the condition to Off, using the slider setting on the right. However, you can still read the message when you’re logged into the LinkedIn site.
- Repeat these steps for each category in the list of Which Emails Do You Want to Receive. Spending time to visit each category and make wise decisions on what needs an immediate email, what can be summarized in a digest, and what isn’t needed can save you lots of time.When you have finished with the Email Frequency setting, click the Back to All Settings link (at the top of the screen).
- Click the Change link next to E-Mail Frequency. The Email Frequency page appears. Each section, such as Invitations, has universal On and Off settings.
- If you want to control who can send you an invitation to connect on LinkedIn: Click the Change link next to Who Can Send You Invitations. You can choose everyone on LinkedIn; only people who know your email address or appear in your imported contacts list; or only people who appear on your imported contacts list. If you choose one of the last two options, a new potential contact must either know your email or be someone whom you have imported from your email program, for example. This setting is especially helpful if you need to control who is in your network.
- To control unsolicited messages from other LinkedIn members or third parties: Click Change next to Messages from Members and Partners. Two questions regarding potential incoming communications appear. You can say Yes or No to receiving an InMail, which is a paid email from a LinkedIn member who is not a member of your network. You can also say Yes or No to receiving sponsored InMail, which is typically a message containing a marketing or promotional message from a LinkedIn partner or advertiser. Your name and email address are not disclosed by responding Yes; you are simply receiving the message and can decide on your own whether to respond.
- To create a more dynamic experience when messaging someone on LinkedIn: Click Change next to Read Receipts and Typing Indicators. If you set this option to On, as you are typing a message on LinkedIn, the recipient will see the typing indicator (three dots). (And you will see the typing indicator when the other person is typing.) In addition, both of you will see a read receipt, which is confirmation that the other party has seen your reply. This feature is similar to that on other social media networks and makes LinkedIn a little more familiar to use when messaging.
- To get pre-programmed replies you can click when sending a message: Click Change next to Messaging Smart Replies. This feature appears only on certain messages where LinkedIn can automatically provide a potentially helpful reply to an incoming message.
- To decide whether you are open to receiving notifications and from and invitations to LinkedIn groups: Click Groups from the left sidebar. Click Change next to Group Invitations and change the setting to Yes if you want to receive invitations to join a group. Click Change next to Group Notifications and change the setting to Yes if you want an update sent to your network when you join a group.
- To receive invitations to participate in LinkedIn’s research efforts: Click the Change link next to Participate in Research. Or click LinkedIn Messages from the left sidebar. Change the setting to Yes.


