By the way, if you’ve used Illustrator for years, you might remember that the Effect menu used to list effects and filters. Filters were like effects, except they couldn’t be easily edited after being applied. But SVG filters are not a revival of those types of filters; SVG filters are called filters because they operate through the SVG filter element in coding web pages.
Here's another cool thing about SVG filters: As you discover shortly, you can import and even create your own SVG filters.
When you apply an SVG filter, it may look similar to an non-SVG effect. For example, this figure shows two identical squares, but the one the left has a raster drop shadow effect applied and the one on the right has a vector (SVG) drop shadow filter applied.
 A drop shadow effect (left) and SVG filter (right).
When I select the rectangle with the SVG filter, that filter appears in the Appearance panel, as shown.
 illustrator-drop-shadow-filter
The different ways that effects and SVG filters change the path of an object have subtle but real implications. Some of those implications are relevant to only web and app developers, but from your end of the workflow, the important thing to keep in mind is to avoid mixing SVG filters and raster effects in projects because they affect objects differently.
By the way, I can’t help sharing here that the square with the raster drop shadow in these figures is almost seven times larger than the one with the SVG filter. Just a brief public service announcement from the SVG industry on how you can lose (file) weight with SVGs.And as you may have surmised by now, raster effects are not programmable. When you turn them over to an animator or an HTML coder, your developer teammate is not going to have the same kind of freedom to control how raster effects work in an animation or a transition.
Finally, when you apply SVG filters instead of raster effects to SVG artwork, you don’t have to worry about those filters degrading when the artwork is rescaled in a browser.
How to apply SVG filters
I’ve made the case for applying SVG filters whenever possible in SVG artwork. Let’s walk through how that happens:- Select the object(s) to which you are applying the filter.
- Choose Effect→SVG Filters and select a filter. The SVG Filters submenu has a list of filters with names that at best are only semi-intuitive (such as AI_Shadow_1, which is a drop shadow) and more often just cryptic (such as AI_Dilate_6). You’ll have to experiment until you get a feel for how these filters work.
- With the object to which you applied the filter still selected, view the Appearance panel (choose Window→Appearance).
- Hover your cursor over the applied filter and click it to reveal the Apply SVG Filter box, shown here.
 Editing SVG filters.
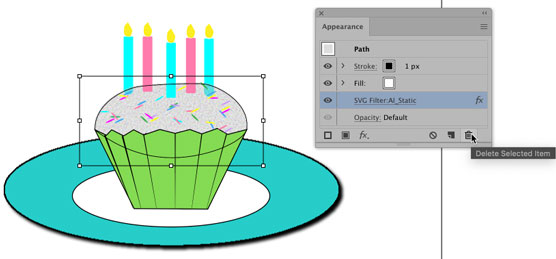
Here you can change the applied filter, and use the Preview check box to see how the filter will look. You can also select and delete an SVG filter in the Appearance panel, as shown.
 Deleting an SVG filter.
How to import SVG filters
Illustrator’s set of filters is useful but hardly pushes the limits of what you can do with SVG filters. If you code in HTML, you’ll find an accessible tutorial for creating your own SVG filters at w3schools.You also can purchase additional sets of filters online, and even find some nice sets of SVG free SVG filters. To install this set of filters or other filters, follow these steps:
- Choose Effect→SVG Filters→Import SVG Filter.
- In the dialog that opens, navigate to and double-click the SVG filters file you downloaded. The file will probably be an SVG file.
- Choose Effect-->SVG Filters to apply new filters to selected objects. After you import new filters, they appear on the SVG Filters submenu.


