To view and use the tools QBOA makes available to accountants, open any client QBO company. Then, on the QBOA toolbar, click the Accountant Tools button (the one that looks like a suitcase). QBOA displays the Accountant Tools menu, shown here.
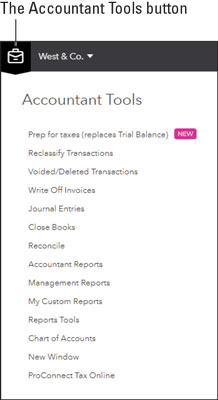 The Accountant Tools menu contains commands specifically designed to aid the accountant.
The Prep for Taxes page in QBOA
You use the Prep for Taxes tool to adjust and review accounts before preparing the client’s taxes. The Prep for Taxes page replaces the Trial Balance page. The page is well-designed to help you find accounts that need year-end adjustments and easily make them by providing a link to the Journal Entry transaction.The page you see initially presents a working trial balance like the one shown here.
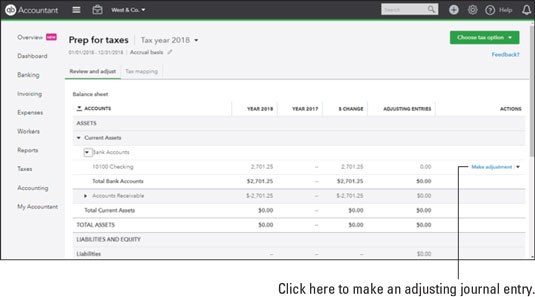 The Review and Adjust tab of the Prep for Taxes page.
- The values in the Unadjusted Balance column are locked on the page to protect the integrity of the data. If you click the carats beside the various headings (that is, Current Assets, Bank Accounts, and so on), you’ll find that you can click the Make Adjustment link in the Actions column beside an appropriate account to create adjusting journal entries for that account. When you click the link, QBOA opens a journal entry window, where you can record the adjusting entry—and QBOA automatically selects the Is Adjusting Journal Entry? check box. Once you save the entry, QBOA redisplays the Prep for Taxes page and indicates that you made a change (see the following figure). If you accept the change, QBOA updates the Prep for Taxes page to incorporate your adjustment; in addition, QBOA changes the Adjusted Balance column to reflect your adjustment.
 The Prep for Taxes page after you make an adjusting entry and before you accept the entry.
- You can click any dollar value that appears as a link to view a report of all transactions that make up that balance. From the report, you can drill down to a particular transaction and, if necessary, change it. After you save the transaction and redisplay the report, you can click the Back to Prep for Taxes link at the top of the report page to redisplay the Prep for Taxes page. Once again, QBOA indicates that you made a change, and, after you accept the change, updates the Prep for Taxes page to incorporate the change.
- You can use the down arrow in the Actions column to add notes and attach documents to a particular line. This helps you remember why you made a particular adjustment.
Click the Tax Mapping tab on the Prep for Taxes page to see the page you use to map last year’s client QBO company information directly into tax forms.
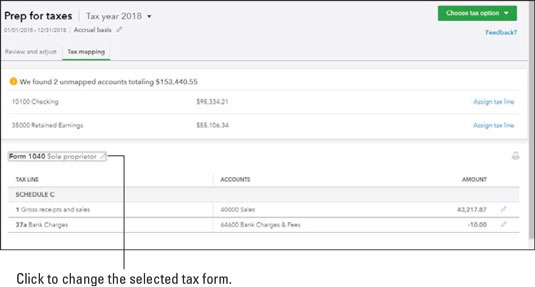 The Tax Mapping tab of the Trial Balance page.
If you haven’t yet selected a tax form for the QBO company, the first time you select the Tax Mapping tab, you’ll be prompted to select one. Or, you can click the Edit button (the pencil) beside the selected form at the bottom left side of the Prep for Taxes page and select a tax form.
To assign an account to a tax form line or edit the line to which an account is assigned, click the Assign Tax Line link. QBOA displays the Assign Tax Line panel on the right side of the screen, which contains a list box from which you select the appropriate tax form line, and then click Save.When you finish reviewing the Prep for Taxes page and making adjustments to entries, you can click the Choose Tax Option button in the upper right corner of the page and then click Create New Return or Update Existing Return (as appropriate) to transfer the information to ProConnect Tax Online and generate a tax return. You don’t pay anything to use the Prep for Taxes feature; you pay only when you print or E-file a return from ProConnect Tax Online.
If you don’t use ProConnect Tax Online or you are not the tax preparer, you have the option to export the adjustments to a comma-separated values (CSV) file (readable by Excel) so that you can import them into a separate application. Choose the Export CSV File option on the Choose Tax Return button.
Reclassifying transactions in QBOA
When you choose Reclassify Transactions from the Accountant Tools menu, the Reclassify Transactions page appears (see the following figure). You can use this page to reclassify transactions without worrying about the company’s closing date.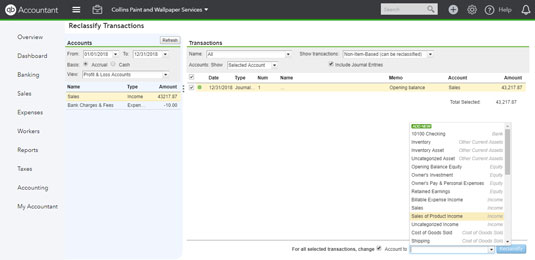 Use this page to reclassify transactions.
You use the information in the Accounts section on the left side of the page and the Transactions section on the right side of the page to filter for the date range and type of accounts (Profit and Loss or Balance Sheet) you want to consider. You then select an account on the left side of the page, and QBOA displays transactions that meet the criteria on the right side of the page. You can reclassify, individually or as a group, transactions that display a green circle.
Follow these steps to reclassify transactions:
1. On the left side of the page, set the date range you want to consider, along with the accounting basis.
2. From the View list box, select the type of accounts you want to consider—Profit & Loss accounts or Balance Sheet accounts.
3. Click an account in the list below the View list box to examine that account’s transactions.
The transactions in the account appear on the right side of the page.
4. Above the list of transactions on the right side of the page, set filters to display the types of transactions that you might consider reclassifying.You can make changes to transactions that display green circles. You can also click a transaction to open it in its transaction window and then make changes to it.
5. To change several transactions simultaneously, select them by clicking the check box beside them.6. Below the list of transactions, select the For Select Transactions, Change check box.
7. From the Account To list, specify a different account.
If Class Tracking is turned on, you’ll also see a field to change the assigned class, the same way you can change an account.
8. Click the Reclassify button.Examining voided and deleted transactions
You can click Voided/Deleted Transactions on the Accountant Tools menu to display the Audit Log. The default view of the Audit Log (see the following figure) shows information about those transactions that have been voided or deleted. But, you can click the Filter button to set a variety of different filters to view other types of transactions and events.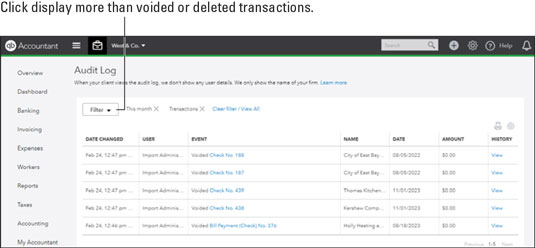 Use the Audit Log to view all kinds of activity in the QBO company.
Writing off invoices
Choosing Write Off Invoices from the Accountant Tools menu displays the Write Off Invoices page, which enables you to view invoices you might want to write off, and then write them off to an account of your choice. At the top of the page, you set filters to display the invoices you want to review. Select the age of the invoices to view those- Greater than 180 days
- Greater than 120 days
- In the current accounting period
- In a custom date range you set
As shown in the following figure, QBOA displays the date, age, invoice number, customer name, original invoice amount, and the amount still due on the invoice. To write off any invoices, click the check box beside them. Then, at the bottom of the page, select the account you want to use to write off the invoices and click the Preview and Write Off button.
The Write Off feature does not make adjusting entries in the current period; instead, it makes adjustments in the period in which the transaction was originally created—and can negatively affect closed periods. To write off an item in a closed period, see this online article.
 Writing off invoices.
QBOA displays the Confirm Write Off dialog box shown in the following figure. If the information in the dialog box is correct, click Write Off. Otherwise, click Cancel.
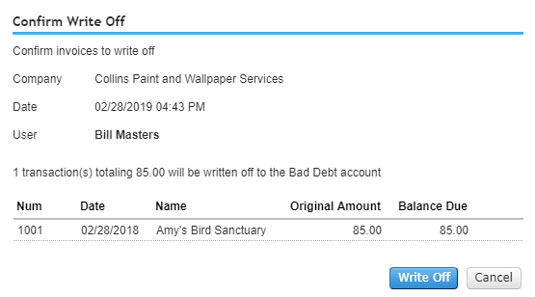 Confirm that you want to write off the selected invoices.
Closing the books
You use the Close Books command on the Accountant Tools menu to display the Advanced page of the QBO company’s Account and Settings dialog box, shown in the following figure. You can click anywhere in the Accounting section to edit the fields in that section, which include the closing date for the books.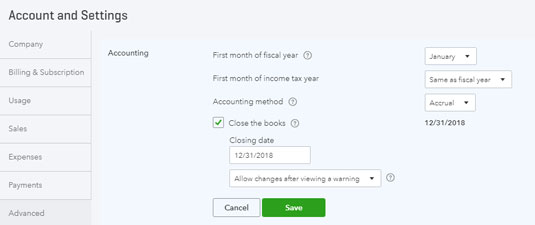 Setting a closing date.
You can set a closing date and then allow changes prior to the closing date after QBO issues a warning, or you can require a password to enter changes prior to the closing date. Click Done to save your changes.
Reviewing reports in QBOA
QBOA contains some reports of particular interest to accountants. If you open a client QBO company and then, from the Accountant Tools menu, click Accountant Reports, the Reports page appears. Reports marked as favorites appear first and, if you scroll down, you’ll find all the reports organized into various groups. The Reports in the For My Accountant group (most appear in the following figure) might be of particular interest to you because it contains reports like the Adjusted Trial Balance report, the Adjusting Journal Entries report, and more. When you’re checking out these reports, be sure to scroll down the page. To make any of these reports appear at the top of the Reports page (so that you don’t need to scroll down), click the star beside the report to mark it as a favorite.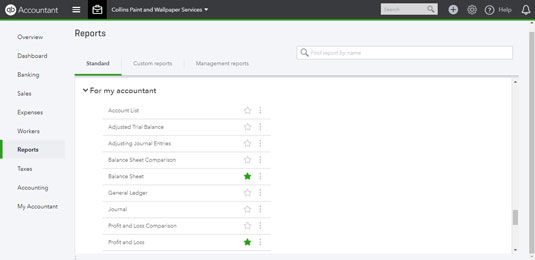 Accountant-oriented reports available in QBOA.
If you choose Management Reports from the Accountant Tools menu (or if you click the Management Reports tab that appears on the Reports page shown), QBOA lists two customized management-style reports: Basic Company Financials and Expanded Company Financials. Both reports display a collection of reports, complete with an elegant cover page and a table of contents. Click the View link in the Action column for either report to view them onscreen, or download them to your computer as PDF files.
The Expanded Company Financials report contains the P&L, Balance Sheet, Statement of Cash Flows, and the A/R Aging Detail and A/P Aging Detail reports. The Basic Company Financials report contains all reports except the Aging Detail reports. If you click the down arrow in the Actions column and then click Edit, you can edit either report package to add or delete reports and modify the appearance of pages in the report, including determining whether pages such as the table of contents appear in the report. Using the same down arrow in the Action column, you can send these reports via email, export the information to PDF files or DOCX files, and make copies of them so that you can make your own set of management reports.
Copying one of these reports before you change it is a great idea; that way, you keep the original report intact but create your own version of it as well.
If you choose My Custom Reports from the Accountant Tools menu or the Custom Reports tab on the Reports page, reports you have customized and saved appear. And you can click Reports Tools on the Accountant Tools menu to set default report dates and the accounting basis. You also can see account reconciliation status for cash and credit card accounts and view and set company closing date information.Be aware that any changes you make using Report Tools resets all default report dates and the accounting basis, even if you run the report from the Reports screen. So, if your report comes up using an unexpected set of dates or accounting basis, check the values set under Report Tools.
Also on the Accountant Tools menu, you’ll find the Reports Tools command. When you choose this command, QBOA displays the Report and Tool Defaults page, which enables you to set default dates you want to use for reports and tools in the client QBO company. These default dates don’t apply to payroll reports, because Payroll is a separate product, nor do they apply to Quick Reports, which you run from the Chart of Accounts page; the Quick Reports period automatically defaults to Since 90 Days Ago.The Report and Tool Defaults page also shows whether the books are closed and provides a button to close the books, and the page shows you the reconciliation status of bank and credit card accounts.
A brief look at other accountant tools in QBOA
The Accountant Tools menu contains a few other tools that make an accountant’s life easier, such as the Reconcile page; from this page, you can opt to reconcile an account you select, or you can review existing reconciliation reports.Also, from the Accountant Tools menu, you can choose Journal Entries to display the Journal Entry window, or Chart of Accounts to display the Chart of Accounts window. You also can use the New Window command to quickly open a new window in QBOA.
Last, from the Accountant Tools menu, you can choose ProConnect Tax Online, which opens a new browser window and takes you to the Tax Hub of ProConnect Tax Online, where you can see the status of your clients’ tax returns. ProConnect Tax Online connects to your QBOA account but is actually a separate product with its own menus in the Navigation bar.


