If you already know how to open, save, and print in, say, Word, you’re probably ready to do the same things in Access without any difficulty.
To make sure you’re totally Access-ready, here’s a look at the basic procedures that can give you a solid foundation on which to build.How to open Access
Access opens in any one of several ways. So, like a restaurant with a very comprehensive menu, some people will love all the choices, and others will say, “I can’t decide! There are just too many options to choose from!”Now, you’ll run into situations in which one of the ways is the glaringly best choice — hands down, and that one will be the way to go. But what if you’ve never heard of it? You’ll be trying to find my phone number (I’m unlisted — ha!) so you can give me a piece of your mind. So to acquaint you with all your choices (so you’ll be ready for any situation), here are all the ways you can open Access:
- Windows 8.1 users can utilize any of several methods to start an application — click the lower left corner of the screen to display the Start icon, press the Windows key on the keyboard, or if you have a touchscreen, tap the Start button. Once the Start screen appears, tap the Access application tile.
If you’ve recently used Access, you’ll see it in the list on the left side of the Start menu. Just choose Start→ Microsoft Access 2019, and Access opens.
- Double-click any existing Access database file on your desktop or in a folder (as shown). Access opens automatically.
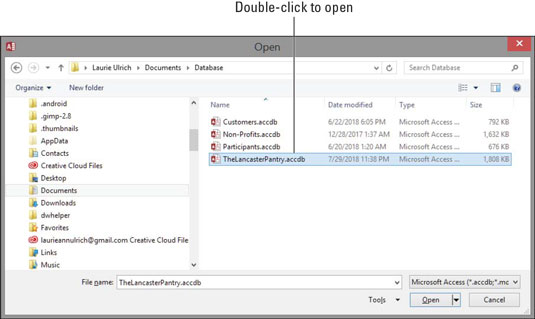 Double-click an Access database file, and Access opens right up.
Good news: Access 2019 will open database files you created with previous versions of Access, and should support whatever features are employed within those database files. All your tables should open properly, and reports, forms, and queries should all work fine, too.
- If some helpful person has added Access to the Quick Launch toolbar (on the taskbar), you can click the Access 2019 icon (it looks like an A on the cover of a book), and there you go. Access opens for you right then and there.
How to select a starting point in Access
So, Access is open, and (assuming you opened it from the Start menu or from the Quick Launch portion of the taskbar) you’re staring at the Access interface. You may see features whose purposes elude you or that you don’t yet know how to use.Look at the ways Access offers you to get started with your database, be it an existing one that needs work or a new one you have all planned out and ready to go.
Opening an existing database
Well, this is the easy one. If a database already exists, you can open it by clicking the File tab (at the upper left of the workspace) and choosing Open from the list of commands that appears. As shown here, a panel opens, displaying the types of files you can open (just to the right of the long red File panel) and the databases you’ve most recently used. Click the word Recent in the list to the near left and then click the database in the Recent list, and it opens, listing its current tables, queries, reports, and forms on the far left side of the window.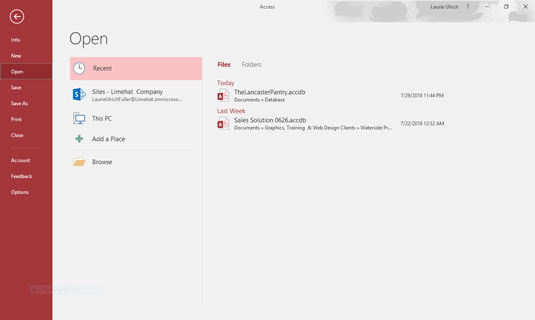 Pick your recently used database from the Recent list on the right.
When the database opens, you can open and view its various parts just by double-clicking them in that leftmost panel; whatever you open appears in the main, central part of the window. The following figure shows an example: a table, ready for editing.
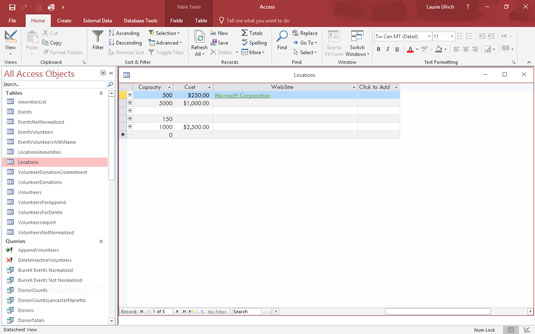 An existing table, ready for more records.
After you open a table, you can begin entering or editing records. If you want to tinker with any existing queries, you can open these, too, just by clicking them in the list on the left side of the workspace.
Starting a new database from scratch
So, you don’t have a database to open, eh? Well, don’t let that stop you. To start a new one, all you have to do is open Access.A database file holds all your database components. Everything associated with the data is part of the database, including:
- All the tables that house your data
- Queries that help you search and use the data
- Reports that show what your data is and what it means
- Forms that allow people to view, enter, and edit data
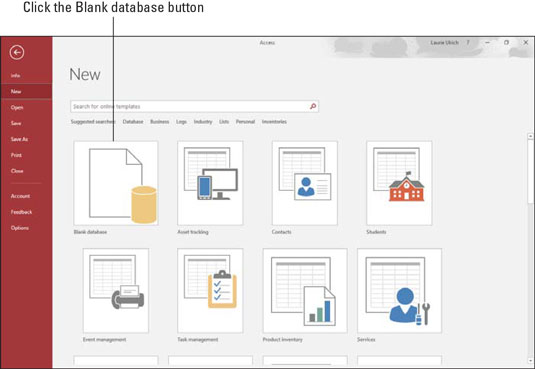 Click the Blank Desktop Database button in the New group.
Next, give your database a name (see the dialog box that appears in the following figure), and click the Create button.
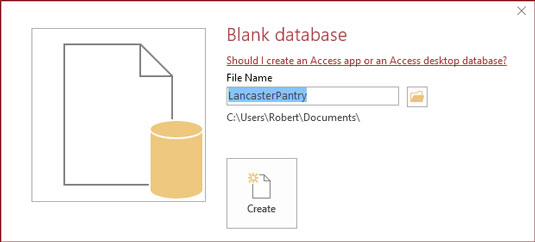 Name your database something that replaces the generic DatabaseX.accdb.
The X in the caption represents a number; Access assigns consecutive numbers to the default names. The figure shows a 1 added to the filename.
If this is your absolute first database in a fresh installation of Access, the filename offered in this panel will be Database1. Note that you don’t need to type a file extension here; Access will add the correct one for you.What is that little yellow folder in the dialog box where you named your new database? It allows you to choose a folder (other than the default Documents folder in Windows 8/8.1) into which you can save your database. Click the folder icon after typing a name for your database, and then use the resulting File New Database dialog box to choose a location — an existing subfolder within Documents, the desktop, a network drive (if you’re on a network, say at your office), or your Office 365 OneDrive. The dialog box looks very familiar to anyone who’s used any Windows application, so this won’t be new territory for you.
At this point, with your new database open, you can begin entering records into your first table or begin naming your fields and setting them up. The field names go in the topmost row (the ID field is already created, by default in the new table), and the label Click to Add is atop the column with the active cell. If you choose to save your table now (right-click the Table1 tab and choose Save), you can name your table something more useful than Table1.Starting with a template
Access provides templates (prepared files that work sort of like database cookie cutters) for your new database needs. You’ll find a set of template icons in the same New panel where we just chose a Blank Desktop Database. As shown, you can choose a template category by clicking any of the words under the Search for Online Templates search box, and search online for templates in that category.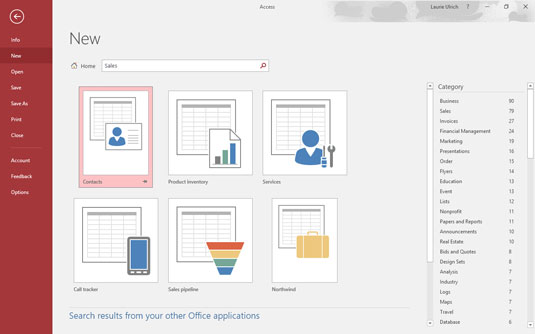 View the database templates for your chosen category.
Once the online search is complete (assuming you’re online at the time), a series of big buttons, one for each template found that matches your search, appears. Note that a larger list of categories — to be used if you want to search again for another category of templates — appears on the right.


