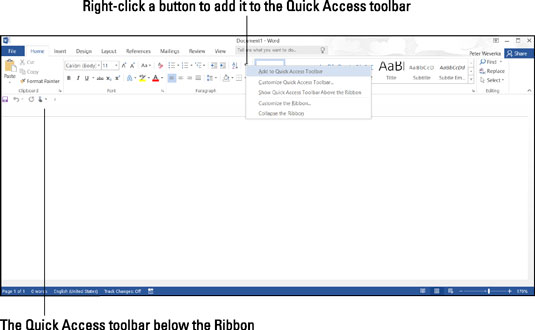
No matter where you go in Office 2016, you see the Quick Access toolbar in the upper-left corner of the screen. This toolbar offers the Save, Undo, and Redo buttons, as well as the Touch/Mouse Mode button if your computer has a touchscreen. However, which buttons appear on the Quick Access toolbar is entirely up to you.
You can put your favorite buttons on the toolbar to keep them within reach. And if the Quick Access toolbar gets too big, you can move it below the Ribbon, as shown here. Adding buttons to and removing buttons from the Quick Access toolbar is a piece of cake. And moving the toolbar below the Ribbon is as easy as pie.

Adding buttons to the Quick Access toolbar
Use one of these techniques to add buttons to the Quick Access toolbar:
Right-click a button you want to see on the toolbar and choose Add to Quick Access Toolbar on the shortcut menu. You can add all the commands in a group to the Quick Access toolbar by right-clicking the group name and choosing Add to Quick Access Toolbar.
Click the Customize Quick Access Toolbar button (this button is located to the right of the Quick Access toolbar) and choose a button on the drop-down list. The list offers buttons deemed most likely to be placed on the Quick Access toolbar by the makers of Office.
On the File tab, choose Options, and go to the Quick Access Toolbar category in the Options dialog box (or right-click any button or tab and choose Customize Quick Access Toolbar on the shortcut menu). You see the Quick Access Toolbar category of the Options dialog box, as shown here. On the Choose Commands From drop-down list, select the name of the button you want to add to the Quick Access toolbar. Then click the Add button.
 Add, remove, and reorder Quick Access toolbar buttons in the Options dialog box.
To restore the Quick Access toolbar to its original buttons, click the Reset button in the Options dialog box and choose Reset Only Quick Access Toolbar on the drop-down list. Choosing Reset All Customizations resets Ribbon customizations as well as Quick Access toolbar customizations.
Changing the order of buttons on the Quick Access toolbar
Follow these steps to change the order of buttons on the Quick Access toolbar:
Click the Customize Quick Access Toolbar button and choose More Commands on the drop-down list.
The Quick Access Toolbar category of the Options dialog box appears. You can also open this dialog box by right-clicking any button or tab and choosing Customize Quick Access Toolbar.
Select the name of a button on the right side of the dialog box and click the Move Up or Move Down button.
These arrow buttons are located on the right side of the dialog box.
Repeat Step 2 until the buttons are in the right order.
Click OK.
Removing buttons from the Quick Access toolbar
Use one of these techniques to remove buttons from the Quick Access toolbar:
Right-click a button and choose Remove from Quick Access Toolbar on the shortcut menu.
Right-click any button or tab and choose Customize Quick Access Toolbar. You see the Quick Access Toolbar category of the Options dialog box. Select the button you want to remove on the right side of the dialog box and click the Remove button.
You can click the Reset button in the Options dialog box to remove all the buttons you placed on the Quick Access toolbar.
Placing the Quick Access toolbar above or below the Ribbon
The Ribbon is the stretch of ground along the top of the screen where the tabs and buttons are found. If your Quick Access toolbar contains many buttons, consider placing it below the Ribbon, not above it. Follow these instructions to place the Quick Access toolbar above or below the Ribbon:
Quick Access toolbar below the Ribbon: Right-click the toolbar, and on the shortcut menu, choose Show Quick Access Toolbar Below the Ribbon.
Quick Access toolbar above the Ribbon: Right-click the toolbar, and on the shortcut menu, choose Show Quick Access Toolbar Above the Ribbon.
The Options dialog box offers a check box called Show Quick Access Toolbar Below the Ribbon. You can select this check box as well to move the toolbar below the Ribbon.


