Managing your Teams settings
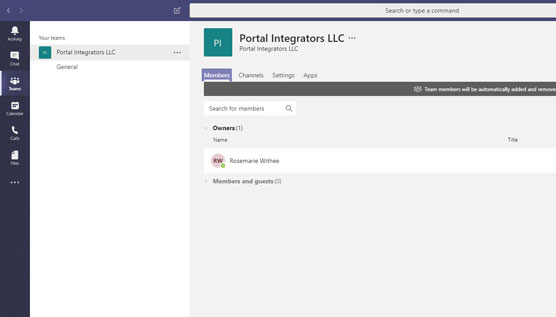
To open the settings for a team, click the ellipsis next to the name of the team to open the more options drop-down menu and select Manage Team. The management screen for a team with the Members tab open.
The settings screen for a team contains the following tabs at the top, as shown:
- Members: The Members screen is where you add new members to the team. You can add people as members of the team or as guests. A guest user is a user who has access to Teams and can chat with you, but does not have access to the rest of your Office 365 ecosystem.
- Channels: The Channels screen is where you can add channel. A channel is an area of a team where you can chat about a common topic. For example, you might have a channel for carpooling, a channel for accounting, and a channel for clients.
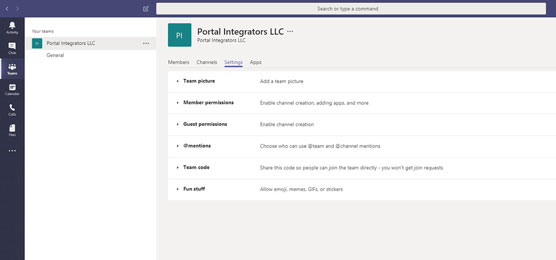
- Settings: The Settings screen is where you manage the settings for a team, as shown. On the Settings screen you can set the team picture, set the permissions of users including what permissions you want to give to guest users, set how @mentions work (pronounced “at mentions”), get a link to the team that you can share so others can join the team, and other fun stuff such as adding virtual stickers.
 The Settings screen is where you can control team settings.
An @mention is when someone uses the @ (“at”) symbol followed by the name of a user in a message. It is essentially tagging the person so that Teams knows who the person is that is being mentioned. When your name is @mentioned, you will get a notification that someone has mentioned your name in a message. This will help you scroll through and find messages that are pertinent to you.
- Apps: The Apps screen is where you can add apps to the team. You can see that some apps are installed by default. You can also add more by clicking the More Apps button.
Managing your user settings
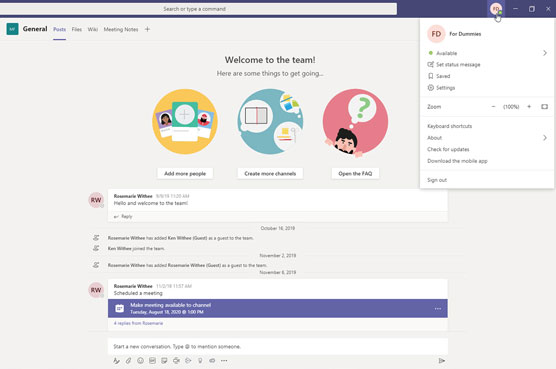
Several settings are unique to each individual Teams user. I like to think of these as your user settings; you can also think of them as your profile settings. These settings are found in the drop-down menu that appears when you click your profile image in the top-right corner of the Teams window, as shown. The profile drop-down menu.
You can use this menu to:
- Set your current status such as Available, Do Not Disturb, and Away. I sometimes even set my status to Appear Away so that I can get work done without people knowing I am busy on my computer.
- Set your status message so that others see a message and know what you are up to or what you want people to know. For example, I sometimes set this to the music I am listening to or a quote that I find particularly captures my current mood.
- View chats and messages you have saved throughout Teams.
- Open your profile settings (more on this shortly).
- Adjust your zoom settings to zoom in and make items in your Teams window bigger or zoom out to make things smaller.
- Change your keyboard shortcuts so you can maneuver around Teams with a few taps of your keyboard.
- Learn more about Teams such as the version number you are currently using and legal notices.
- Check for any updates to Teams so that you can be sure you have the latest version.
- Download the mobile app so that you can have Teams on your smartphone and in your pocket so that you are never out of touch.
- Sign out of Teams. I rarely do this, but have used it plenty of times while writing this book when I’ve needed to sign in and out of various accounts. You might use this if you are a member of multiple organizations and you need to sign into one account or the other.
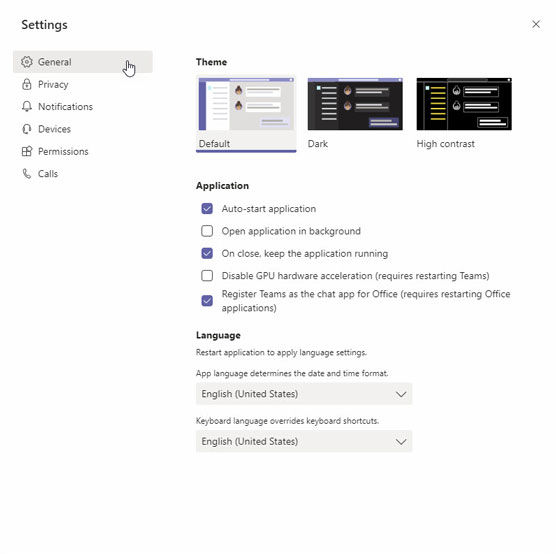
 The settings menu for a Teams user.
General
The General section includes settings for the theme you are using, how the application behaves, and the language you want to use.You can change the way Teams looks by changing the theme you are using. For example, maybe you prefer a dark or high-contrast theme to the default.
In the application section, you can decide how you want Teams to behave on your computer. For example, do you want Teams to start up automatically when you boot up your computer? Or do you want it to stay running in the background when you click the X button to close the Teams app? In this section you can also associate Teams as the chat app of choice for the rest of your Office products. This option is useful when you are part of an organization that is moving from Skype to Teams. You can choose to use Teams instead of Skype by default using this option.
Finally, you can change the language format and keyboard layout you are using.
Privacy
In the Privacy section, you will find settings to manage priority access, turn on or off read receipts, and turn on or off surveys.Priority access defines who you will allow to interrupt you when your status is set to Do Not Disturb. For example, you might want your boss to be able to send you messages at any time, but everyone else must wait until you set your status to Available.
Read receipts is used to inform others when you read their messages. If you don’t want people to know that you have read a message, then you can turn this off.
The surveys option is a tool Microsoft uses to improve Teams. If you don’t mind giving feedback, you can leave this option on. If you don’t want to be bothered with it, then turn it off and Microsoft won’t survey you for your opinion on how to improve Teams.


